Drag-and-drop diagram labelling for Moodle. Turn any image into a game with Study, Practice and graded Test modes, and see exactly which parts your learners get wrong.
Label Diagram is a free Moodle activity that turns any image into a drag-and-drop labelling game. Learners drag labels onto numbered points on a diagram, one slide after another, and find out what each part does as they go.
It suits anything with parts: engines, brakes, aircraft, switchboards, plant and machinery, the heart, the skeleton, tools, PPE, a commercial kitchen. Trainers set it up in minutes, and learners get instant feedback instead of a static worksheet.
BEST FOR LEARNING THE PARTS
Study
Every label already placed
Tap a part to read what it does
No marks, no timer
BEST FOR PRACTISING
Practice
Instant right or wrong
Hint and Show answers
Never graded, unlimited tries
BEST FOR PROVING IT
Test
Feedback only at the end
Attempts and optional time limit
Goes to the gradebook
Three modes, one activity
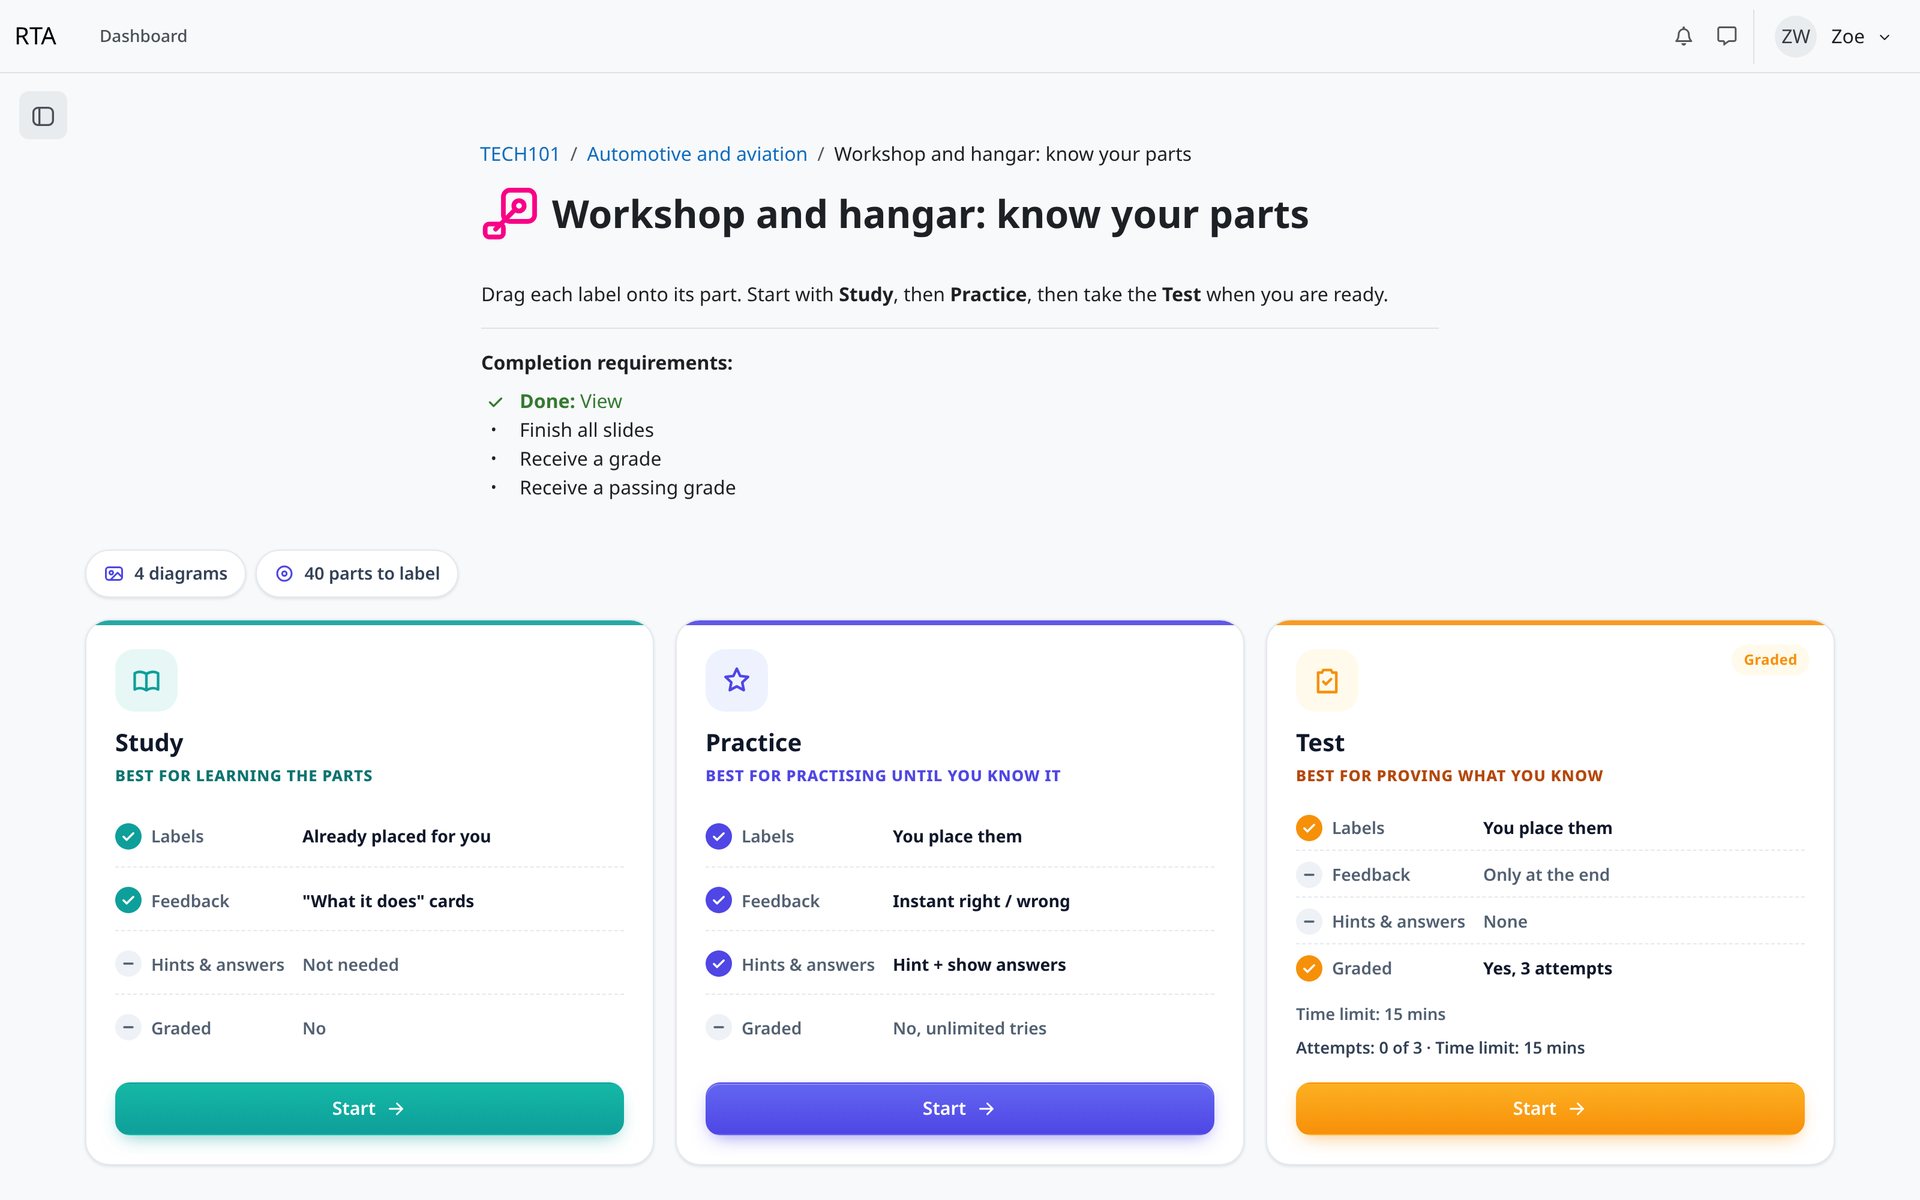
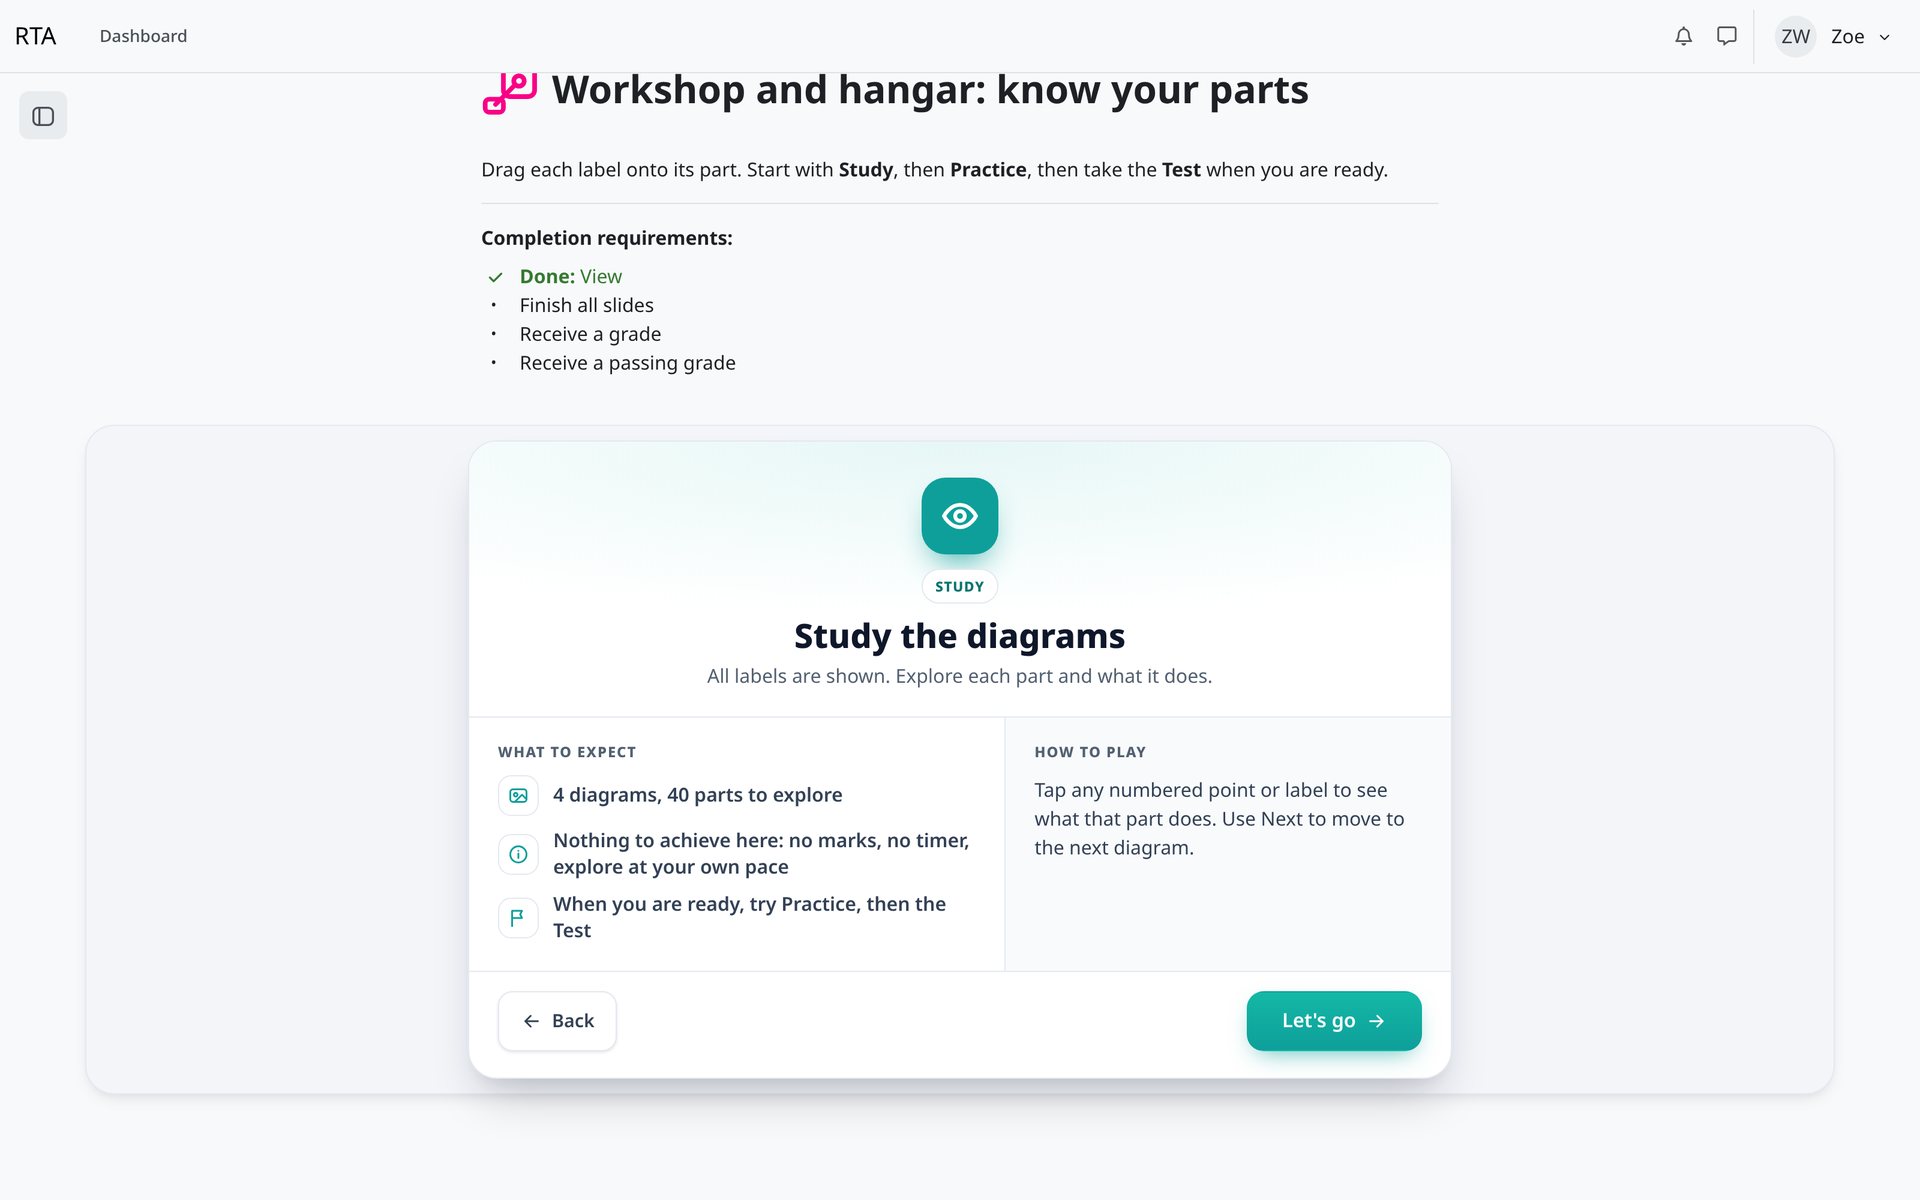
Three modes, one activity. Learners pick Study, Practice or Test. Each card shows exactly what the mode does.
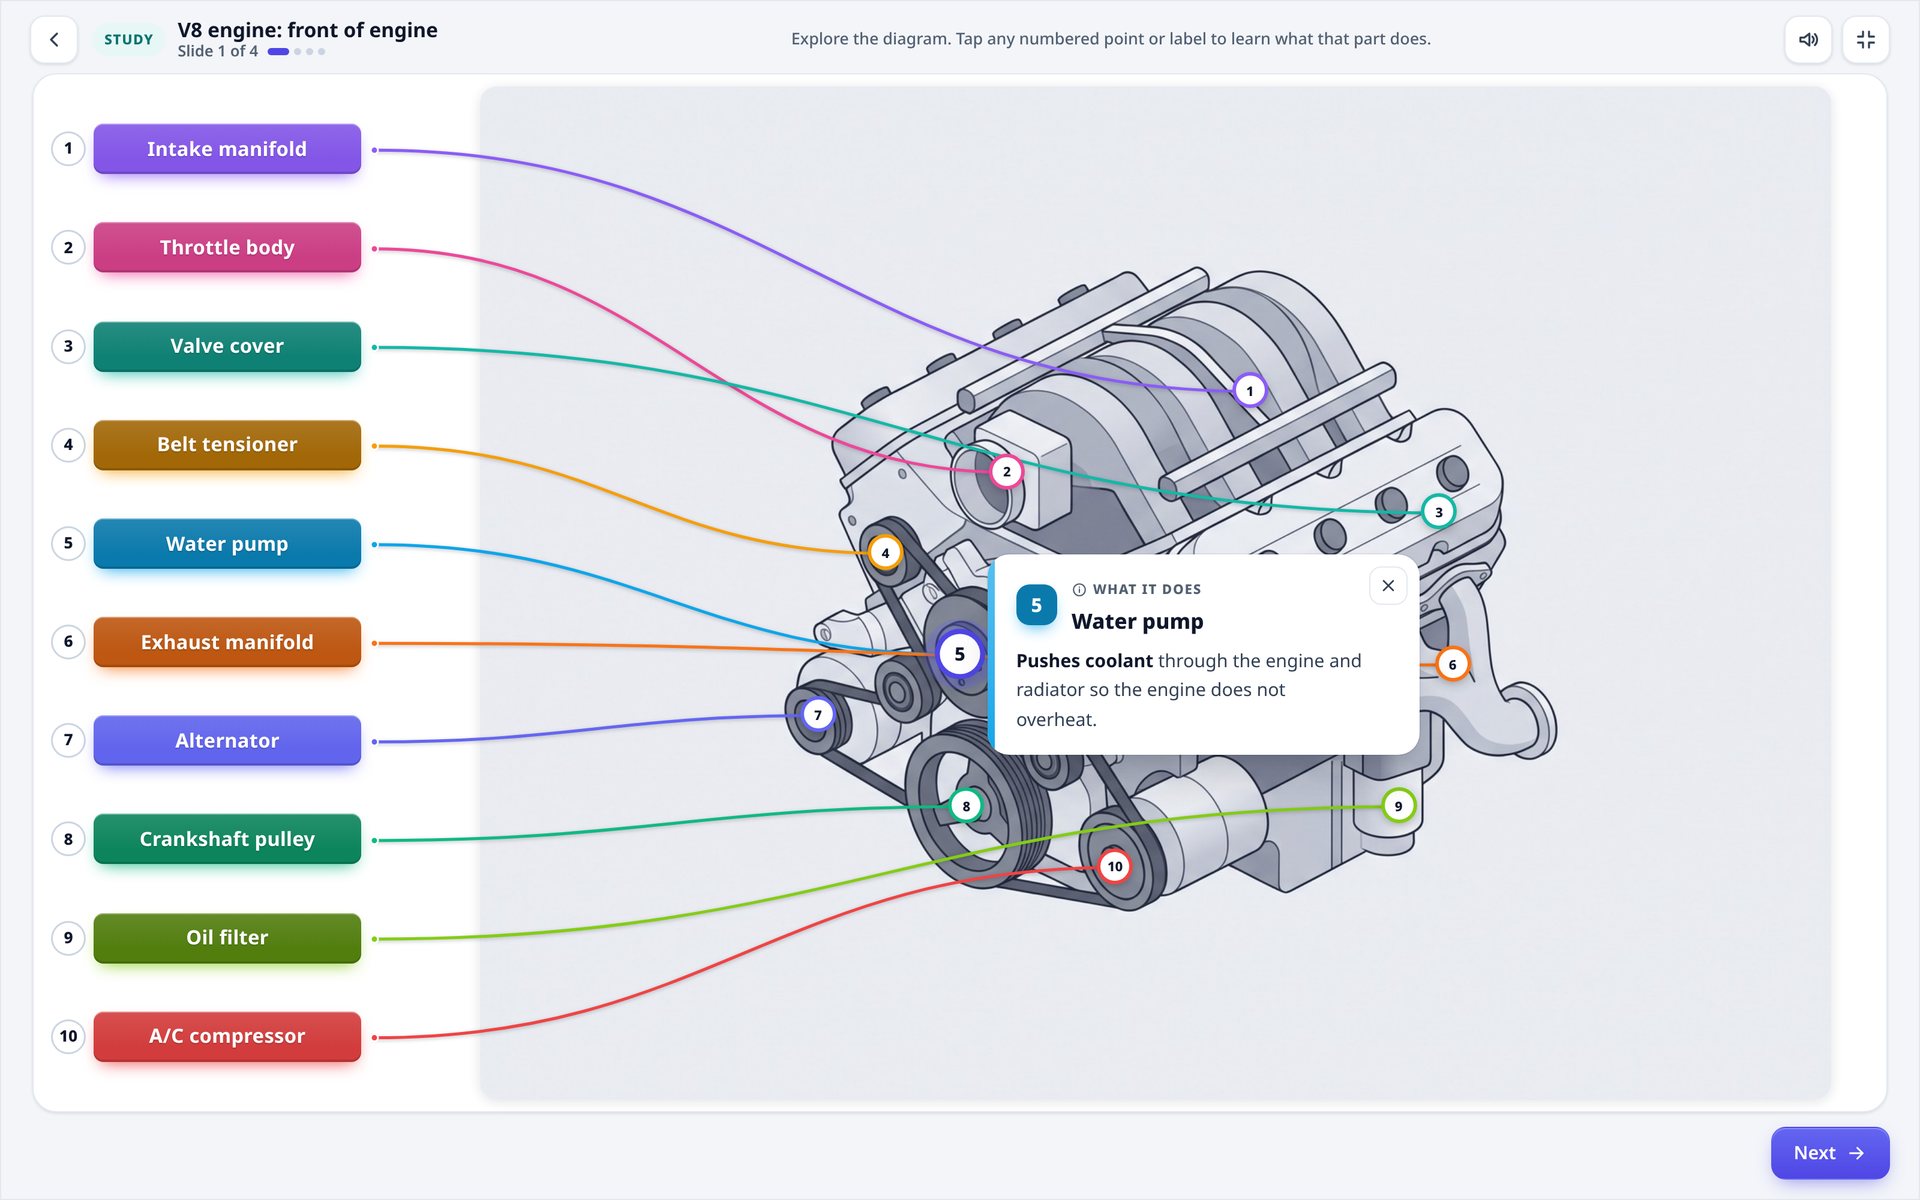
1Study: every label already placed, with "What it does" cards. Not graded.
2Practice: instant right or wrong, hints and Show answers. Never graded.
3Test: graded, feedback at the end, attempts and an optional time limit.
4Diagram and part counts for the whole activity.
Start here
Free, no AI, and why that matters
FREE · NO AI · NO CHATGPT
Label Diagram is free. There is no AI inside, it uses no AI credits, and nothing is ever sent to ChatGPT or any other AI service.
Free. No price, no credits, no per-learner fees.
No AI. Every placement is checked against the labels you placed. Learners always get the same, predictable result, so the outcome is easy to defend at audit.
Your data stays on your Moodle. Diagrams, attempts and grades are stored in your own Moodle database. No learner data leaves your site.
Cheat-resistant. In Test mode the answer key never reaches the browser. Every placement is marked on your server, and each attempt gets fresh random tokens.
Optional prompt helpers. The upload page and label editor include two prompts you can copy into any AI tool you already use, to clean up a photo or draft labels. They are plain text you copy yourself. The plugin never calls an AI service, and you can ignore them completely.
Start here
Install
Download the latest mod_labeldiagram ZIP from lms-labs.com.
In Moodle, go to Site administration > Plugins > Install plugins and drop in the ZIP.
Click Install plugin from the ZIP file, then Upgrade Moodle database now.
Optional: set the site defaults for sounds and the leaderboard.
Command line install: unzip into mod/labeldiagram (on Moodle 5.x, public/mod/labeldiagram), then run php admin/cli/upgrade.php.
Requirement
Details
Moodle
4.4 to 5.3 (declared support)
Database
PostgreSQL, MySQL or MariaDB
Third-party libraries
None
Licence
GNU GPL v3 or later
Site defaults
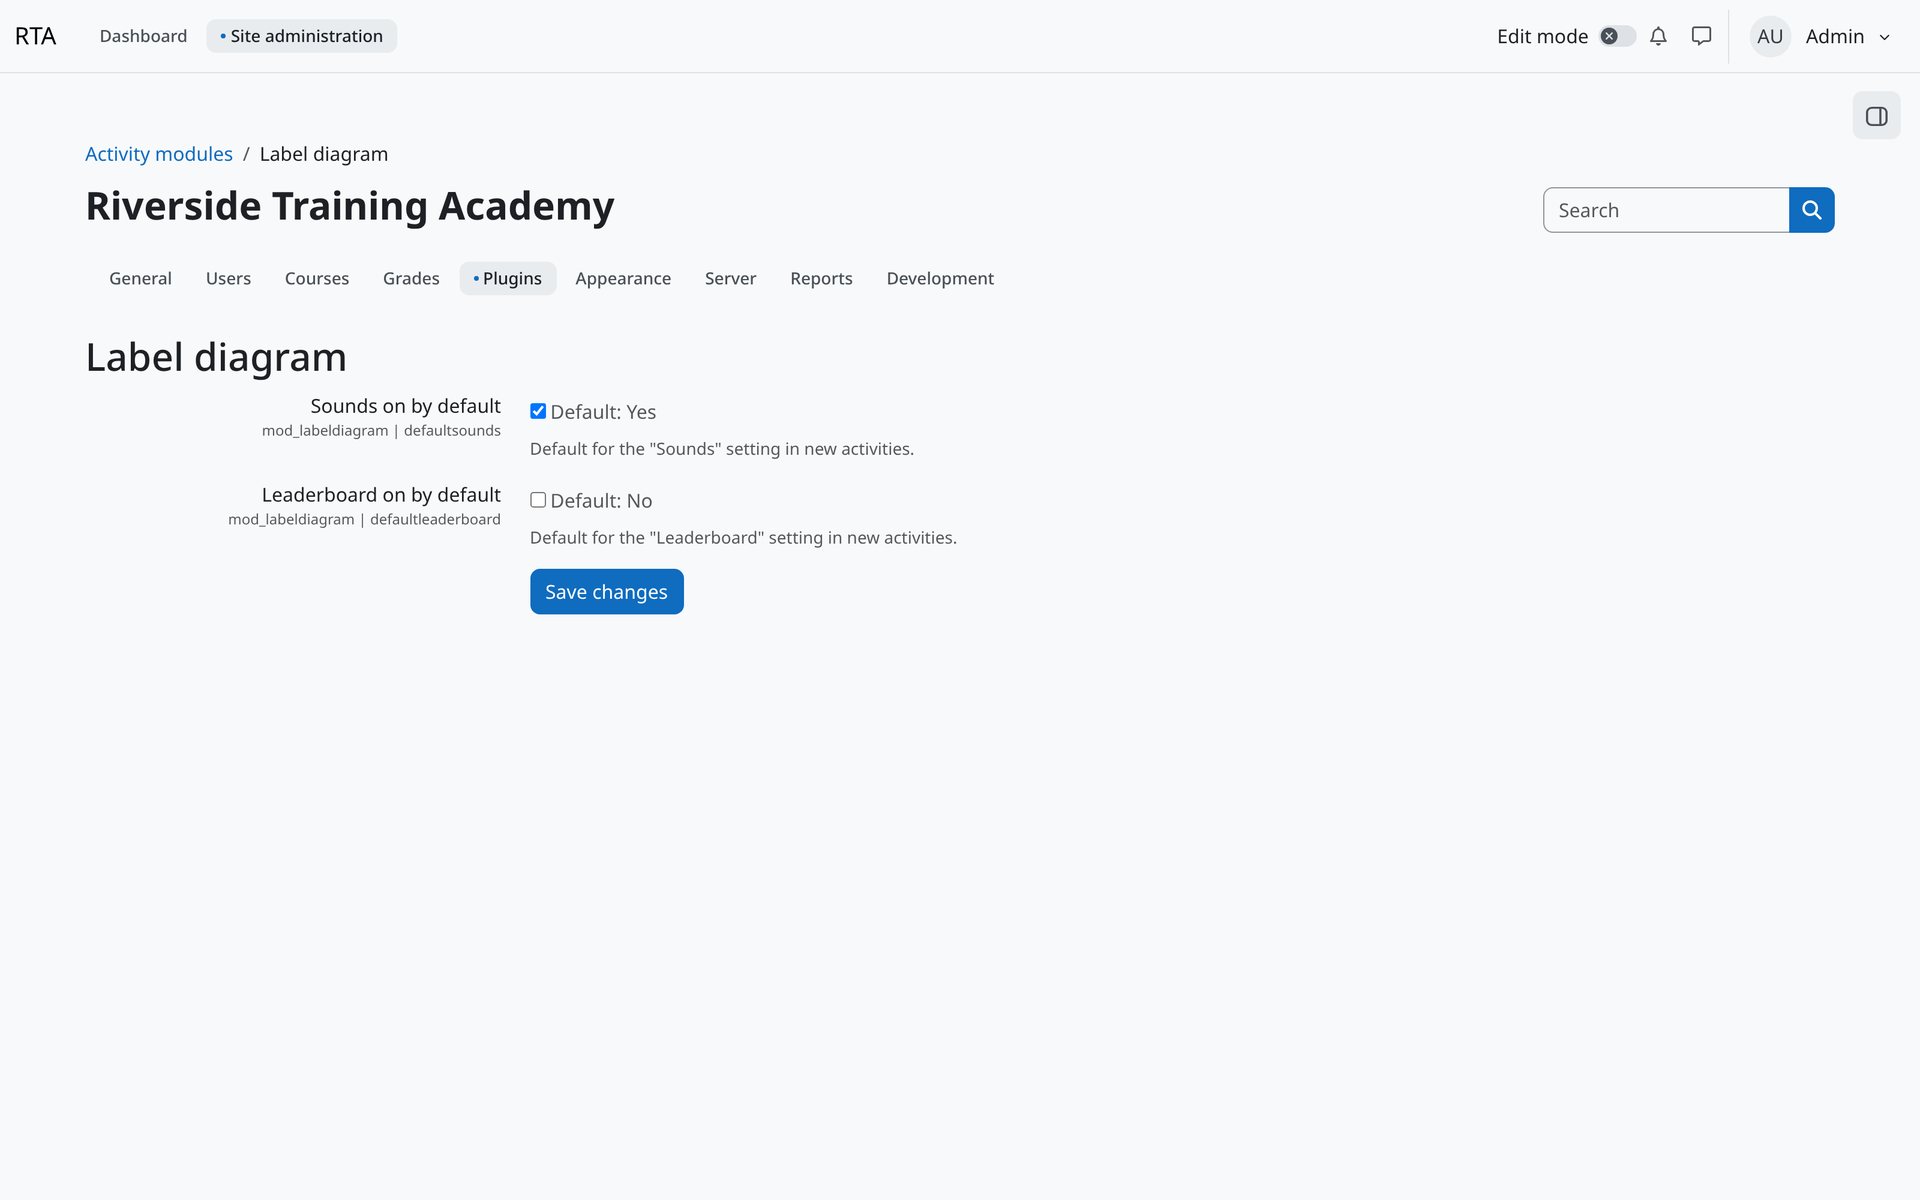
Site defaults. Site administration > Plugins > Activity modules > Label diagram.
1Sounds on by default for new activities.
2Leaderboard on by default for new activities.
Set up
Create an activity
Turn editing on, choose Add content > Activity or resource, and pick Label diagram. Give it a name, then choose the modes and settings.
Add a Label diagram
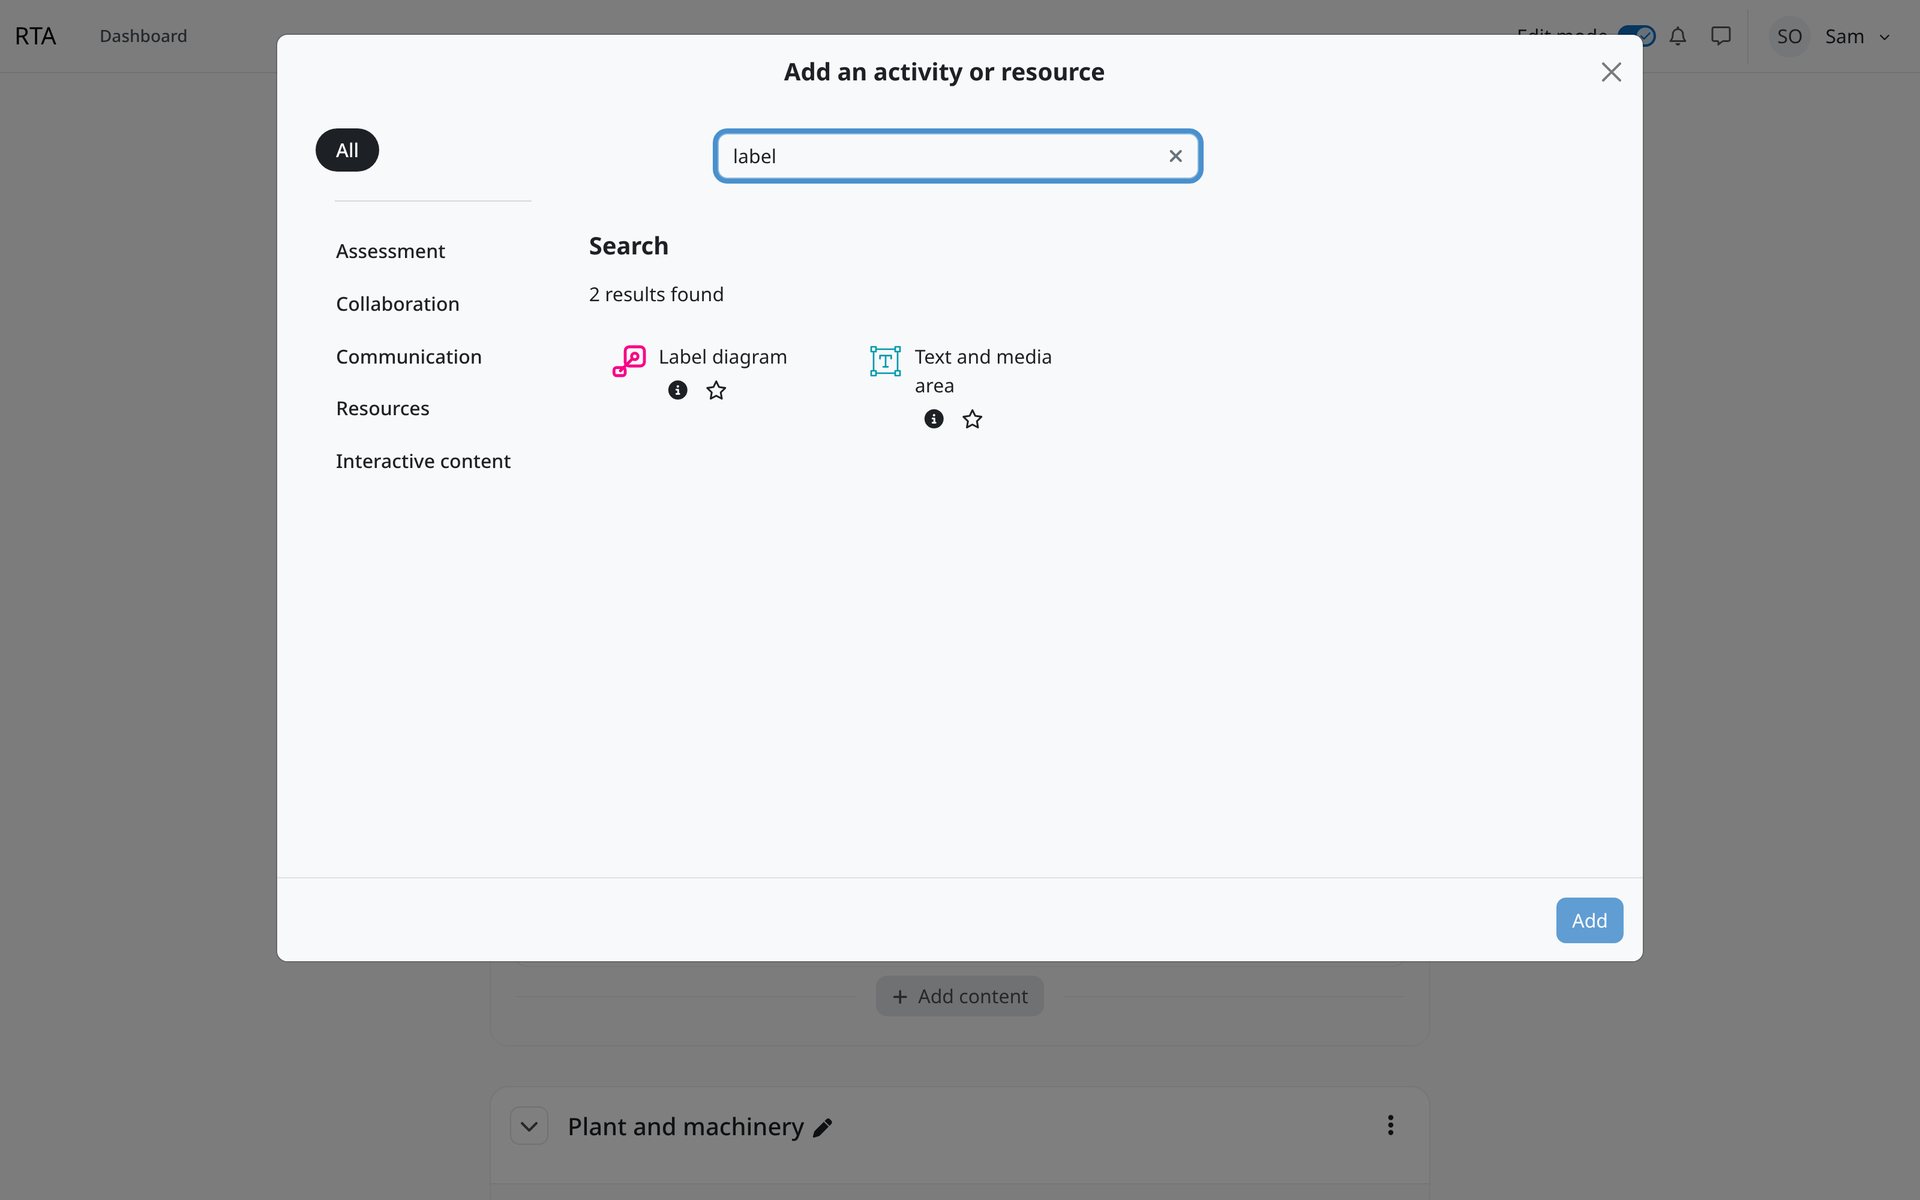
Add a Label diagram. Turn editing on, Add content, then choose Label diagram from the activity chooser.
1Search "label" to find it fast.
Modes and test settings
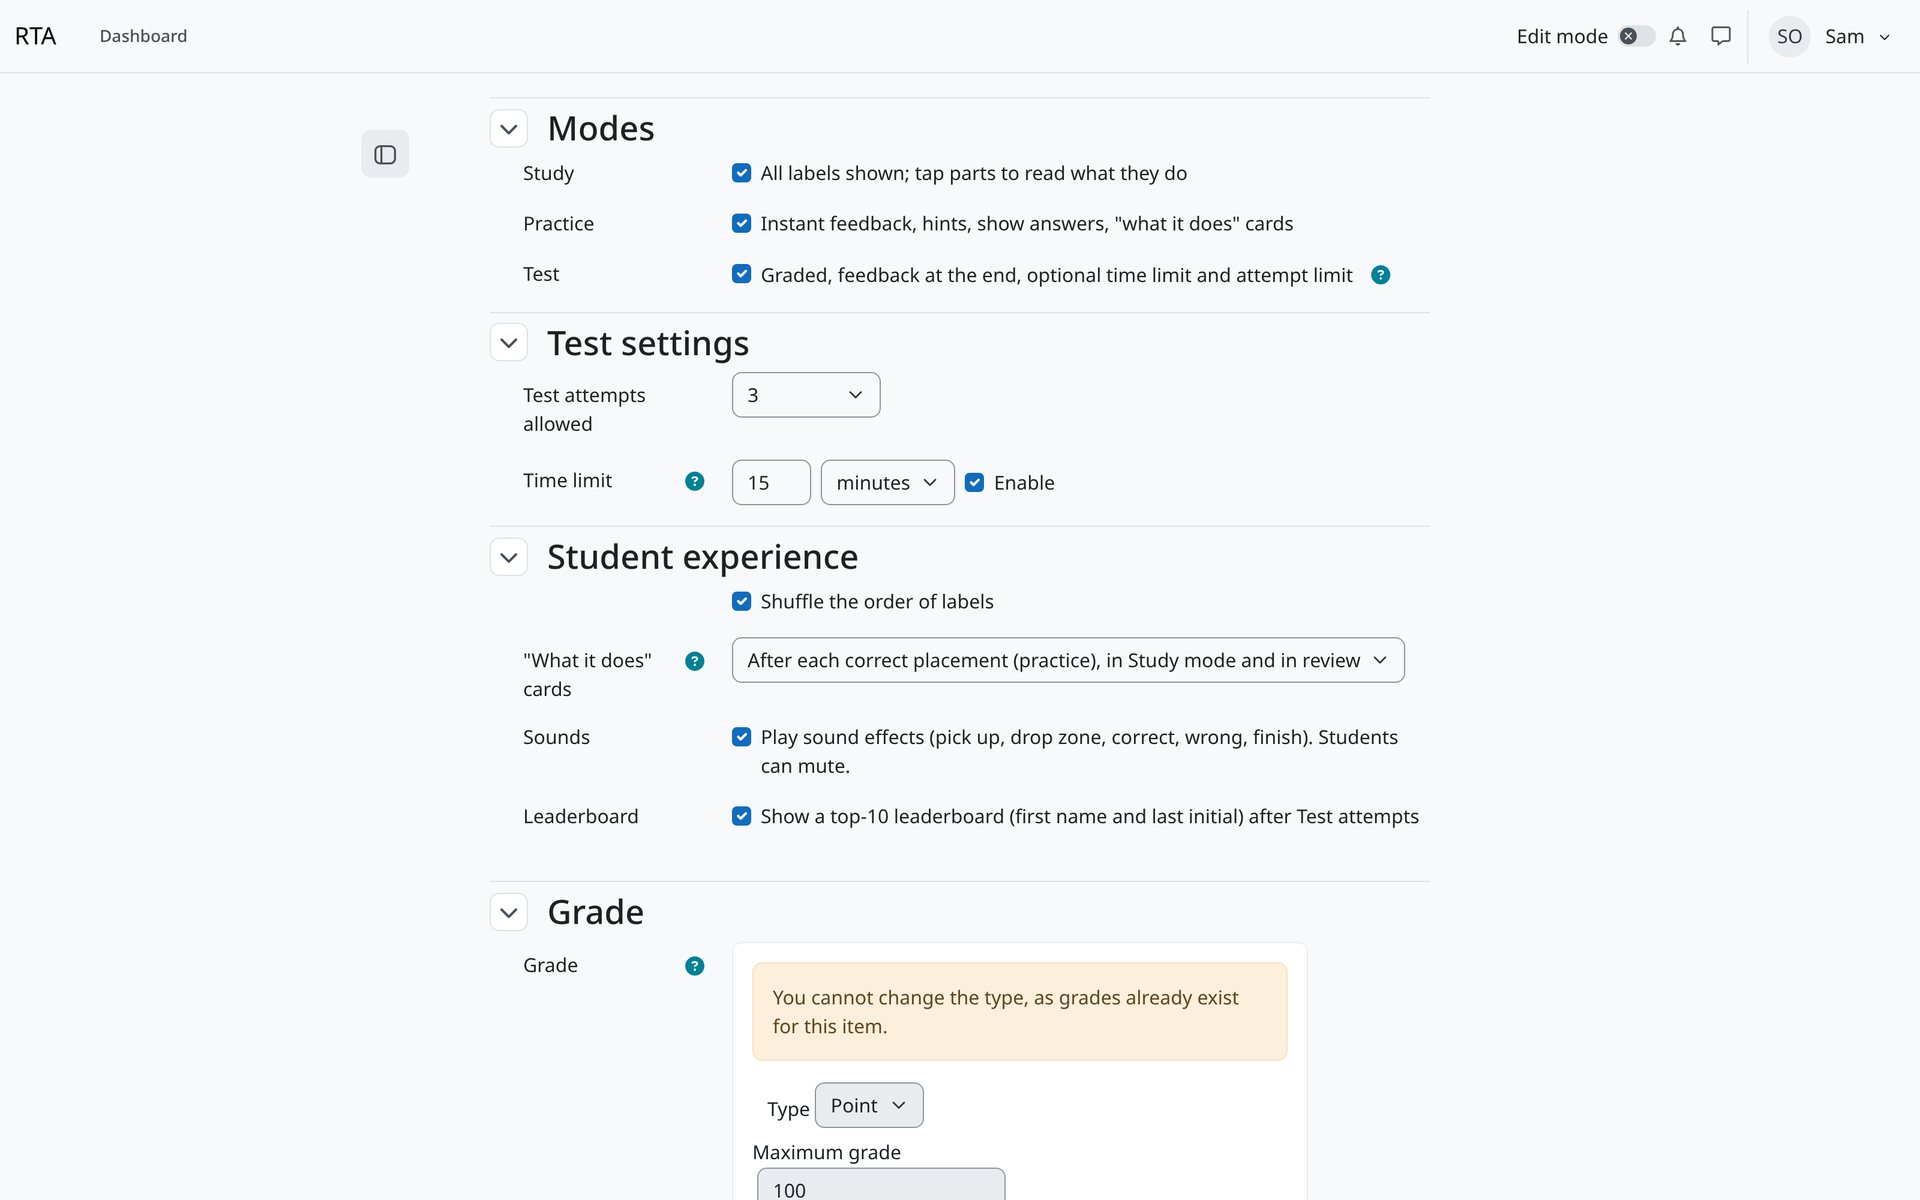
Modes and test settings. Switch each mode on or off, then set attempts and the time limit for the Test.
1Tick the modes learners can use. Most trainers leave all three on.
2Test attempts allowed: unlimited or 1 to 10, plus an optional time limit enforced on the server.
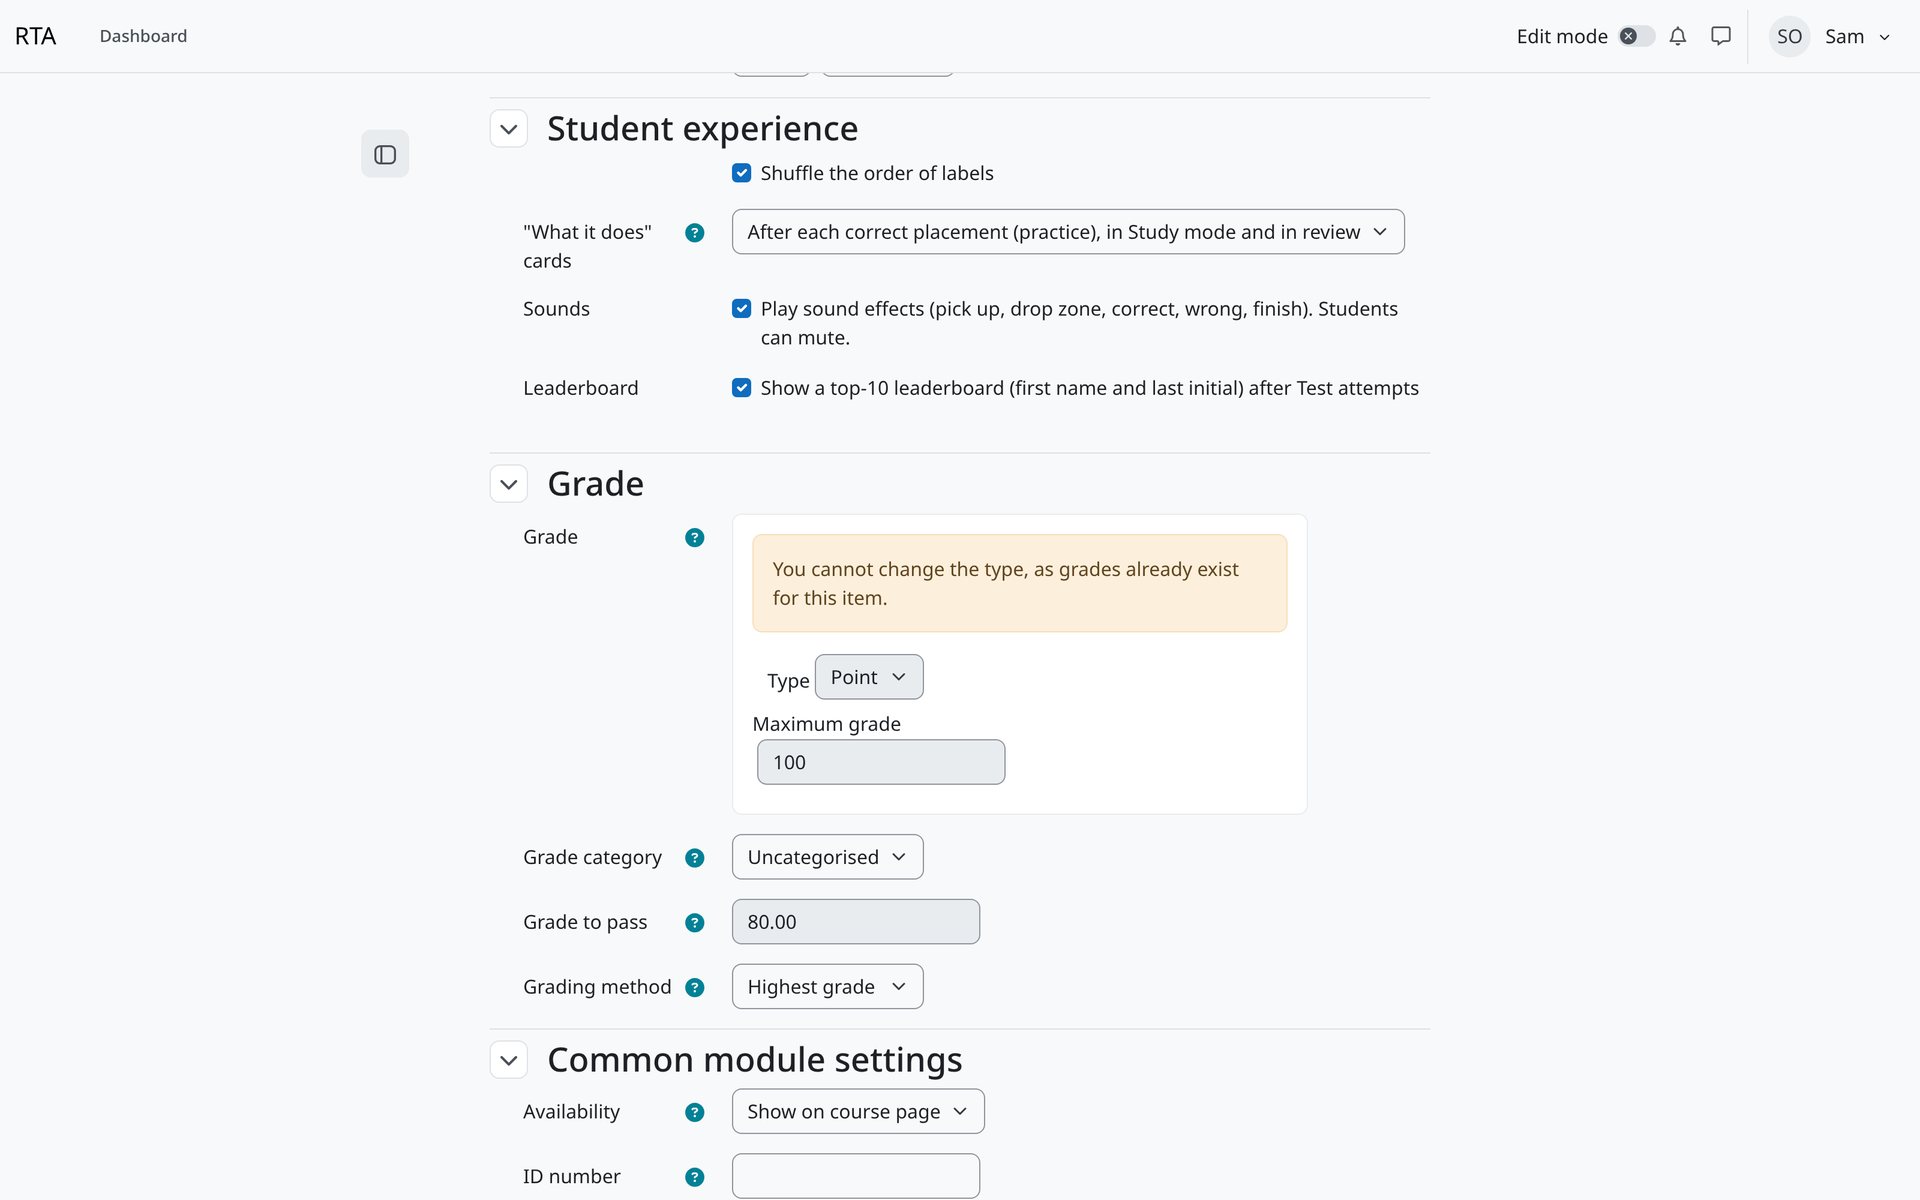
Student experience
Student experience. Shuffle, "What it does" cards, sounds and the leaderboard.
1Shuffle the label order for every attempt.
2When learners see "What it does" cards.
3Leaderboard shows first name and last initial only.
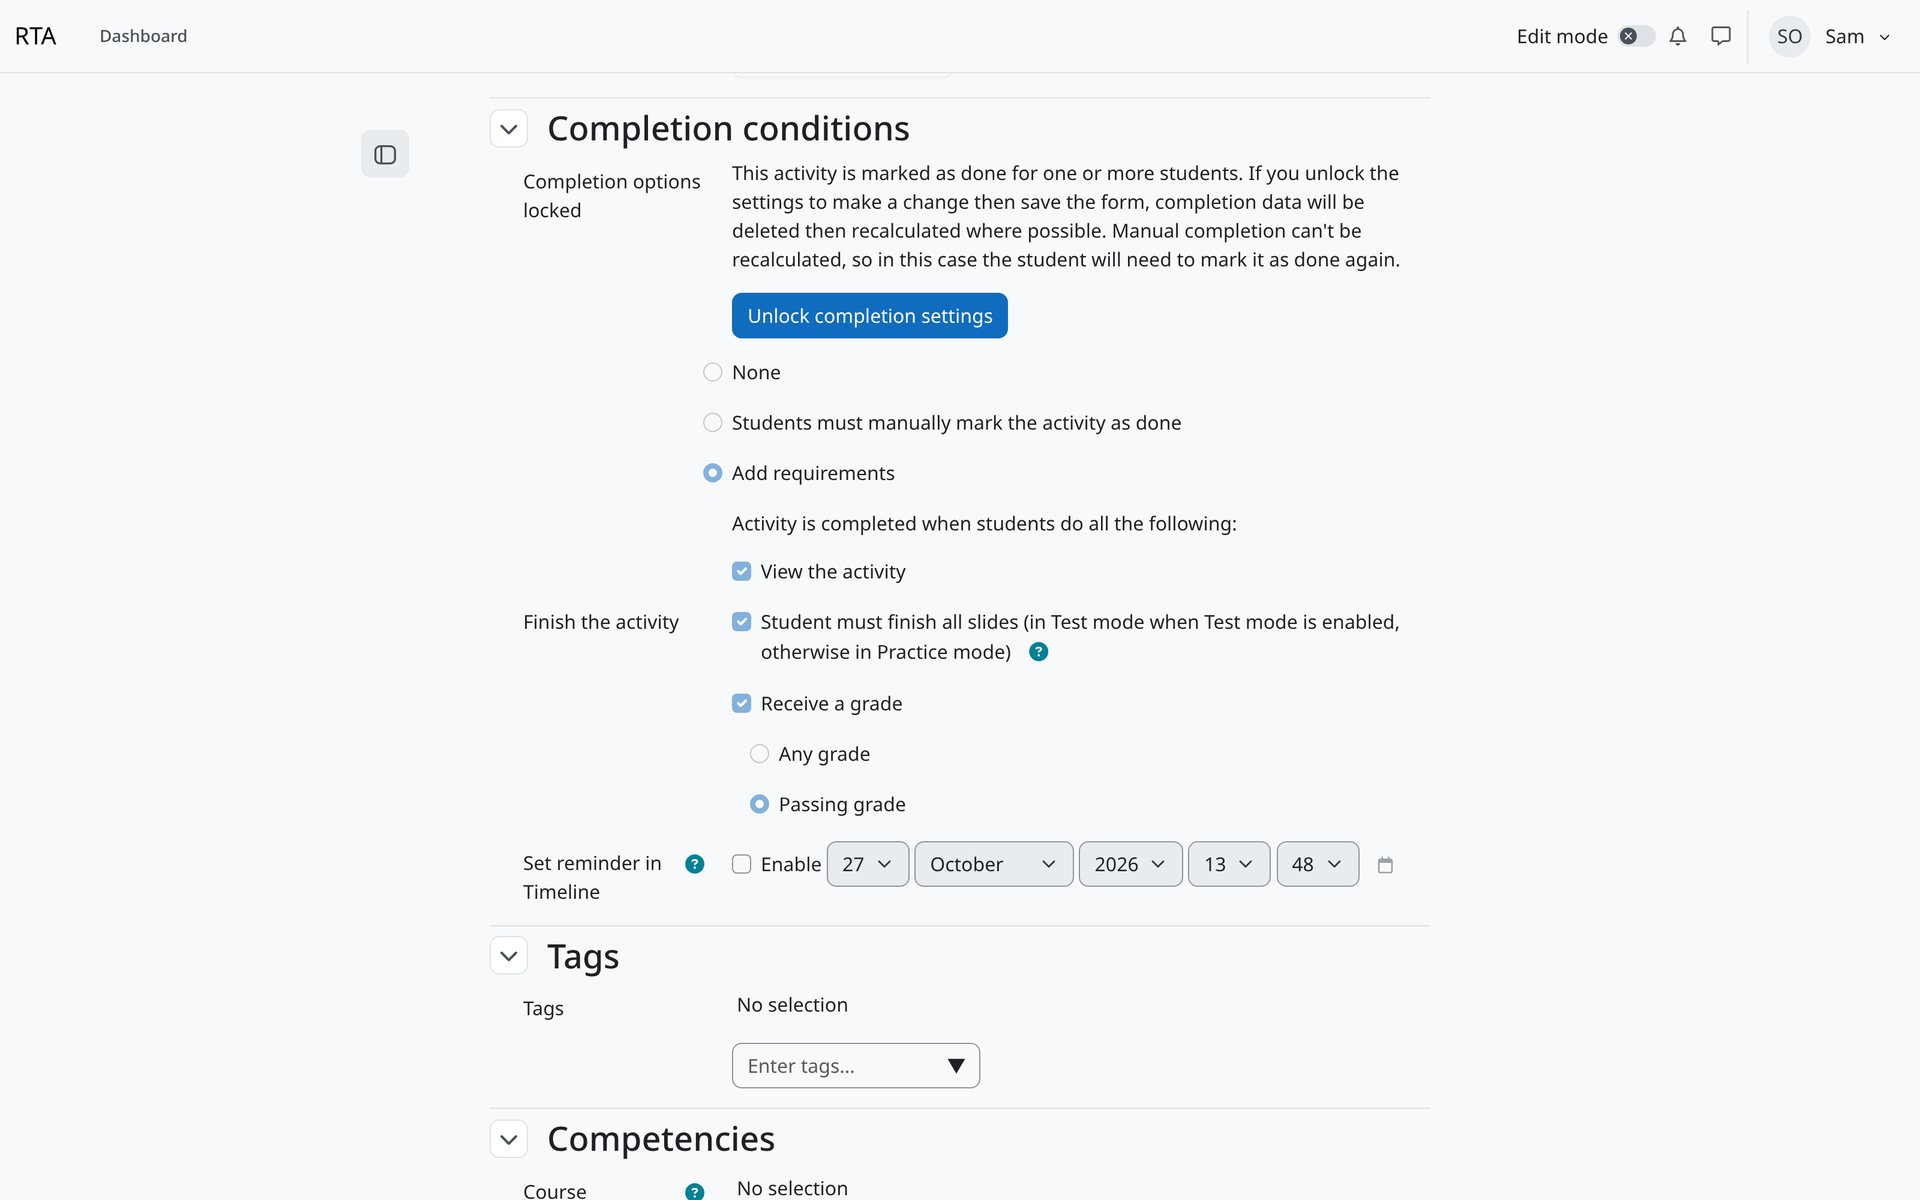
Grade and completion
Grade and completion. Grade to pass, grading method and completion rules.
1Finish the activity: every slide, in Test mode when it is on.
Setting
What it does
Default
Modes
Which of Study, Practice and Test learners can use
All on
Test attempts allowed
Unlimited, or 1 to 10
Unlimited
Time limit
Whole-test limit. When time runs out the current slide is submitted and the attempt finishes.
Off
Grading method
Highest, average, first or last Test attempt
Highest
Shuffle labels
New label order for every attempt
On
"What it does" cards
After each correct placement, only in Study and review, or never
After each correct placement
Sounds
Pick up, drop, correct, wrong and finish sounds. Learners can mute.
Site default
Leaderboard
Top 10 after Test attempts, first name and last initial
Site default
Completion: Finish the activity
Every slide finished, in Test mode when it is on, otherwise Practice
Off
Set up
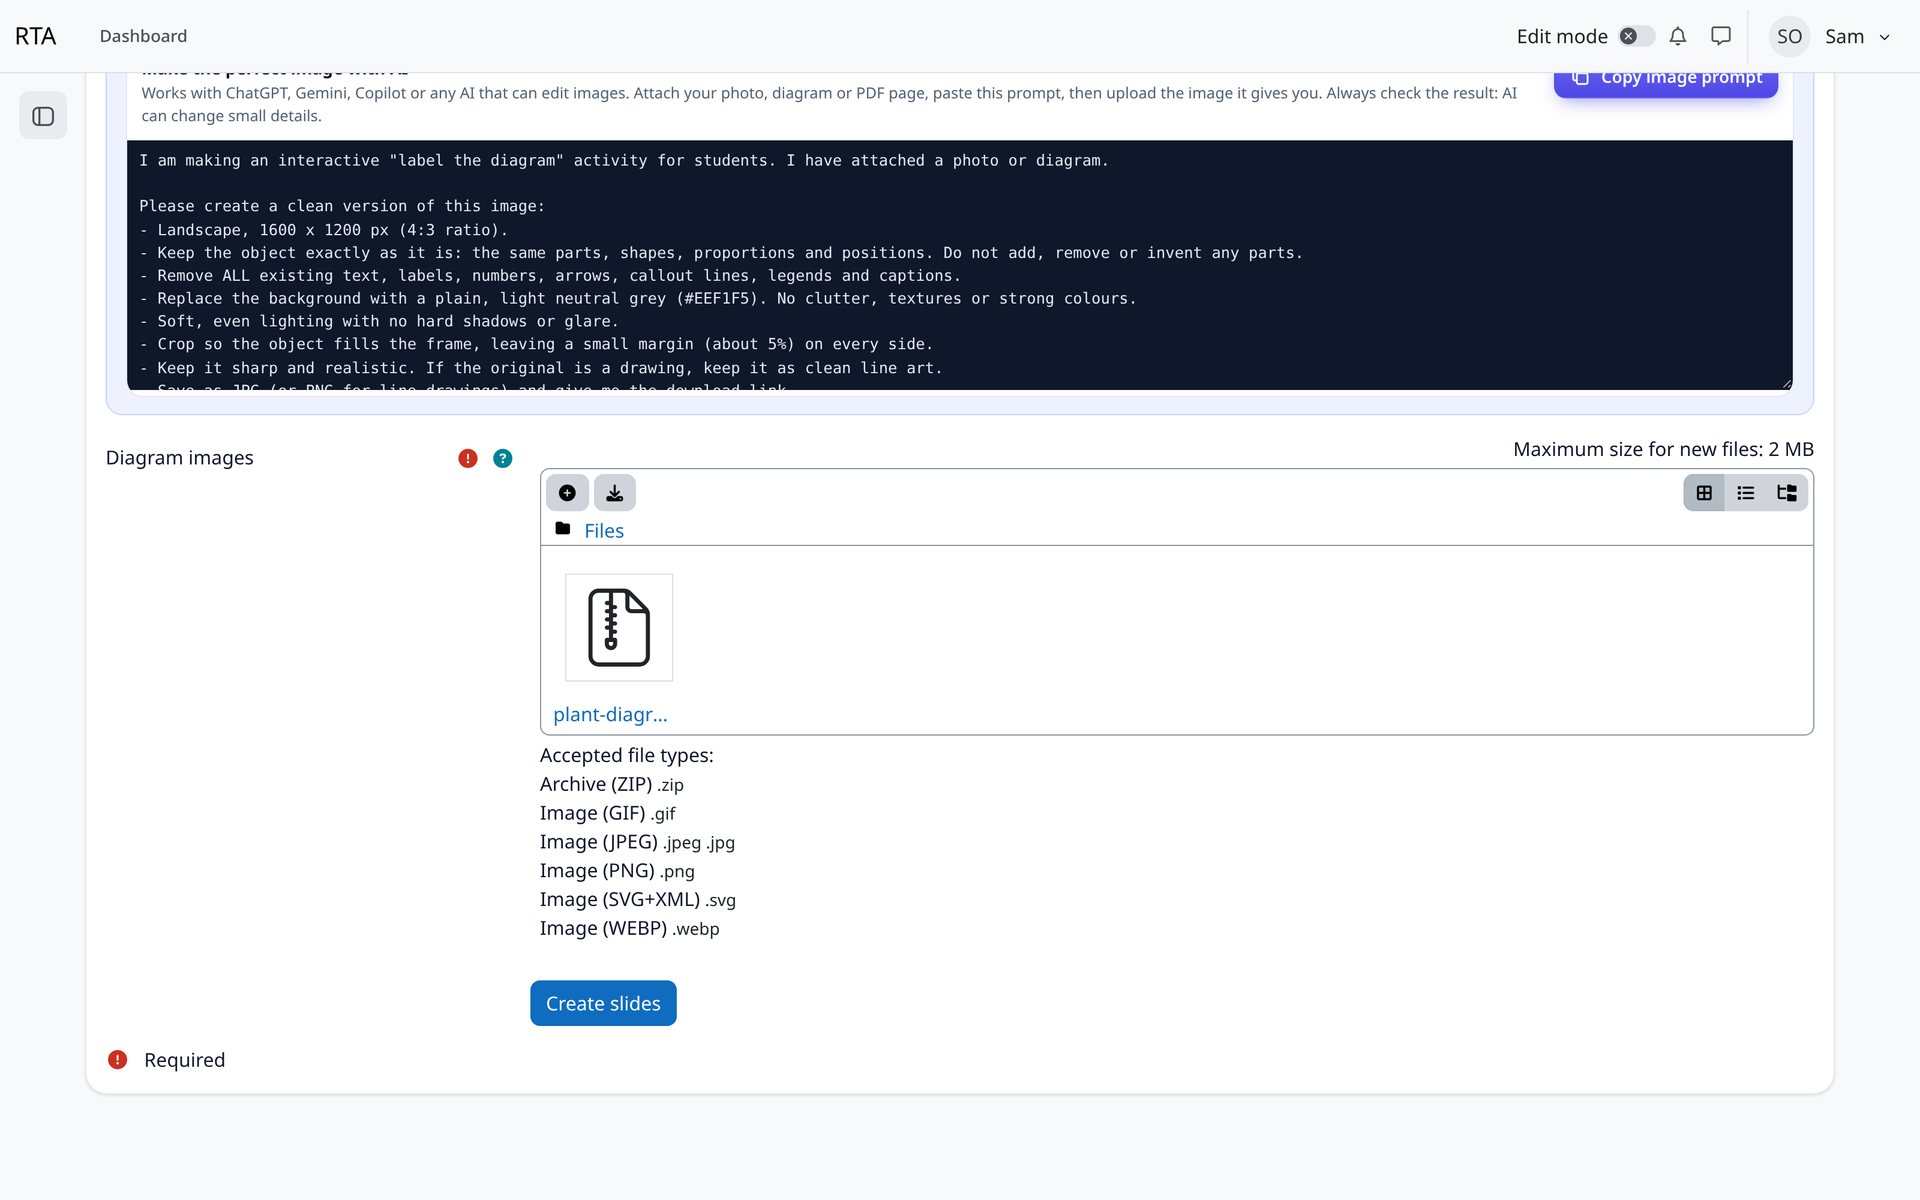
Add your diagrams
Open Manage slides. Drop in images, or a ZIP of images. Each image becomes one slide, in file-name order. Each slide holds up to 10 labelled parts and 4 distractors.
Add diagram slides
Add diagram slides. Drop images or a ZIP. Each image becomes a slide, in file-name order.
1Drag in images or a ZIP: up to 100 images and 200 MB at a time.
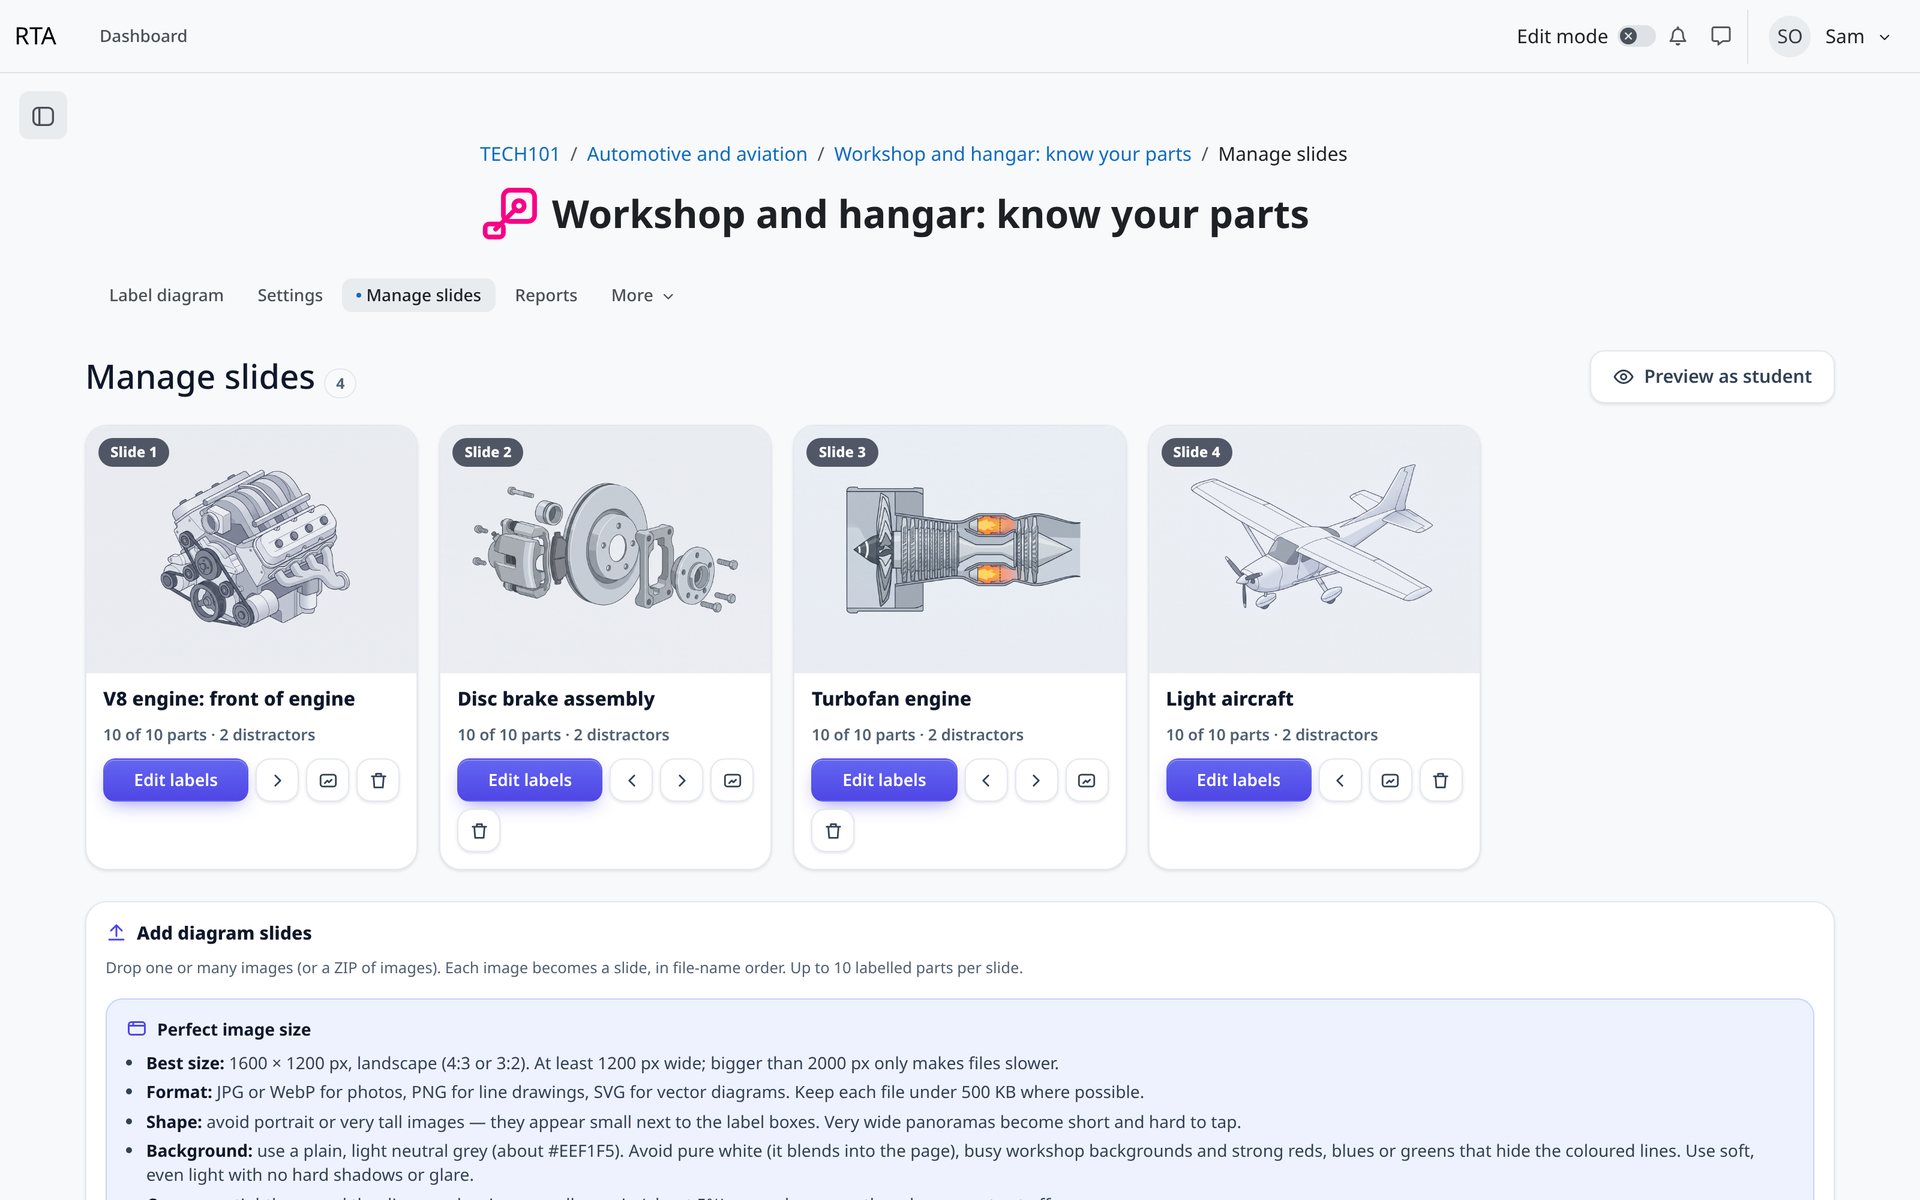
Manage slides
Manage slides. Every diagram as a card with its parts, distractors and quick actions.
1Each card shows the parts placed and distractors.
2Preview as student at any time.
Perfect image size
Tip
Why
1600 × 1200 px, landscape (4:3 or 3:2)
Fills the player without wasting space. At least 1200 px wide.
Remove old labels, numbers and callout lines
So learners cannot read the answers off the image.
Plain light grey background (about #EEF1F5)
Pure white blends into the page. Busy or strongly coloured backgrounds hide the labels.
Crop tightly with about 5% margin
Markers near the edge are not cut off.
Keep parts about 5% apart
Markers do not overlap on phones.
JPG or WebP for photos, PNG for drawings, SVG for vectors
Keep files under 500 KB where you can.
Swap images any time. Markers are stored as percentages, so you can replace a diagram with a sharper version and every marker stays in place.
Place labels
Place the labels
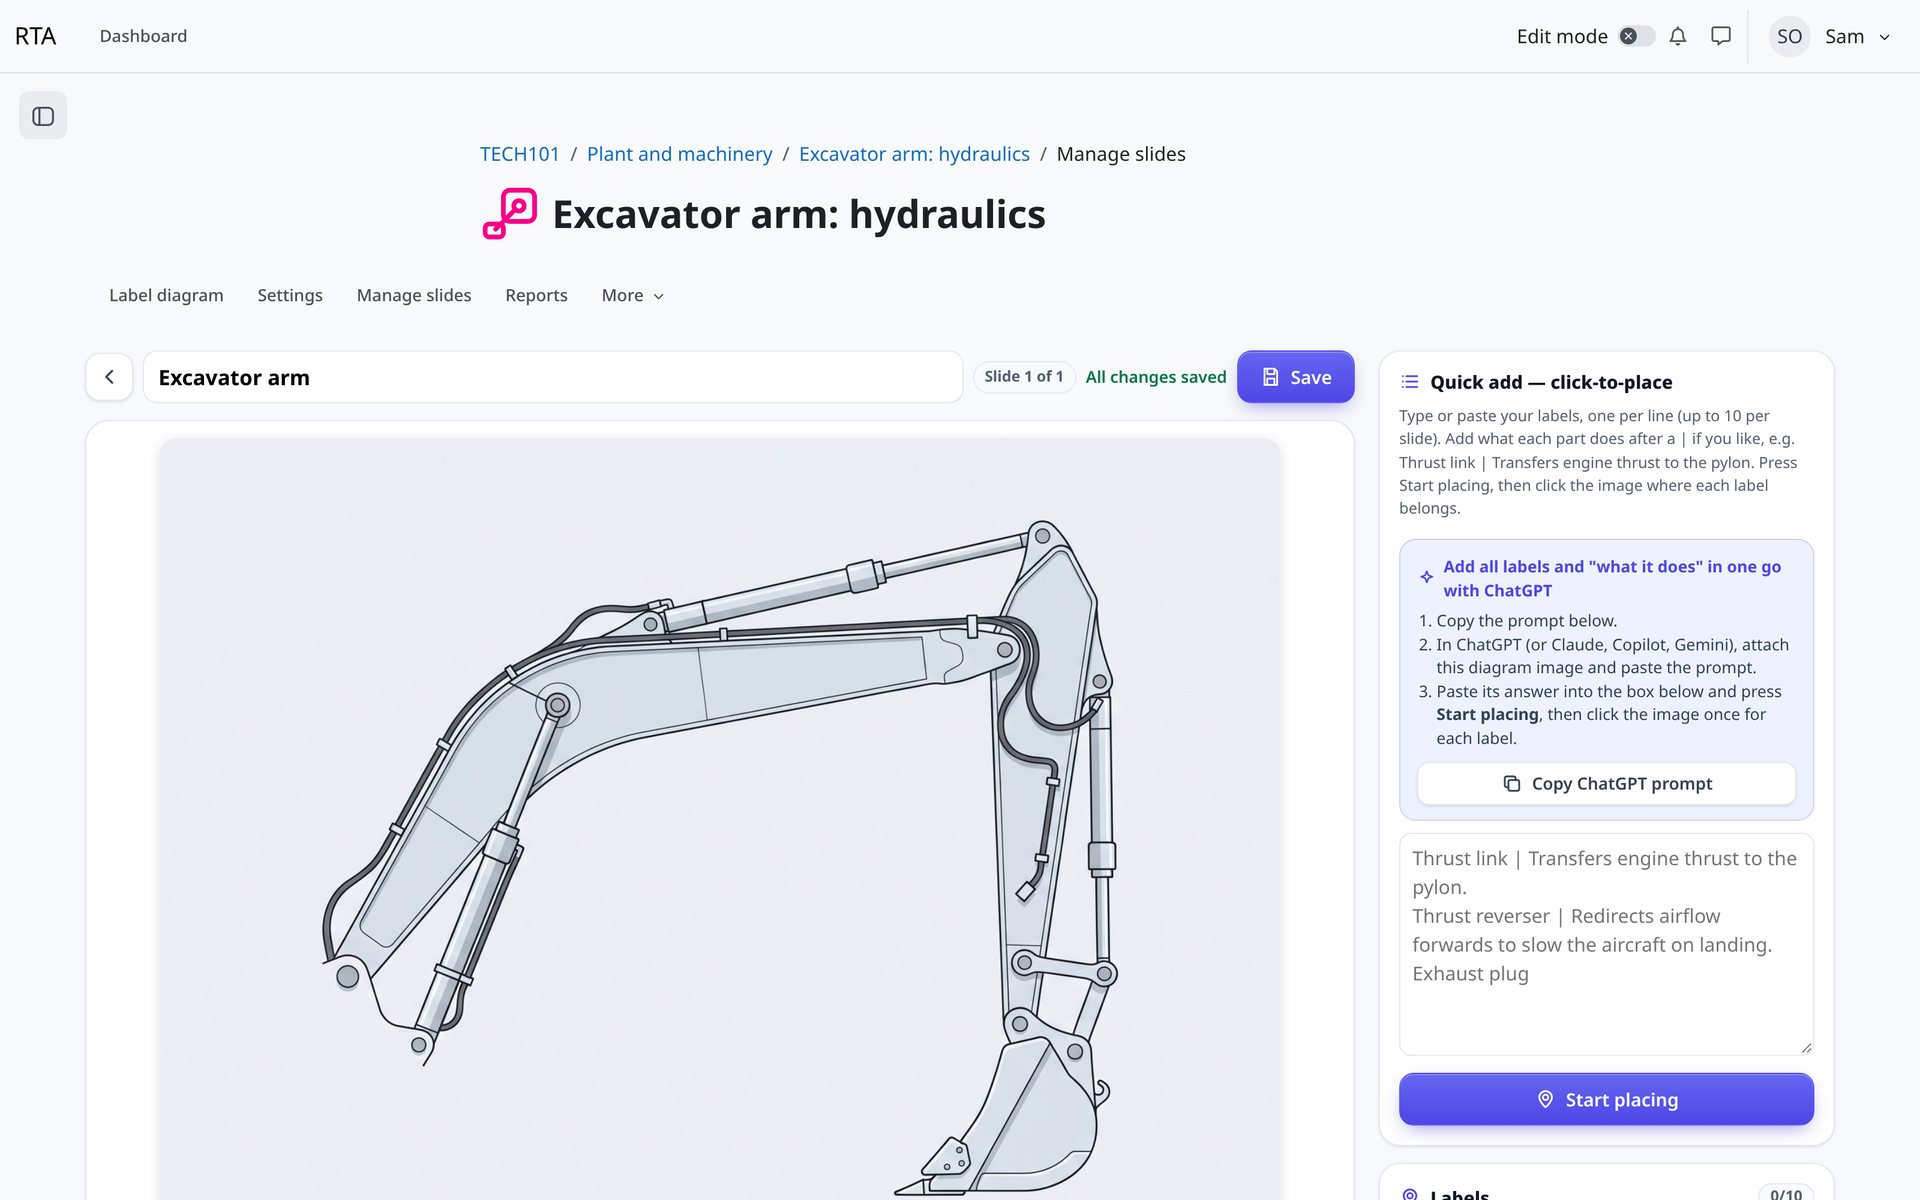
Click Edit labels on a slide. The fastest way is Quick add:
Type or paste your labels, one per line. Add what each part does after a bar, for example Water pump | Pushes coolant through the engine.
Press Start placing.
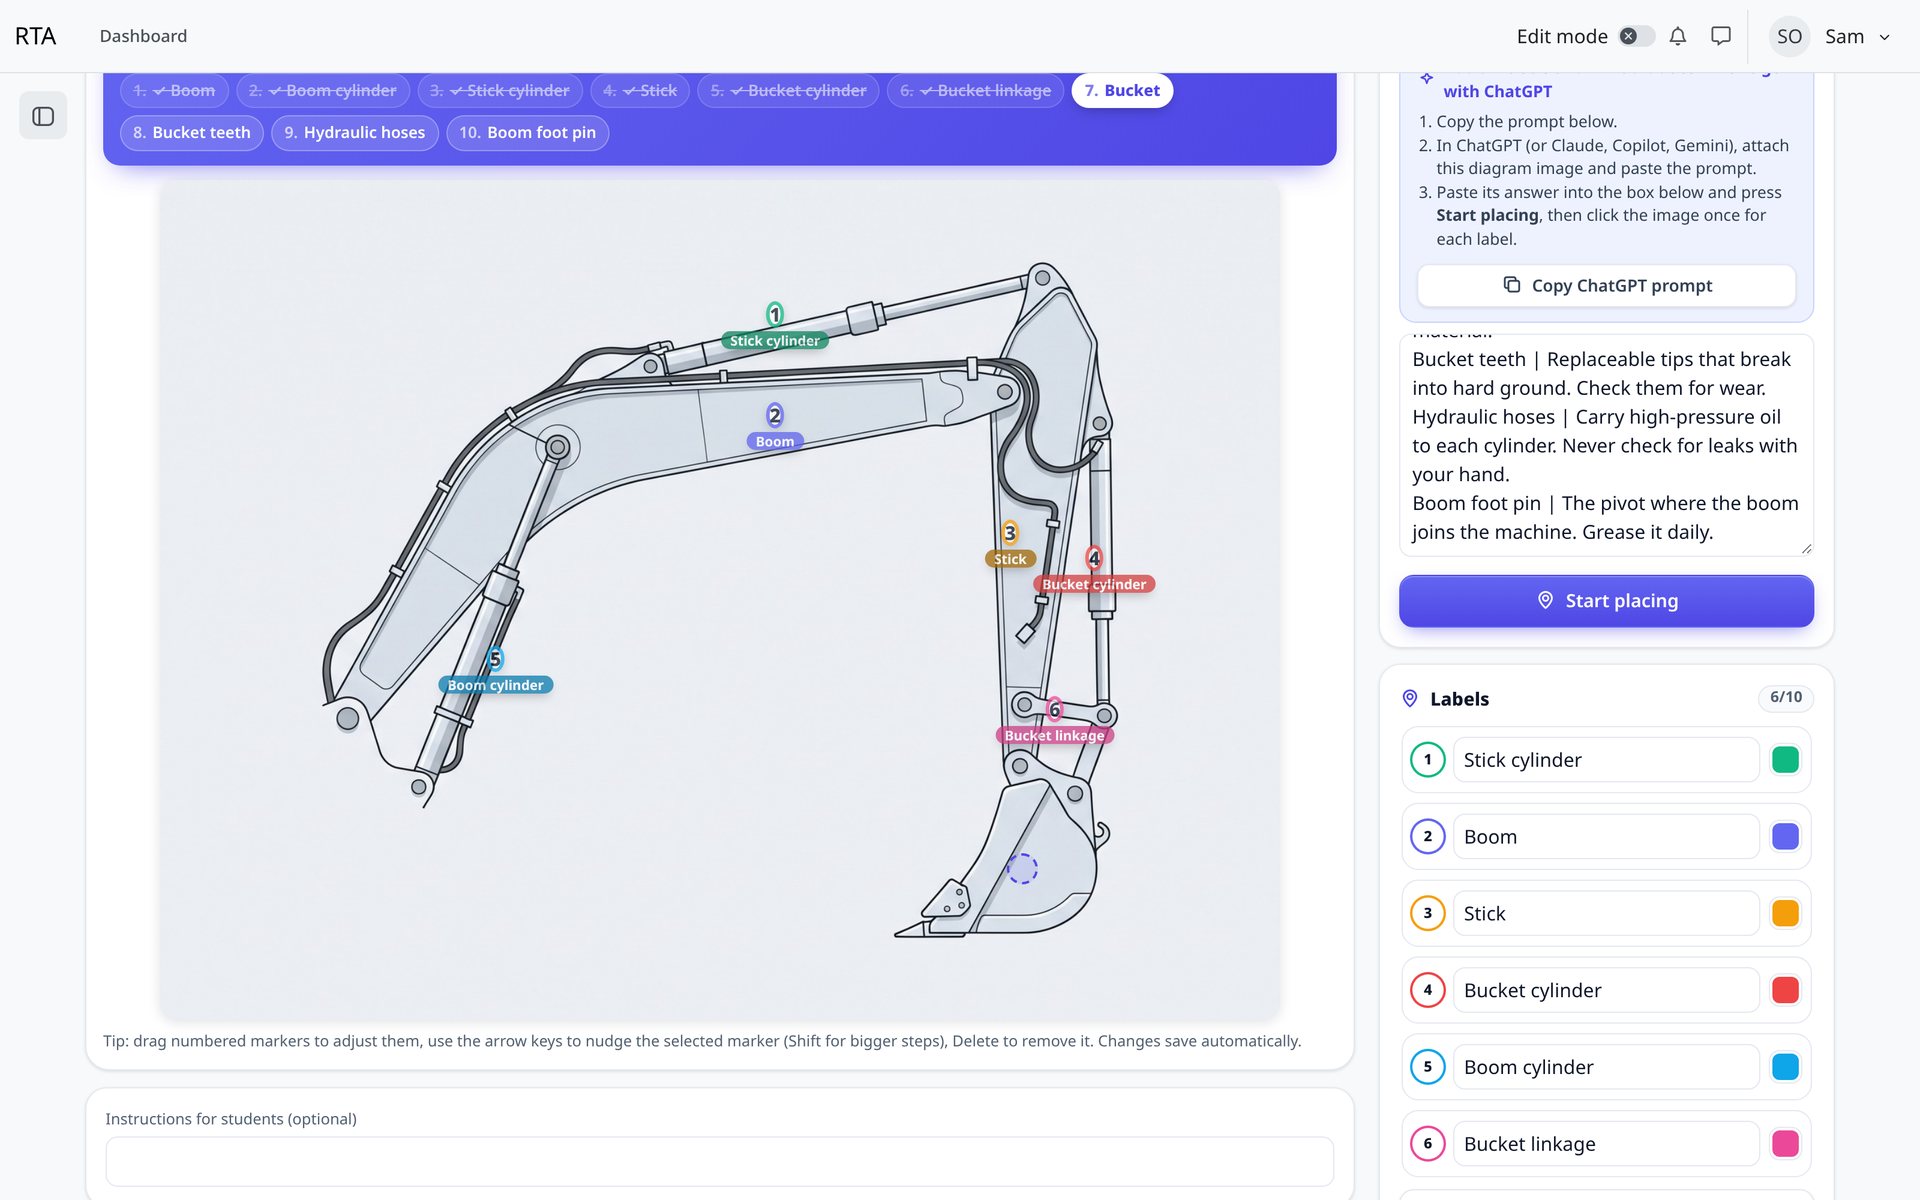
Click the image once for each label. The banner shows which label is next.
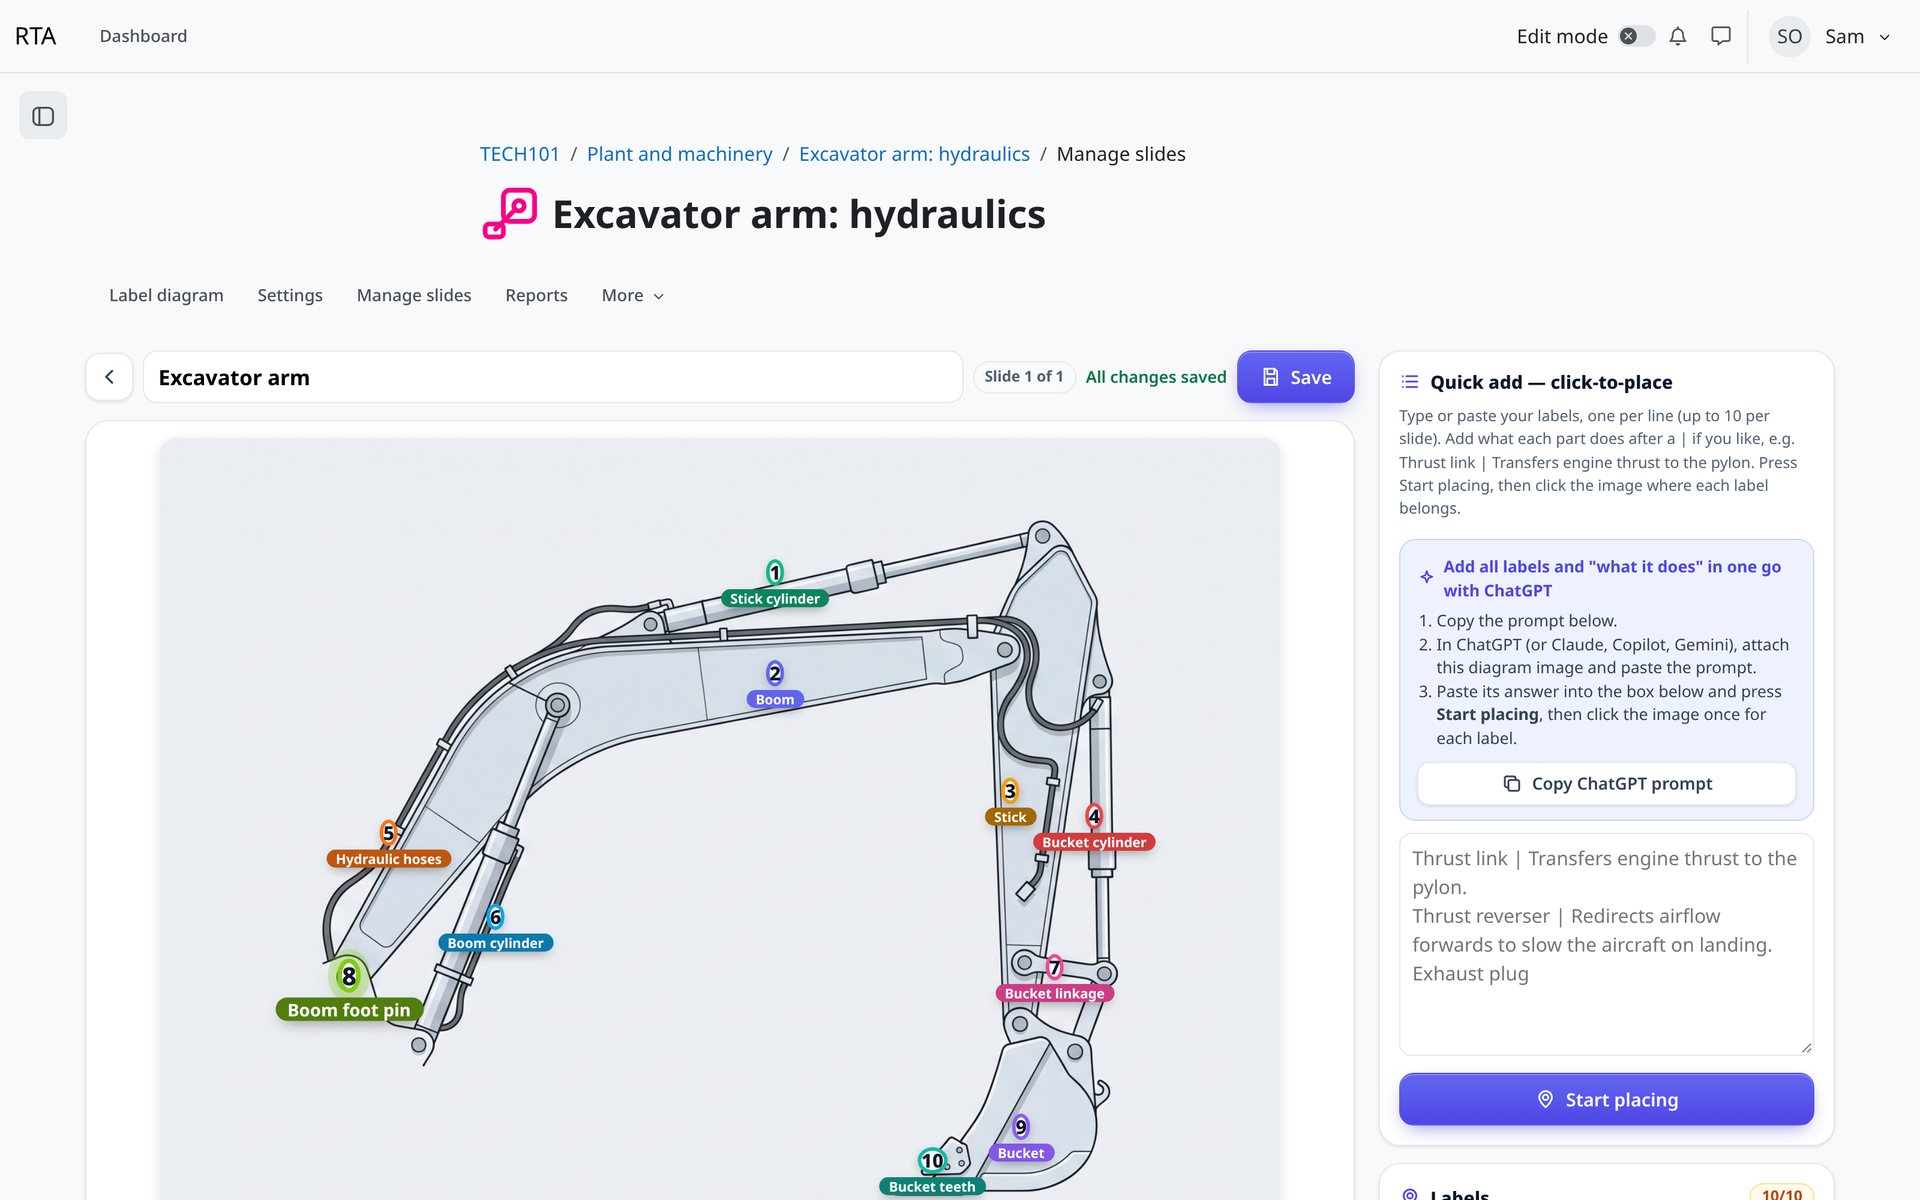
Fine-tune by dragging a marker, or select it and nudge with the arrow keys (Shift for bigger steps). Delete removes it. Every change saves automatically.
The label editor
The label editor. Quick add lets you type every label at once, then click to place them.
1Your diagram. Click to place, drag to adjust.
2Start placing, then click once per label.
Click, click, click
Click, click, click. The banner shows which label is next. Tap any label to place it next instead.
1Placed, current and still-to-place labels.
2Each click drops the next label.
All placed and saved
All placed and saved. Drag markers or nudge with the arrow keys. Every change saves automatically.
1Changes save automatically.
Colours, distractors and "What it does"
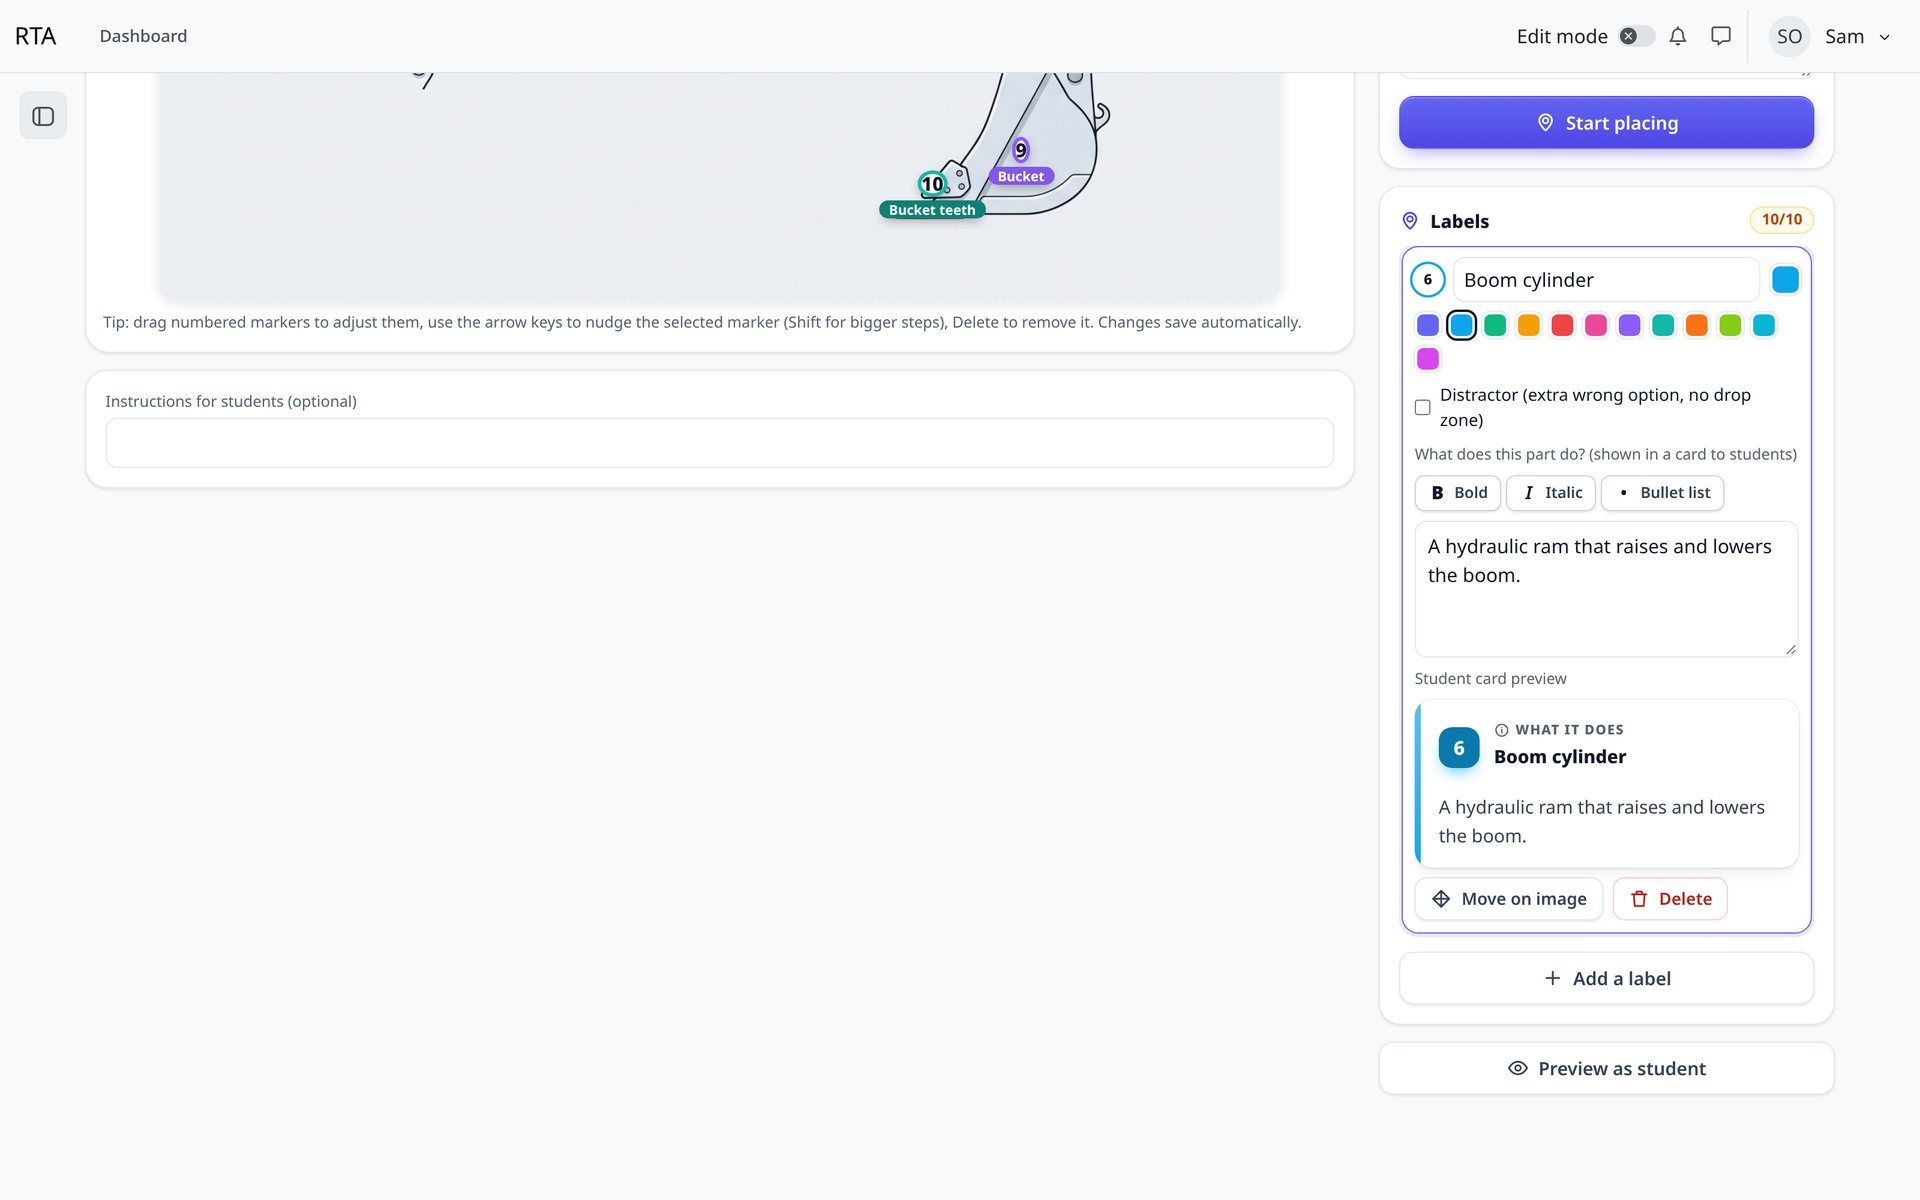
Colours, distractors and "What it does". Pick a colour, tick a distractor, and write what the part does with a live card preview.
1Choose from 12 accessible colours.
2Distractor: an extra wrong option with no drop zone.
3Bold, italic and bullet points.
4Live preview of the learner card.
Writing good labels
Use the exact term learners must know, as it appears in the unit or the manufacturer's manual.
Keep "What it does" to one or two plain sentences. Bold the key words.
Add distractors that are believable: parts from the same system that are not on this diagram.
Two parts with the same name, such as two bolts, are interchangeable automatically.
Learners
Study mode
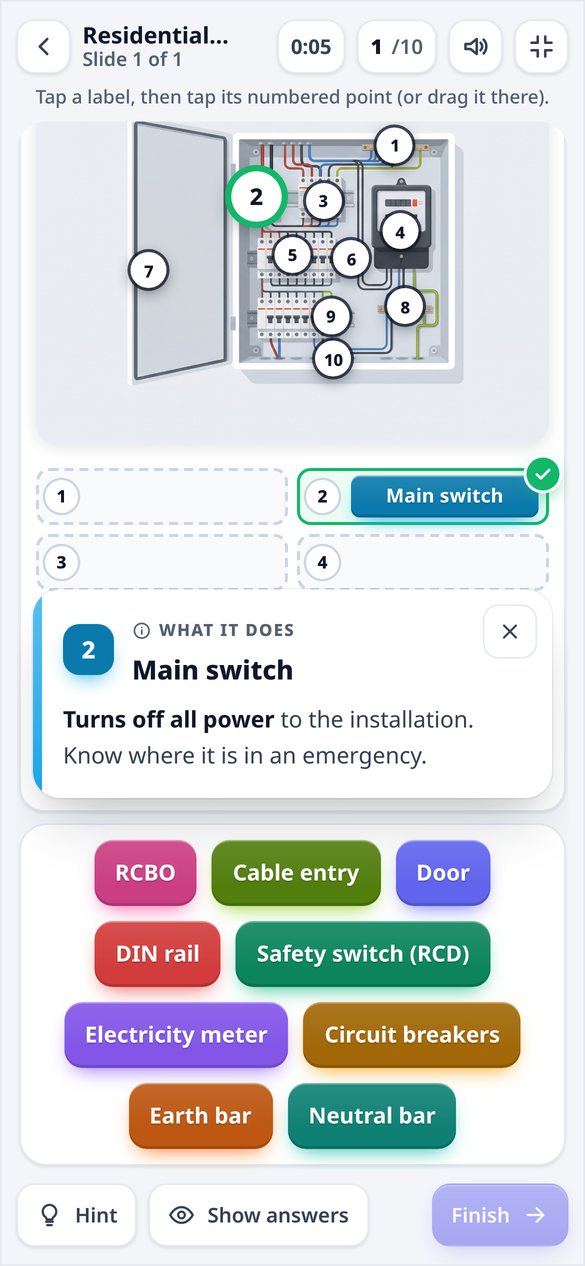
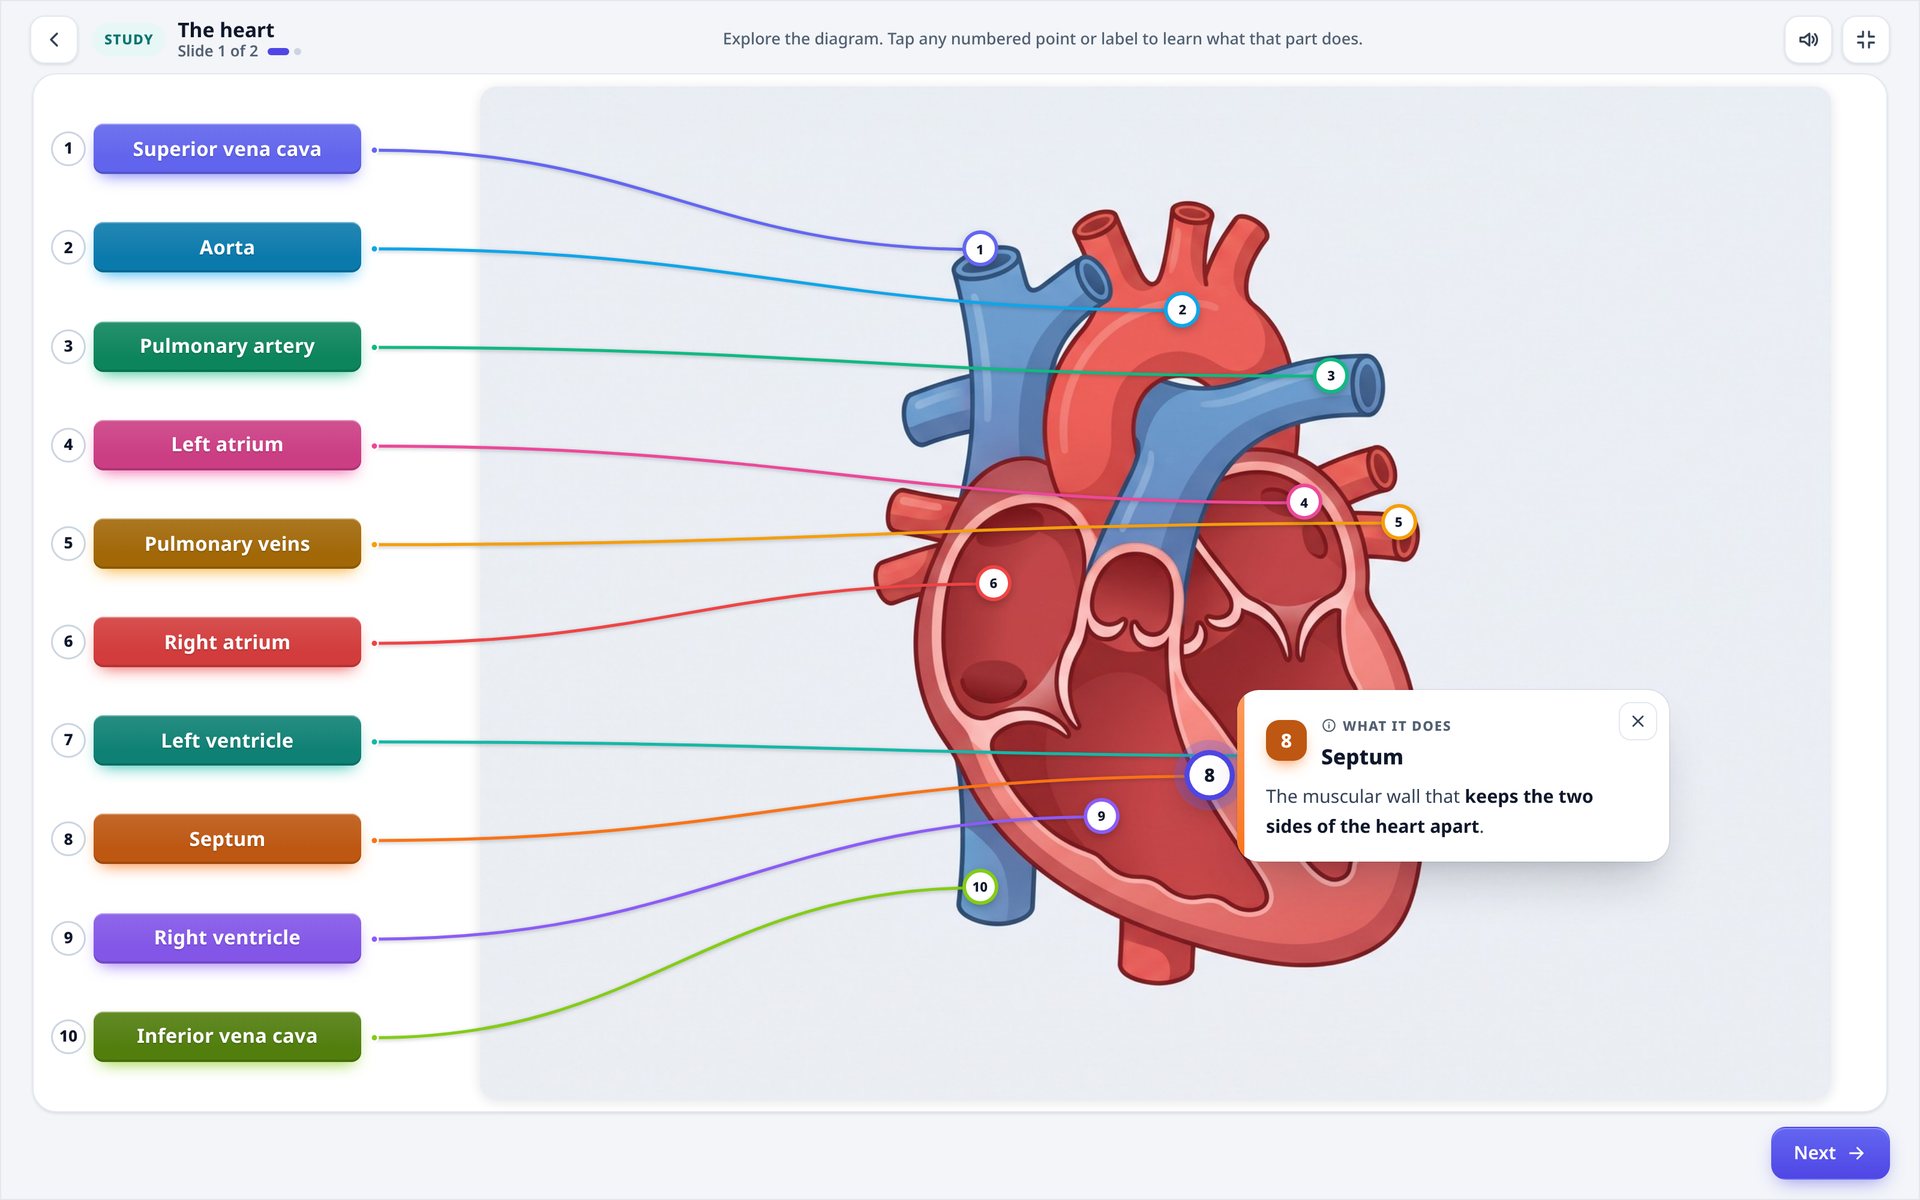
Every label is already placed and joined to its point with a curved line. Learners tap any part, or any label, to read what it does. There is nothing to achieve: it is the friendly first step before Practice.
Start screens
Start screens. Each mode opens with what to expect and how to play.
1What to expect, then a short how-to animation.
Study mode
Study mode. All labels shown. Tap any part to read what it does.
1Every label is already placed.
2The "What it does" card.
Learners
Practice mode
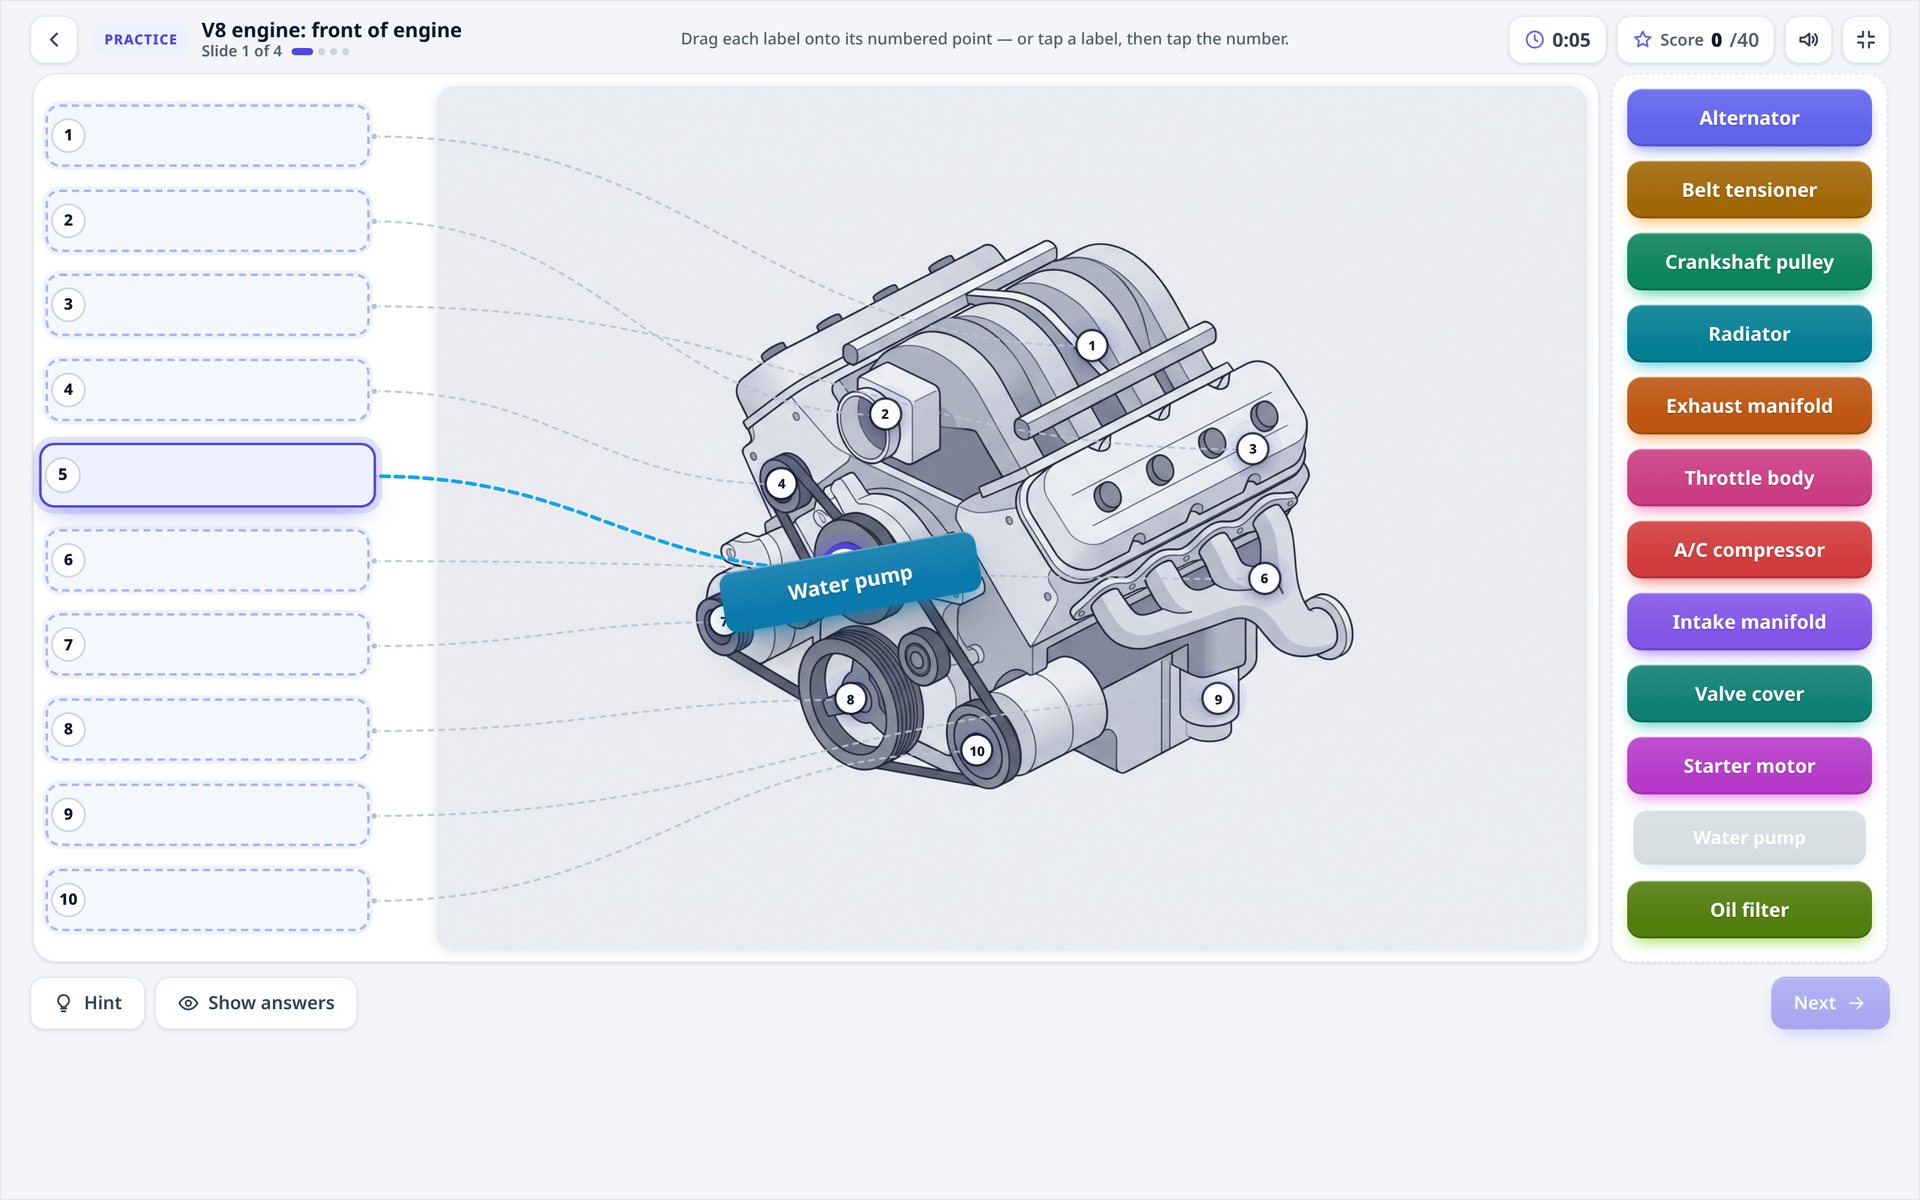
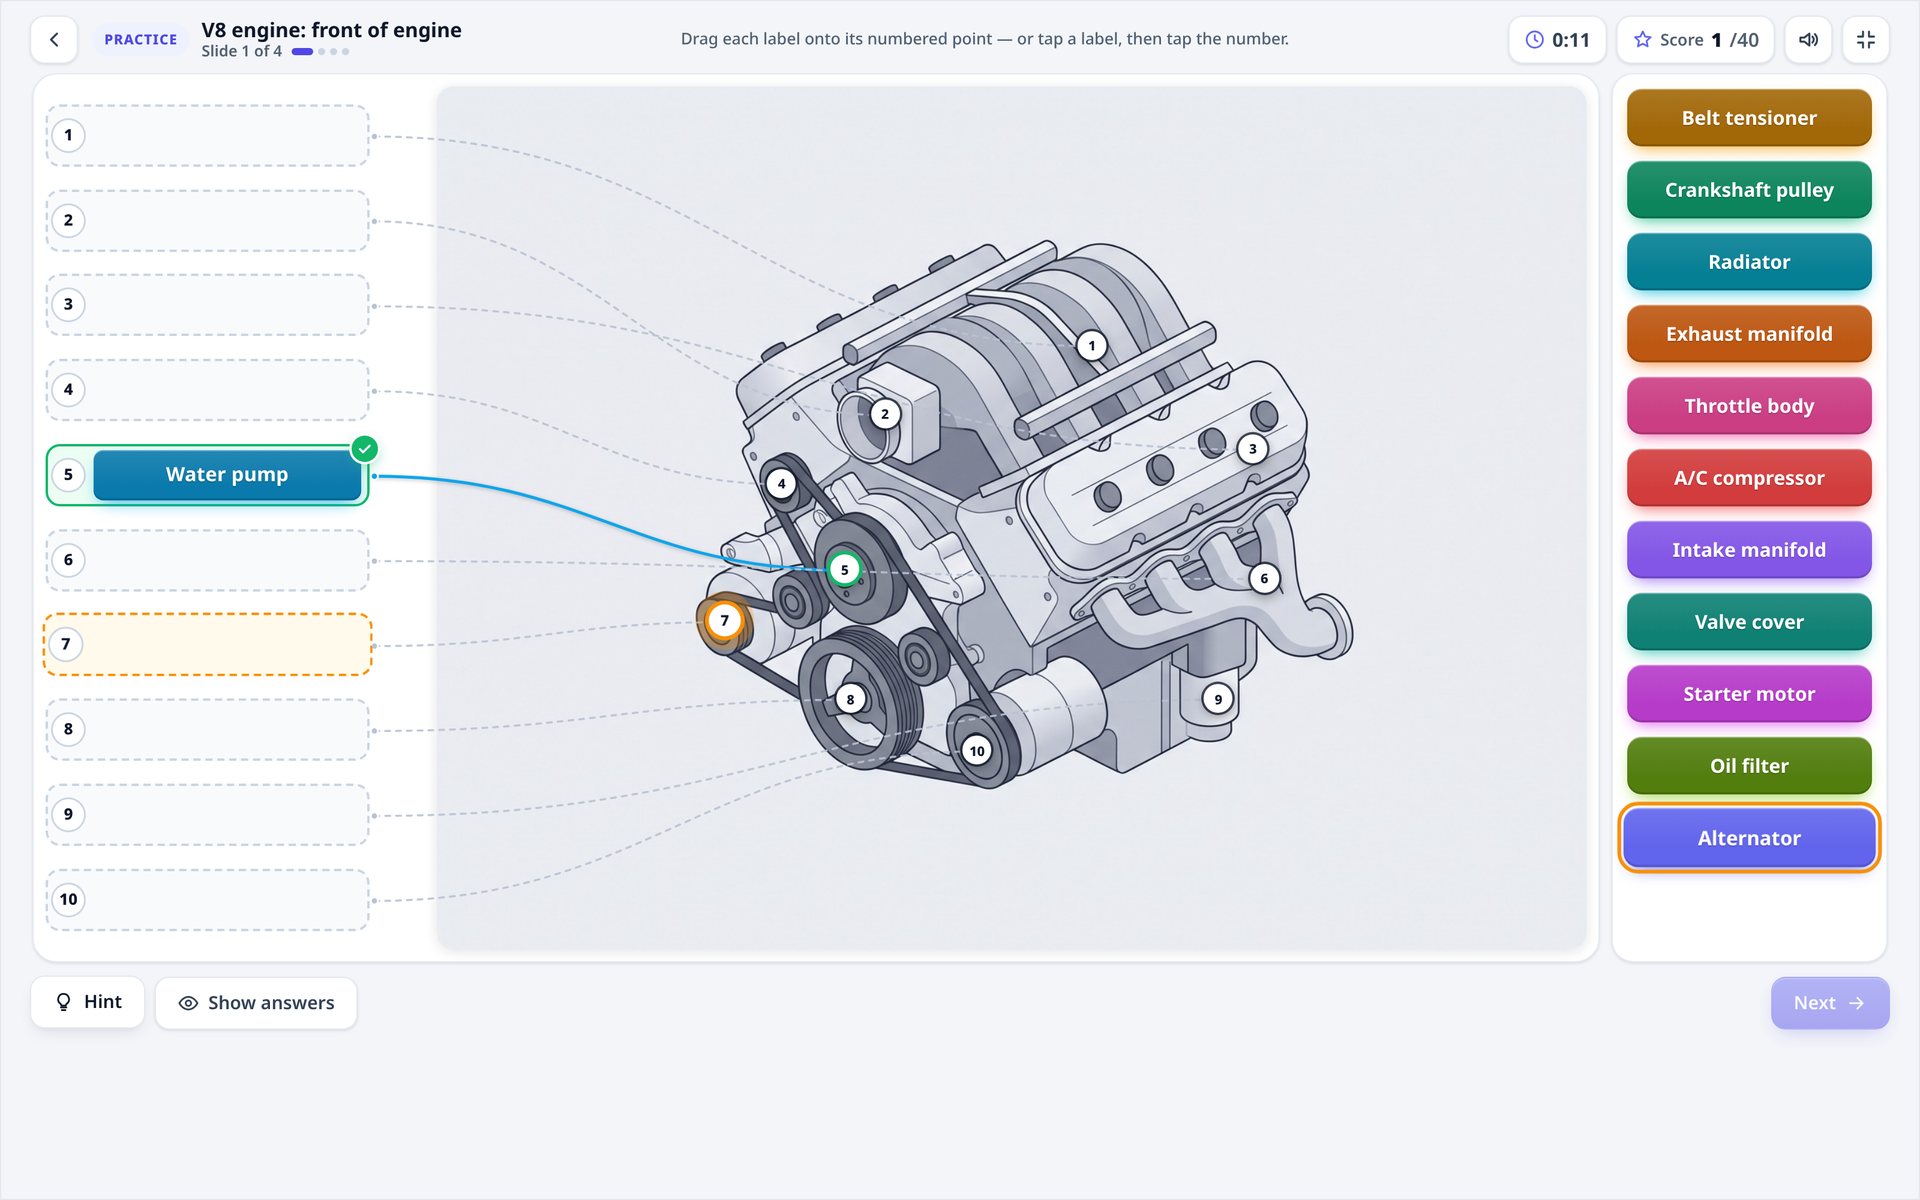
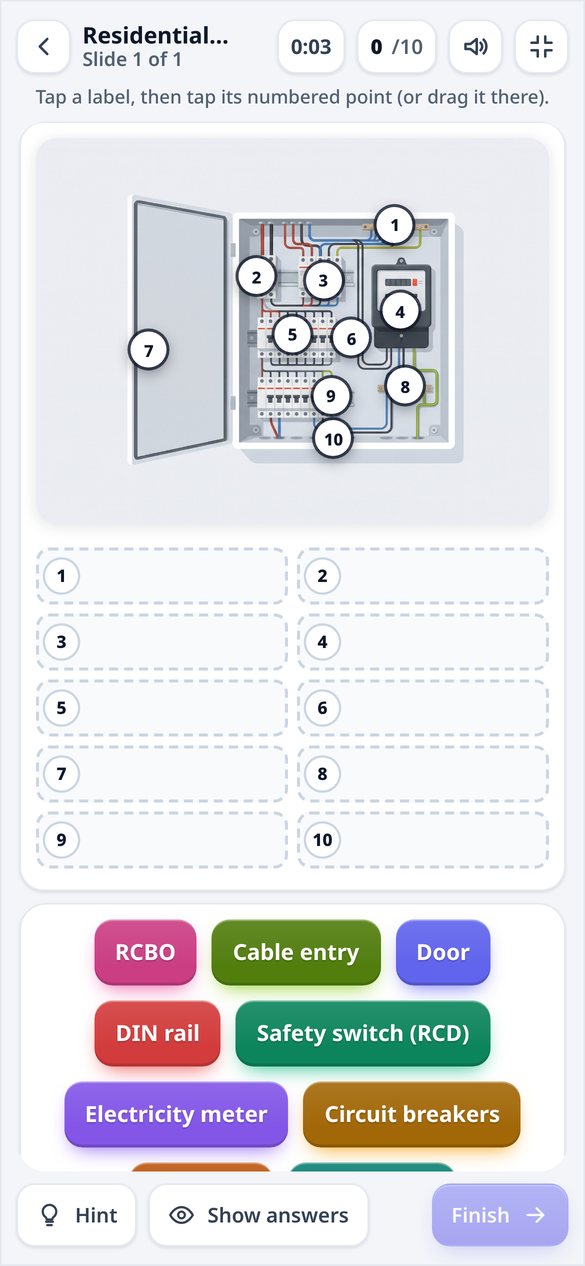
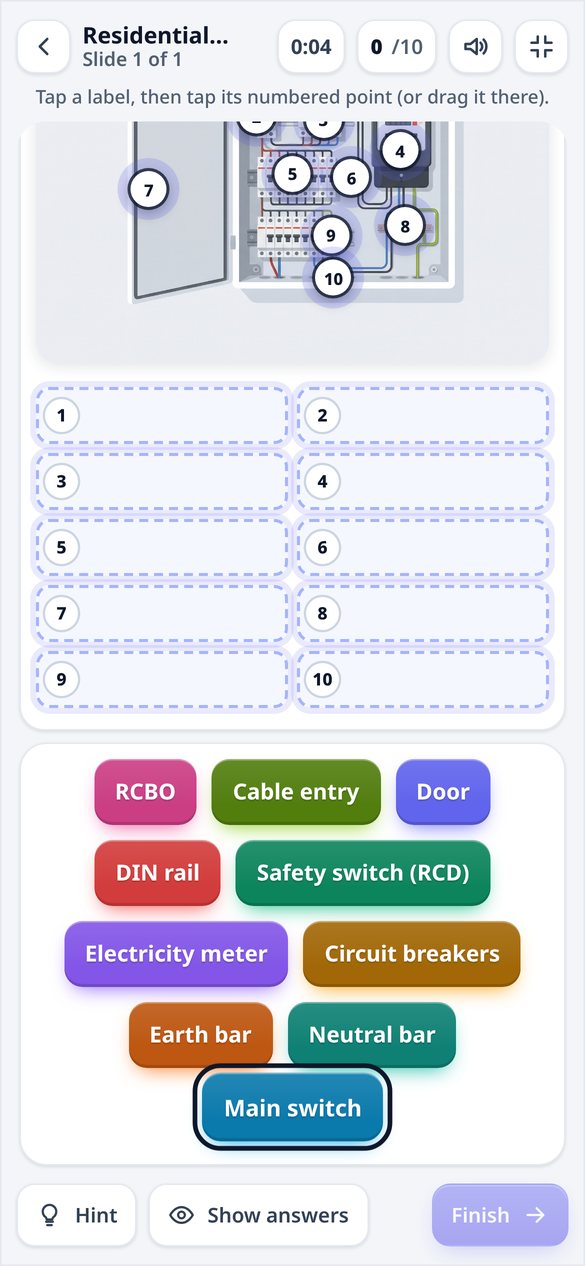
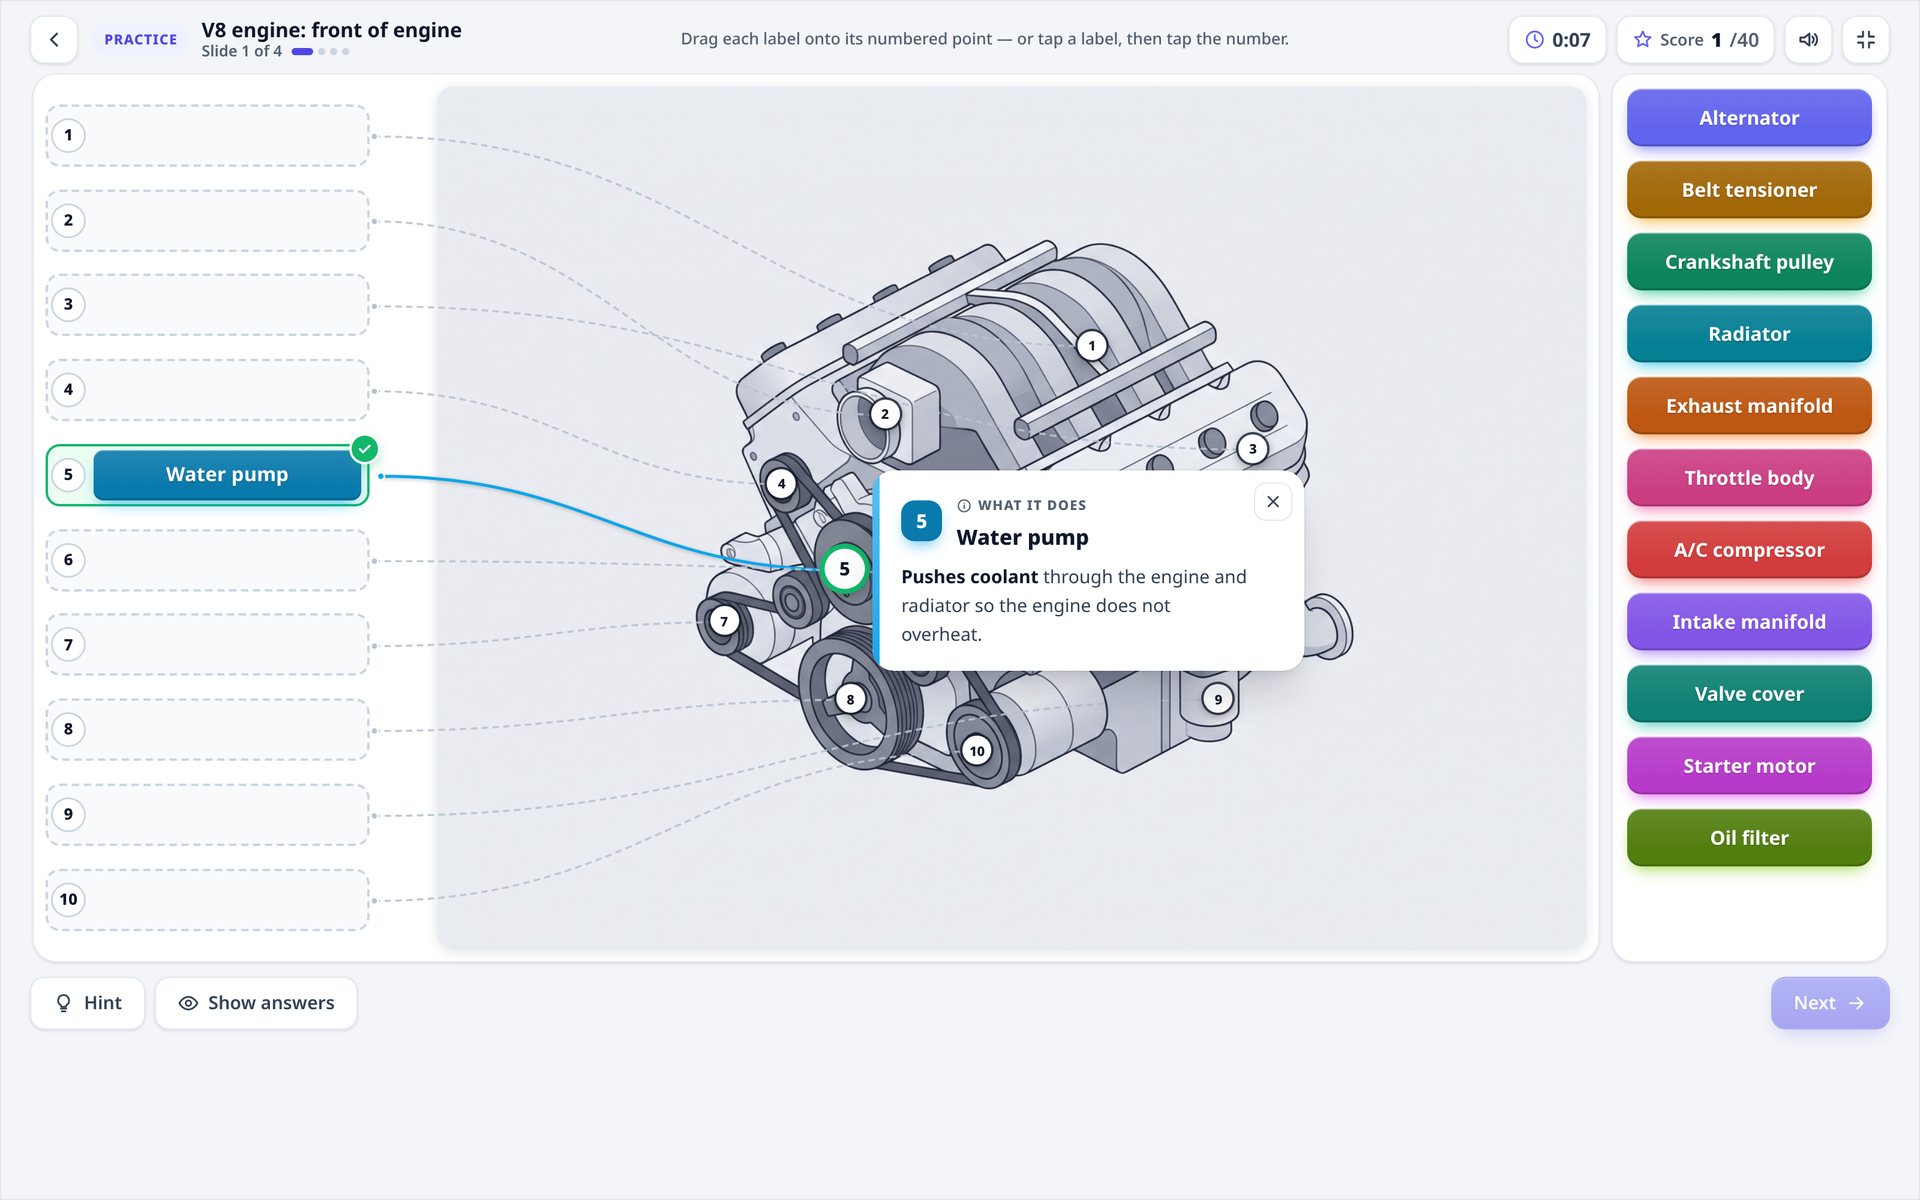
Practice feels like a game. Labels sit in a tray. Learners pick one up, and it tilts as it follows the pointer. The drop zones breathe, and the nearest one snaps and lights up.
Drag and snap
Drag and snap. The label tilts as it follows the pointer and the nearest zone snaps and lights up.
1The nearest drop zone lights up.
2Labels wait in the tray.
Right first time
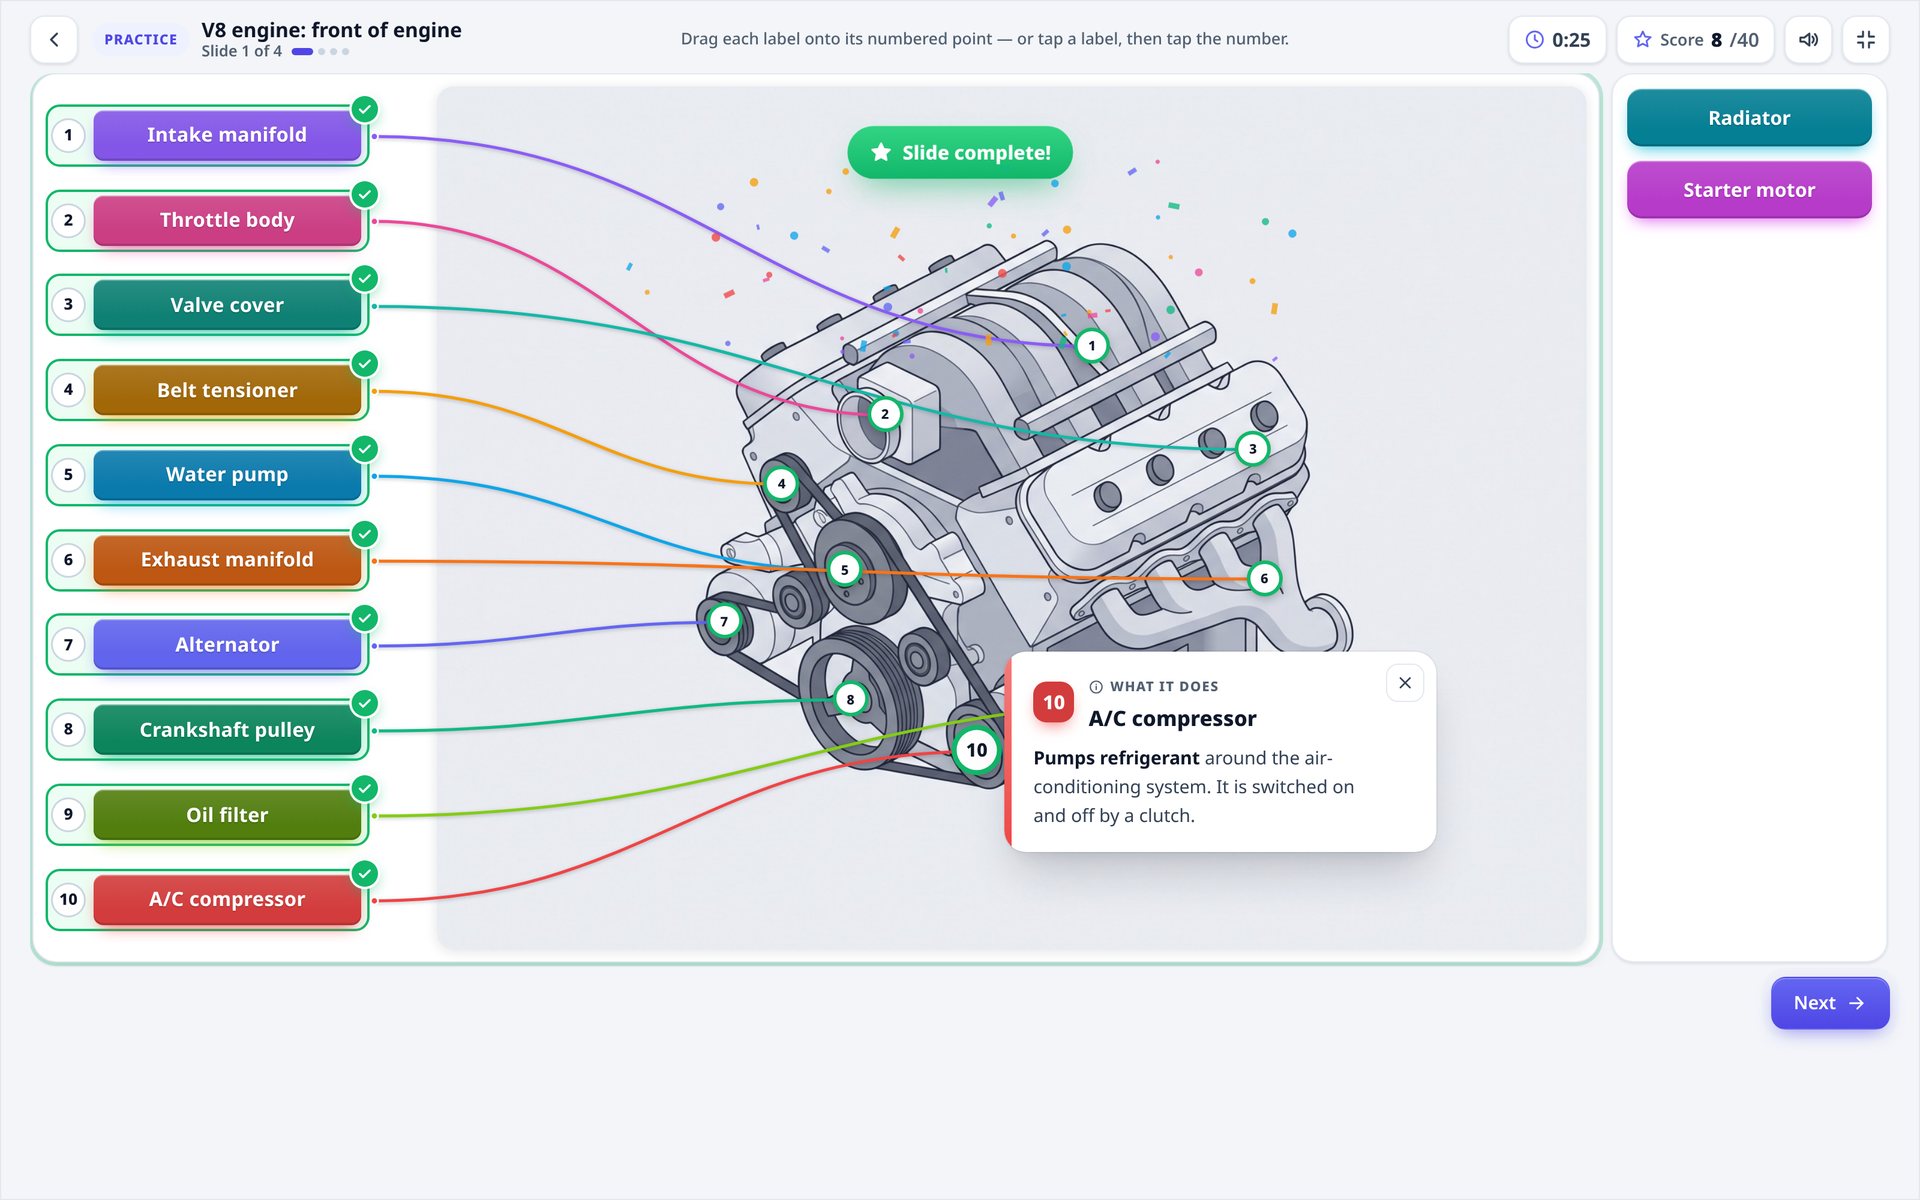
Right first time. Particles, a happy sound and the "What it does" card.
1Correct: the zone turns green with a tick.
2What the part does.
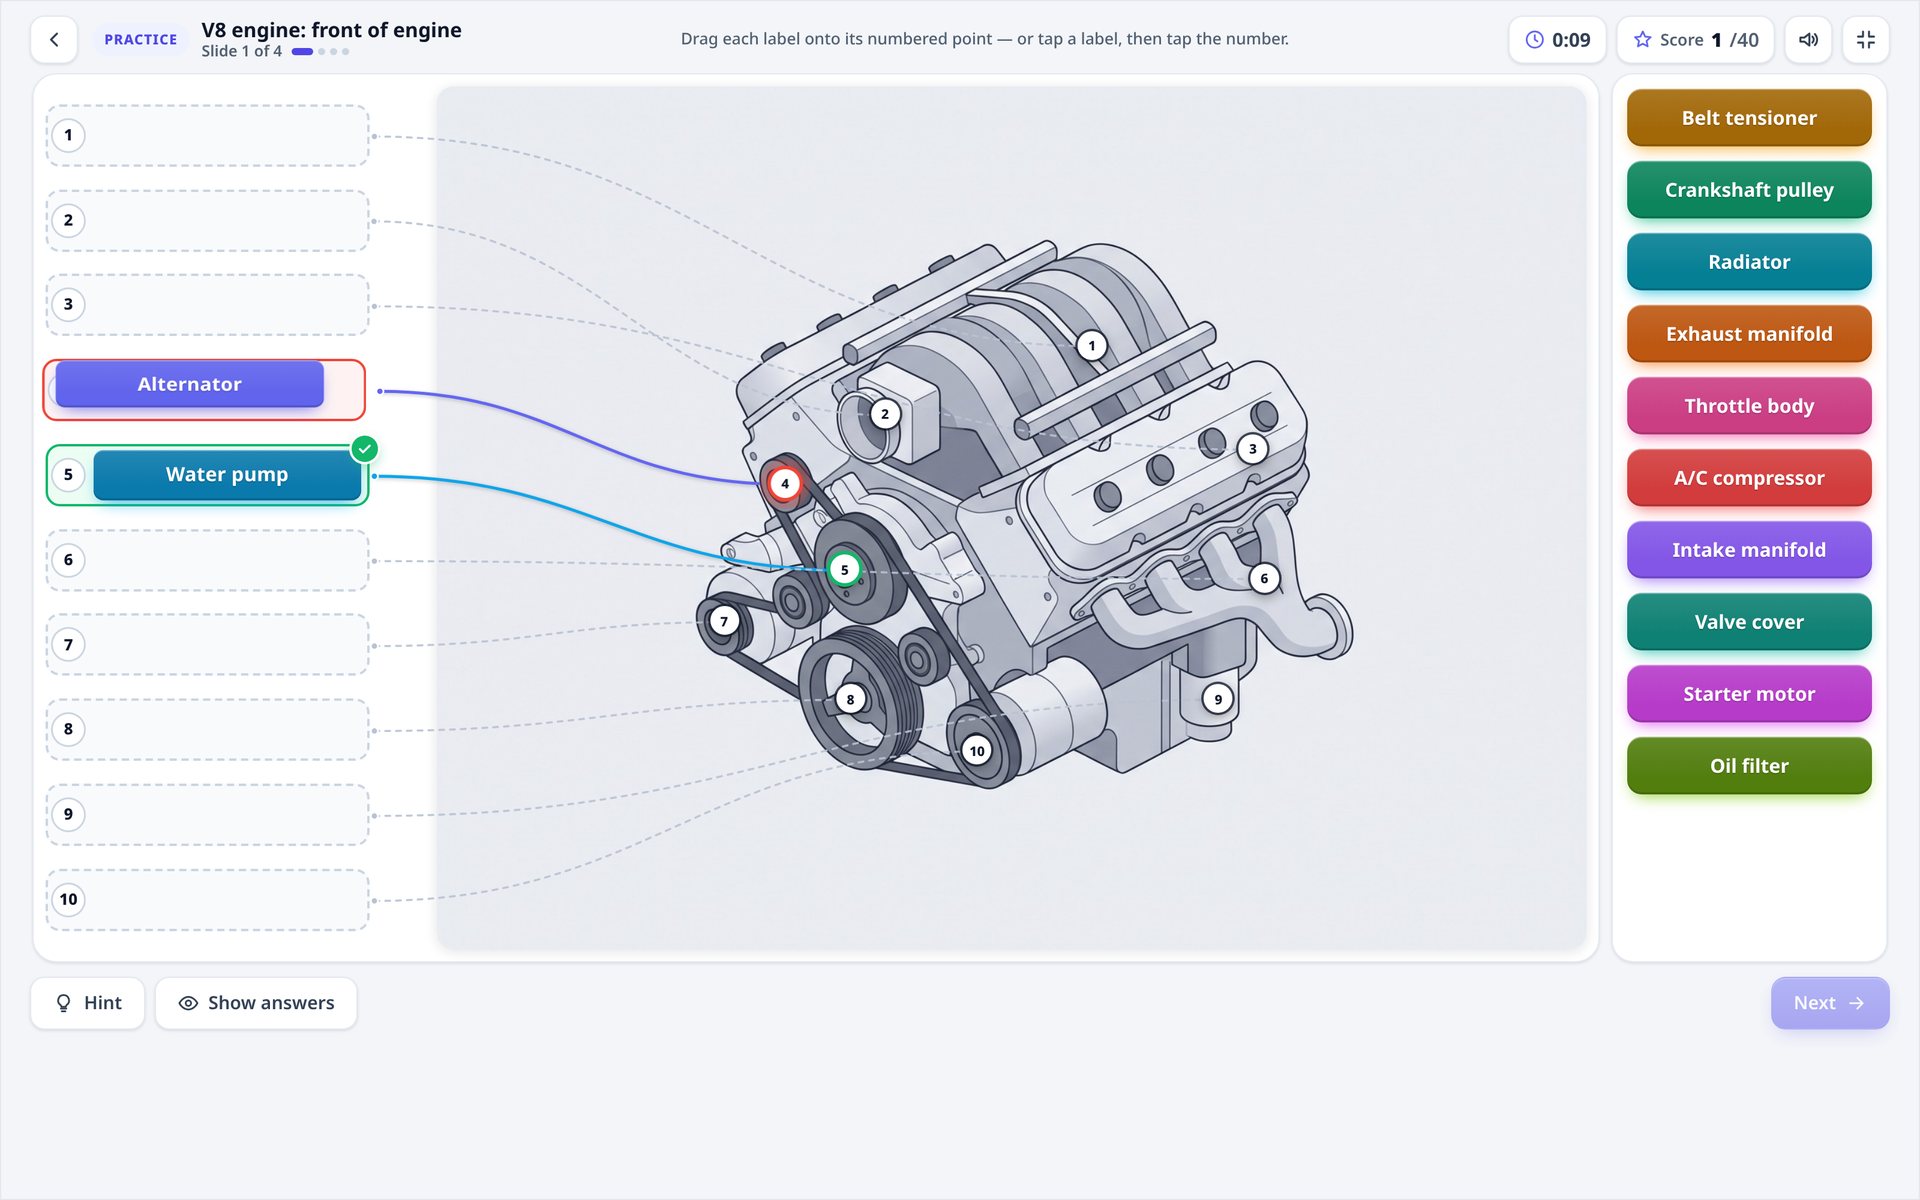
Not quite
Not quite. A wrong drop shakes and springs back. It counts as another try in the report.
1Wrong: the zone shakes and the label returns.
Hint and Show answers
Hint and Show answers. Hint shows where one label goes. Show answers fills in the rest.
1Hint highlights one label and its zone.
2Show answers places the rest, with extra tries recorded.
Slide complete
Slide complete. Confetti, then on to the next diagram.
1Slide complete banner.
Correct: particles, a happy sound, a green tick and the "What it does" card.
Wrong: the zone shakes and the label springs back to the tray.
Hint shows where one label goes. Show answers fills in the rest. Both count as extra tries in the report.
Only right-first-time placements count toward the Practice score. Practice is never graded.
Learners
Test mode
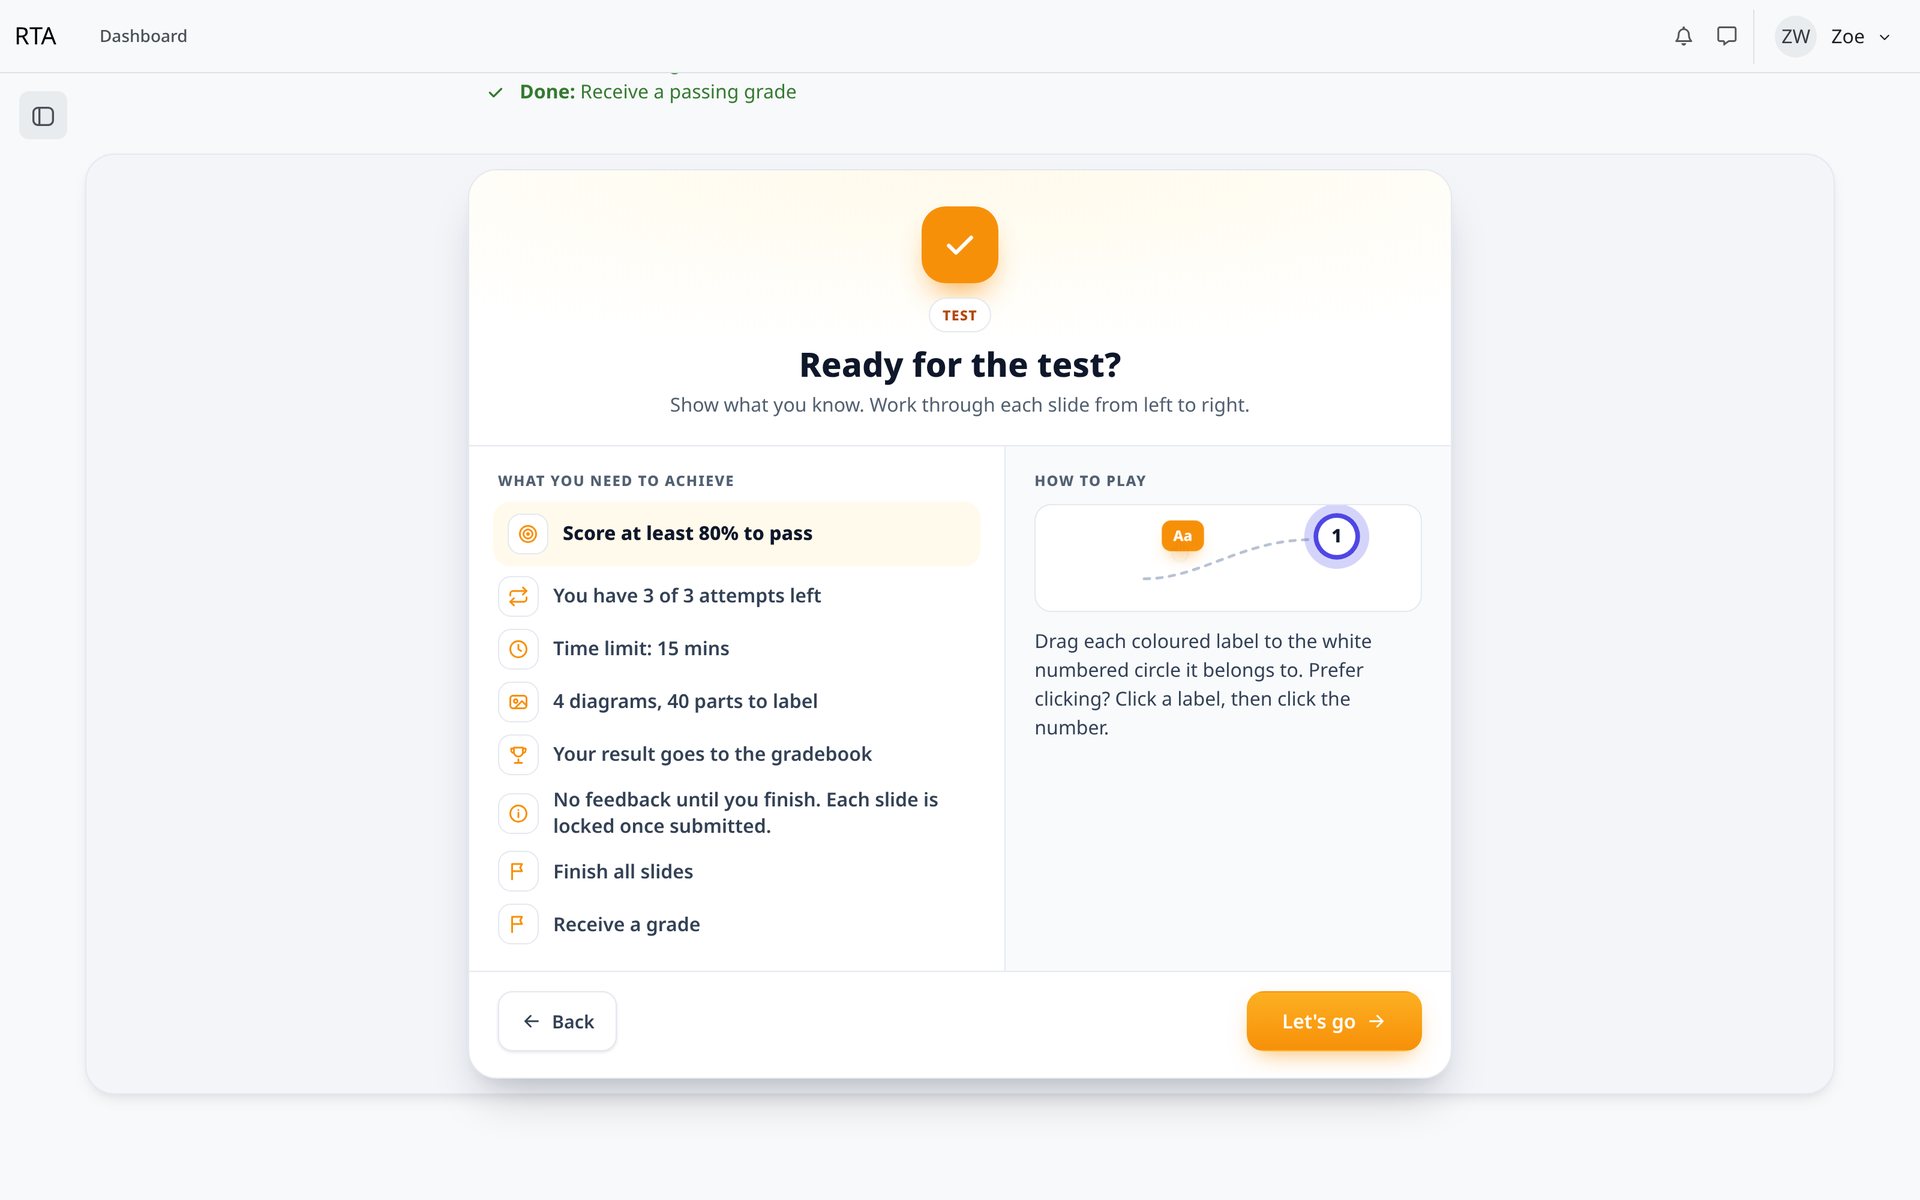
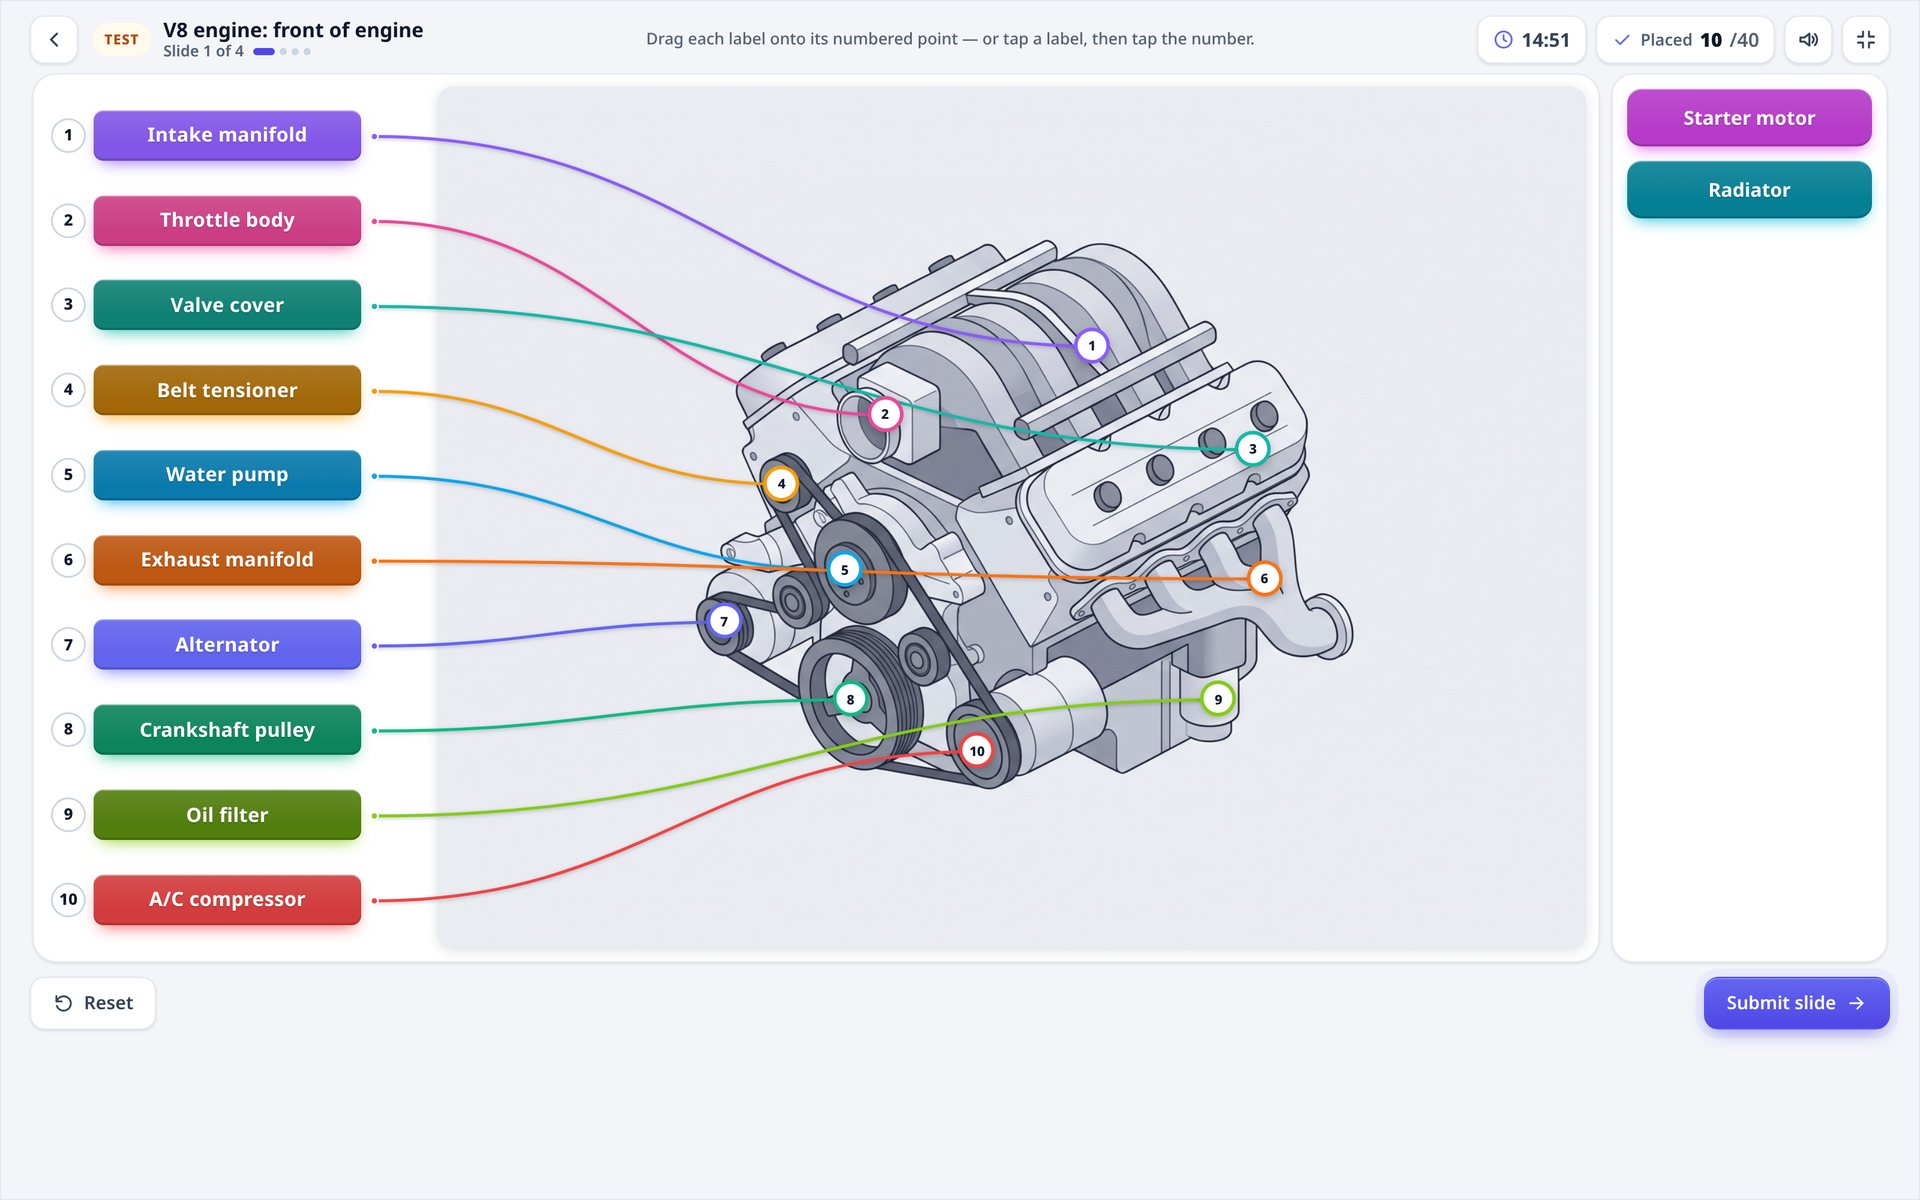
The start screen shows what learners need to achieve: the pass mark, attempts left and the time limit. There are no hints. Learners place every label, then Submit slide. Submitted slides lock.
Ready for the test?
Ready for the test?. Pass mark, attempts left, time limit and completion rules, before they start.
1What learners need to achieve.
Test mode
Test mode. No hints. Place everything, then Submit slide. Submitted slides lock.
1Time left, shown only when there is a limit.
2Submit slide: marked on the server.
Results
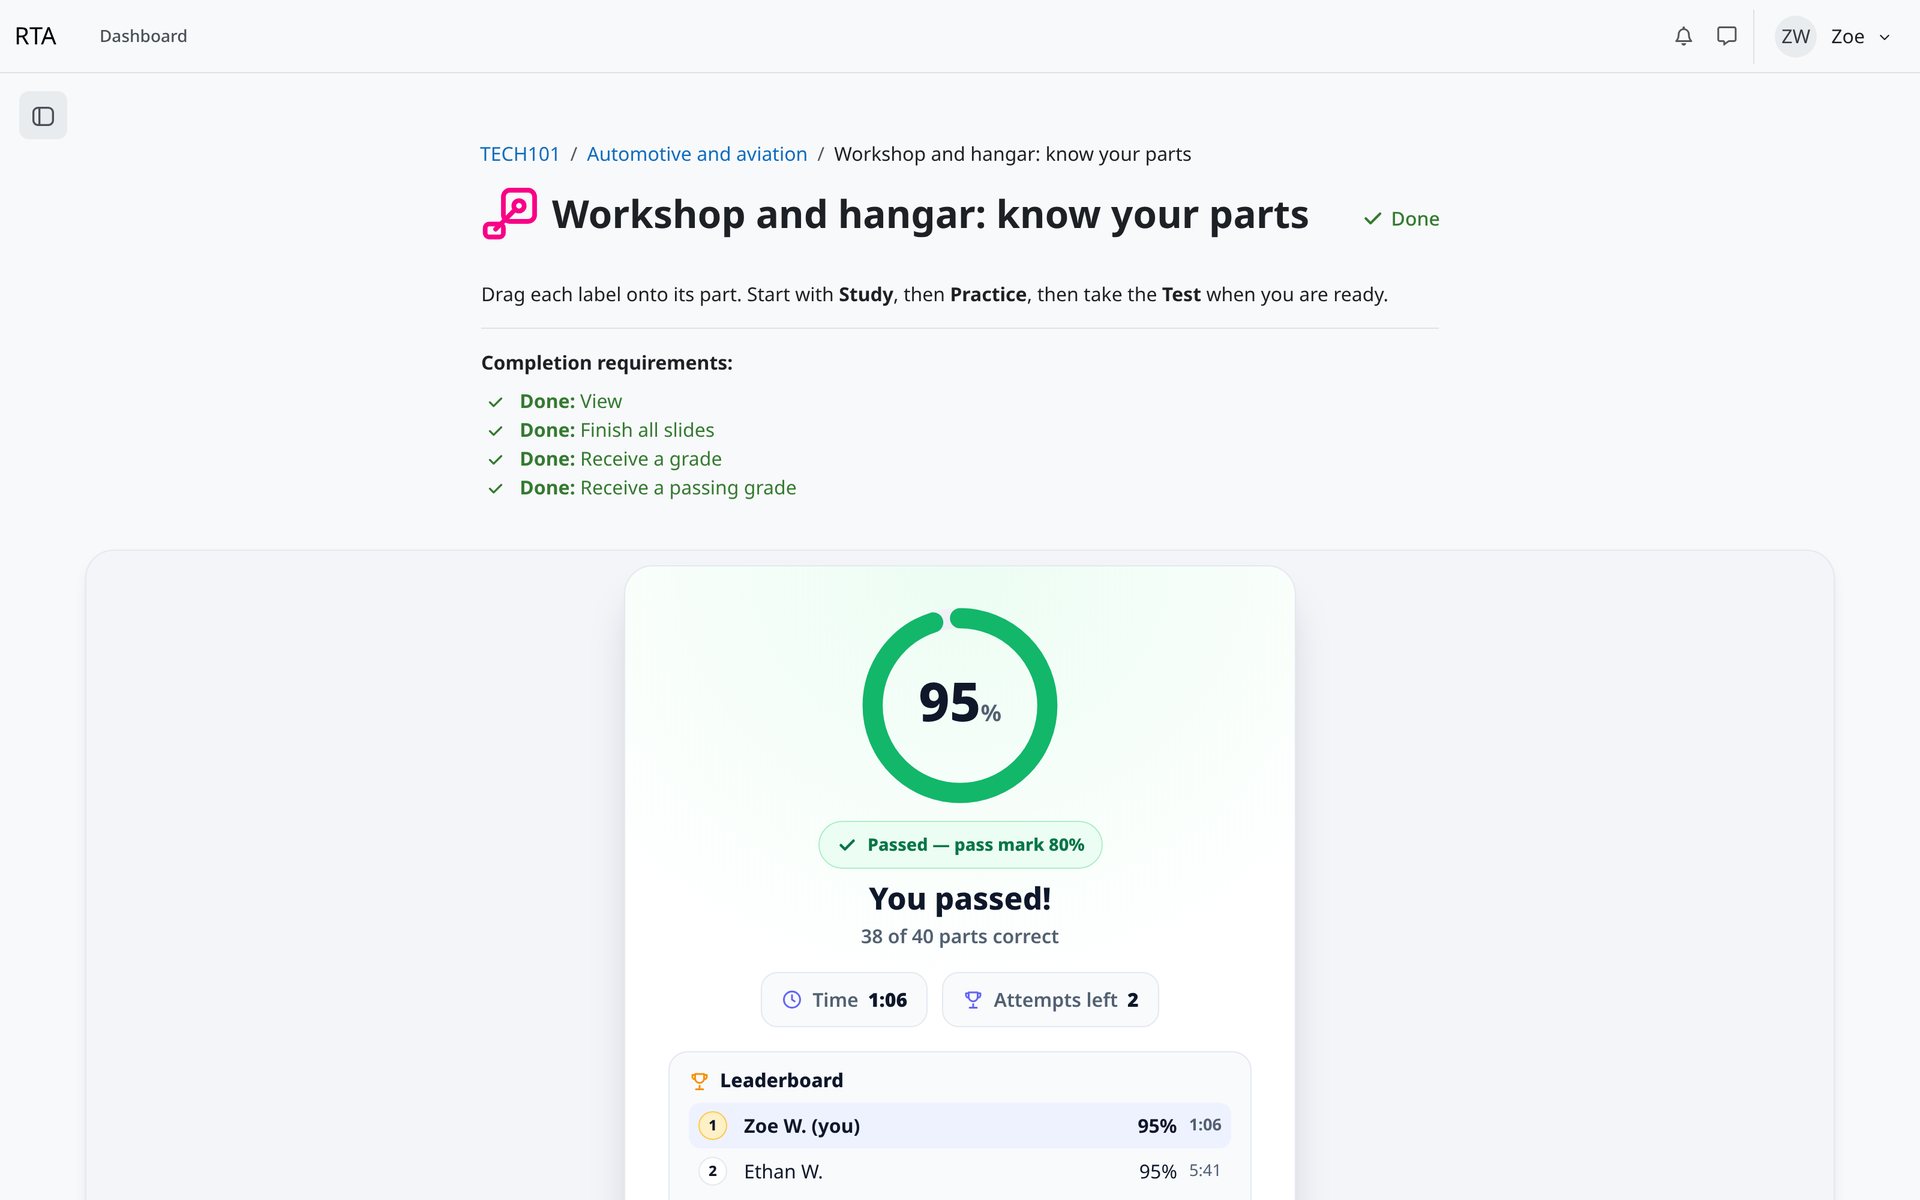
Results. Score ring, pass mark, time and attempts left.
1Score against the pass mark.
2Leaderboard, when it is on.
Review answers
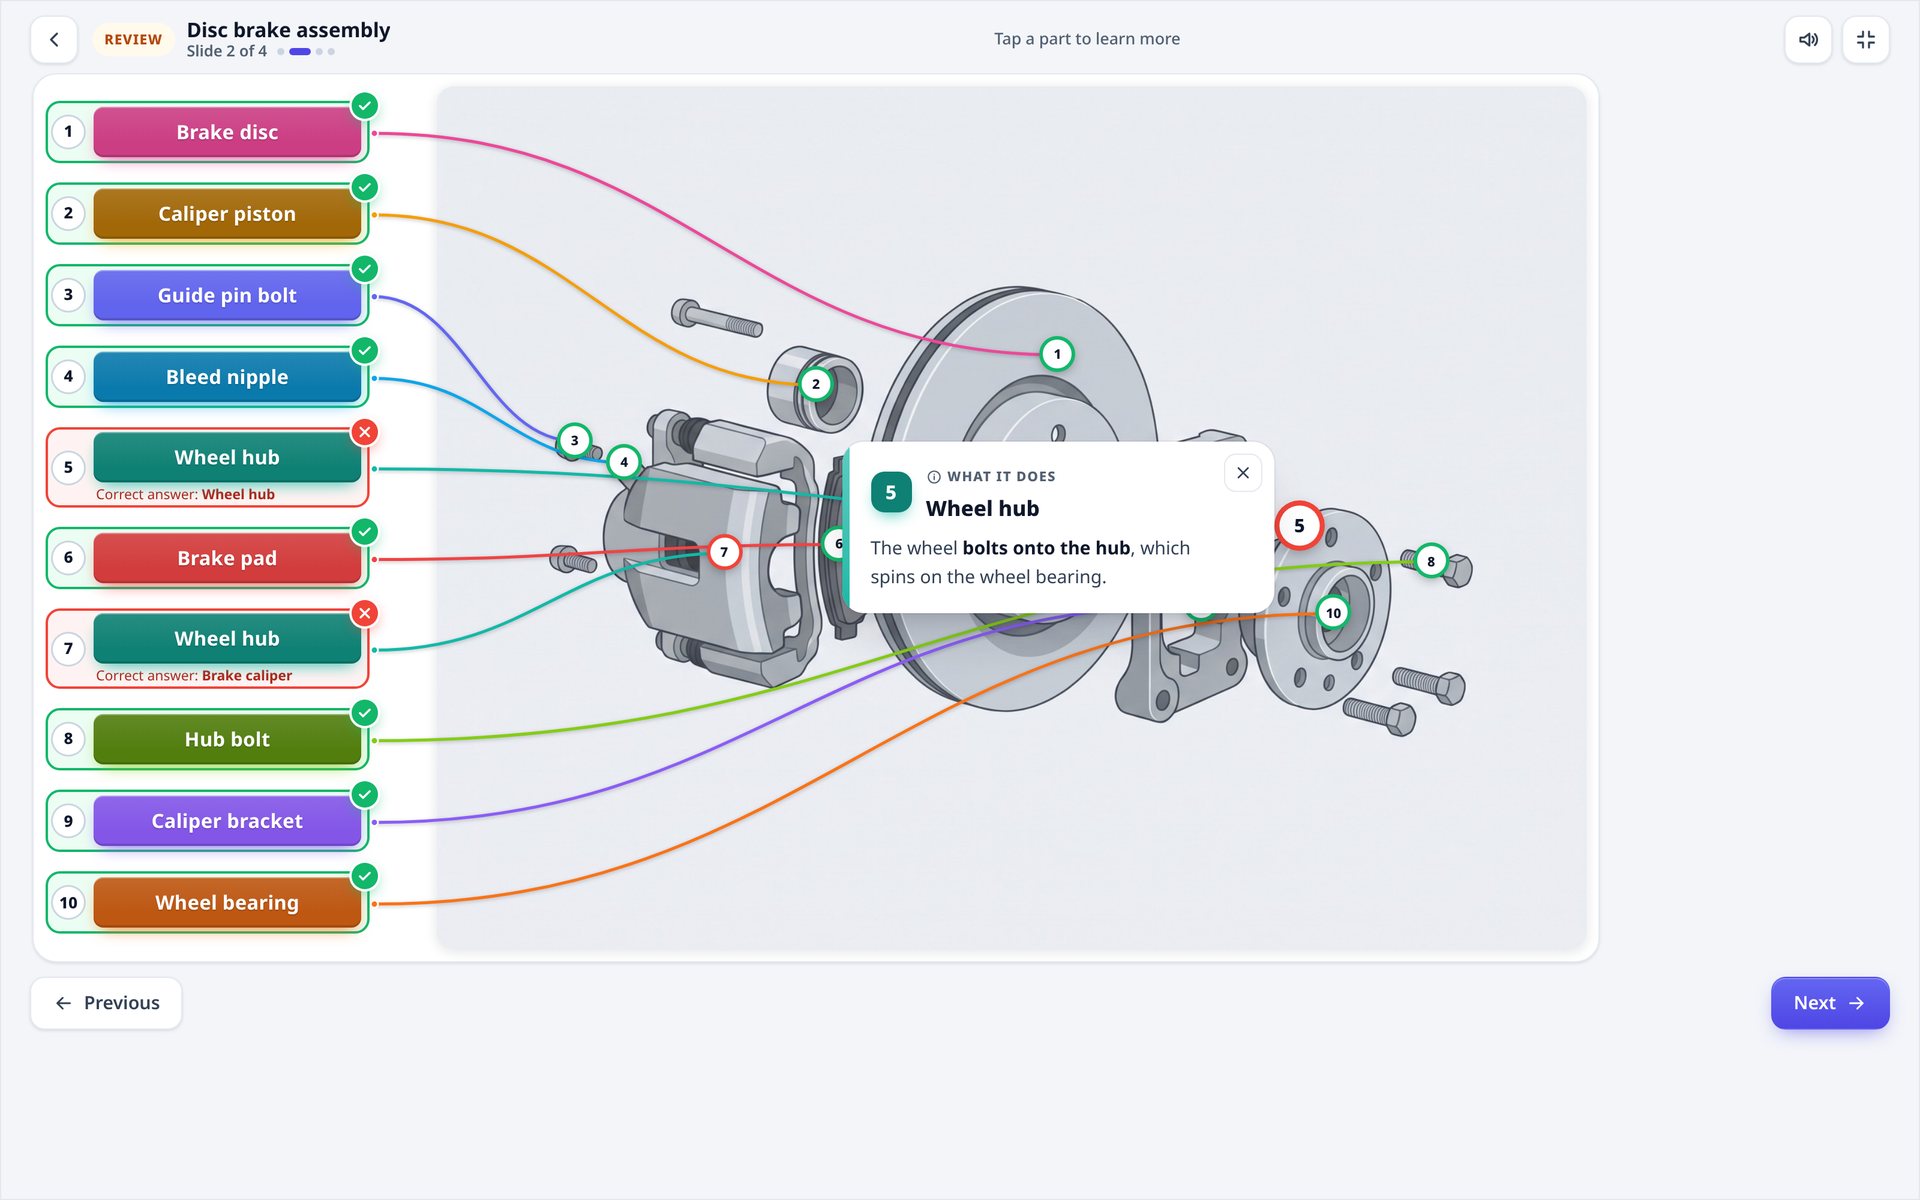
Review answers. What they placed, the correct answer and why.
1Wrong answers show the correct one underneath.
2The card explains the part.
The answer key never reaches the browser. Every placement is marked on the server.
The time limit is enforced on the server, with a short grace period for slow connections.
Results show a score ring against the pass mark, with confetti and a fanfare for a pass.
Review answers shows every slide, what was placed, the correct answer and the "What it does" card.
Learners
Phones, keyboards and accessibility
Not everyone can drag. On a phone, learners tap a label, then tap its number. The layout stacks the diagram, drop zones and labels so everything fits without scrolling sideways.
Keyboard: Tab to a label, Enter to pick it up, Tab to a drop zone, Enter to place it, Escape to cancel.
Screen readers: every pick-up, placement and result is announced.
WCAG 2.1 AA: label colours use darker shades behind white text, whatever colour you pick, and there is always an alternative to dragging.
Reduced motion: tilts and animations are turned down when the device asks for less motion.
Full screen works everywhere, including on iPhone.
Reports
Grades and completion
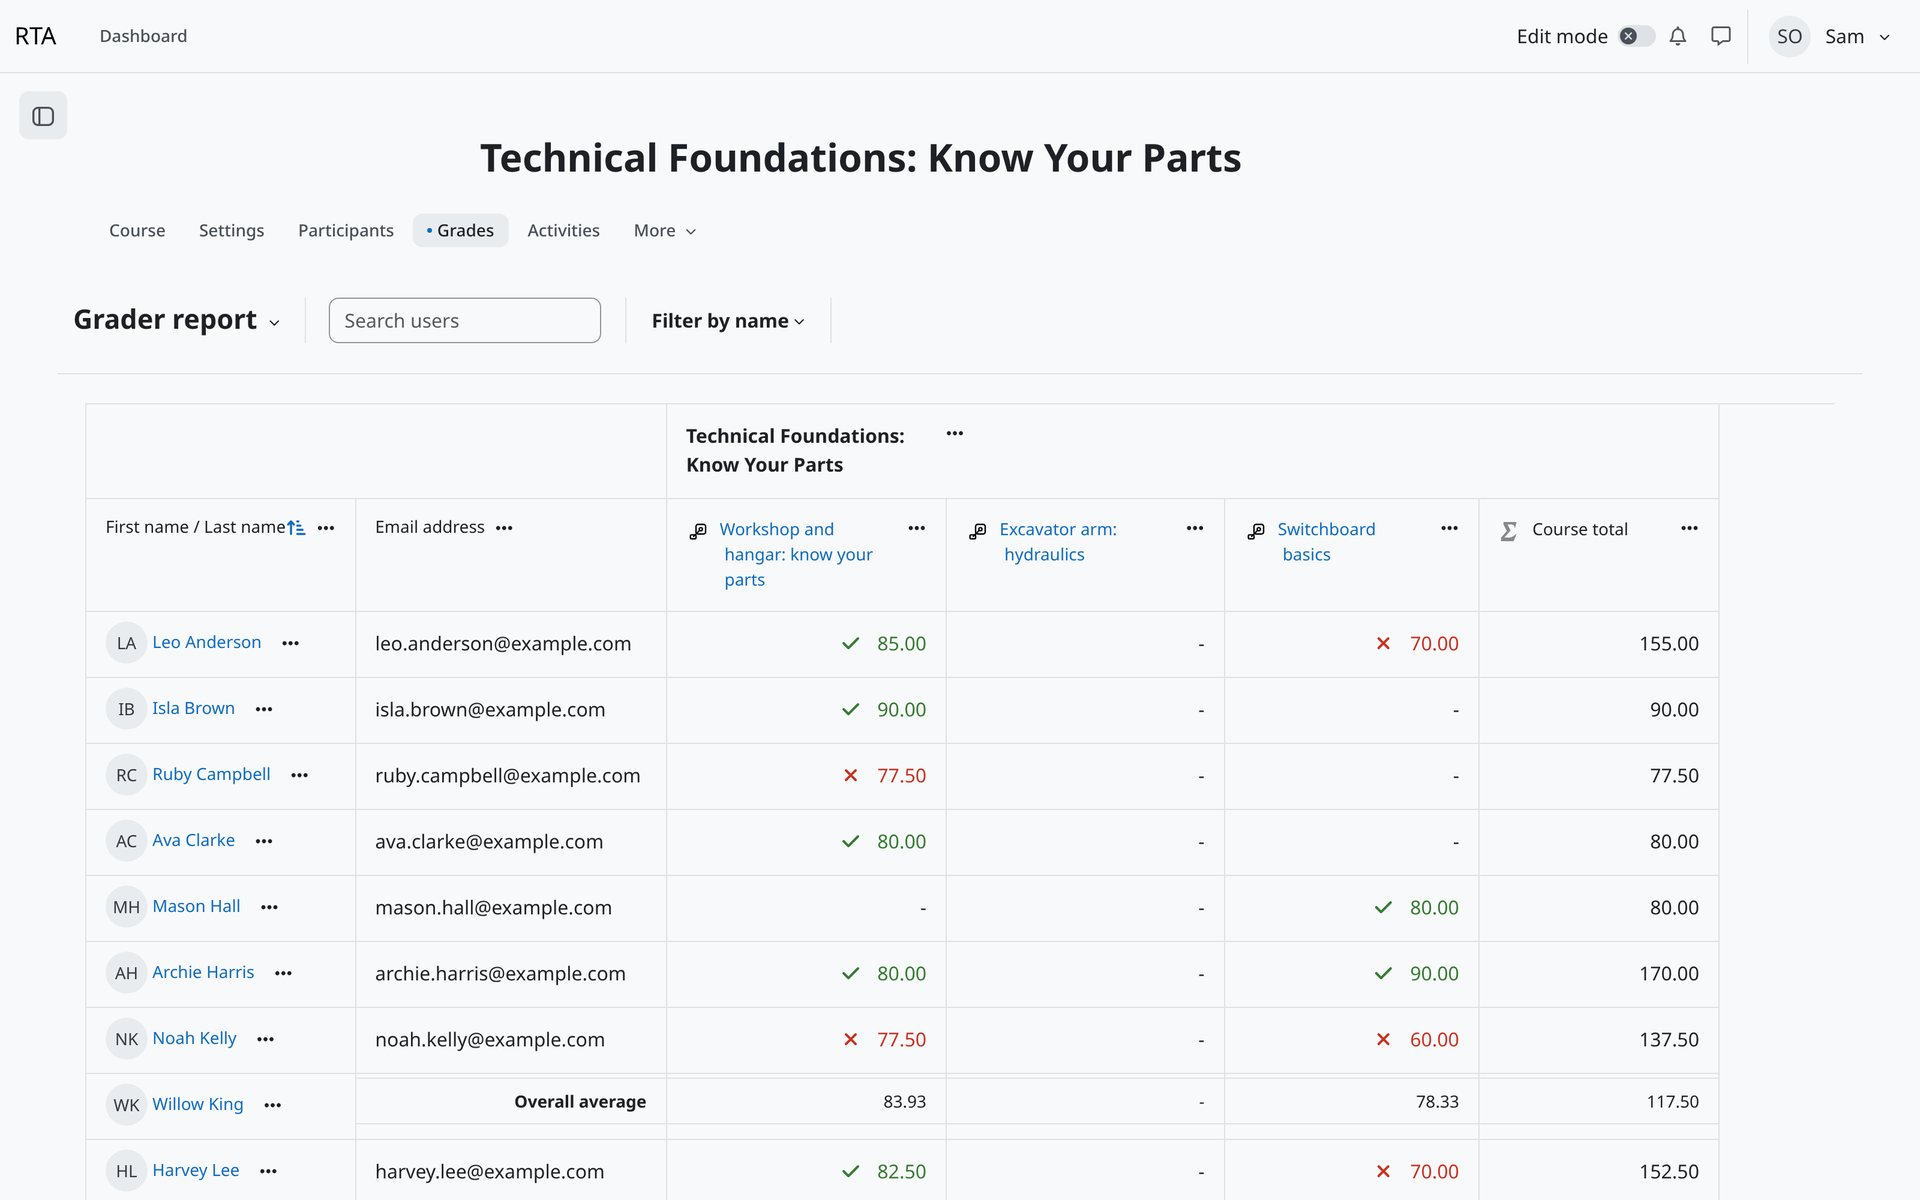
Test scores go to the gradebook using the grading method you choose. Practice and Study are never graded. Set a grade to pass, and use completion rules such as Finish the activity and Receive a passing grade.
Gradebook
Gradebook. Test results go to the gradebook: highest, average, first or last attempt.
1One grade item per Label diagram activity.
Reports
Reports
Open Reports from the activity.
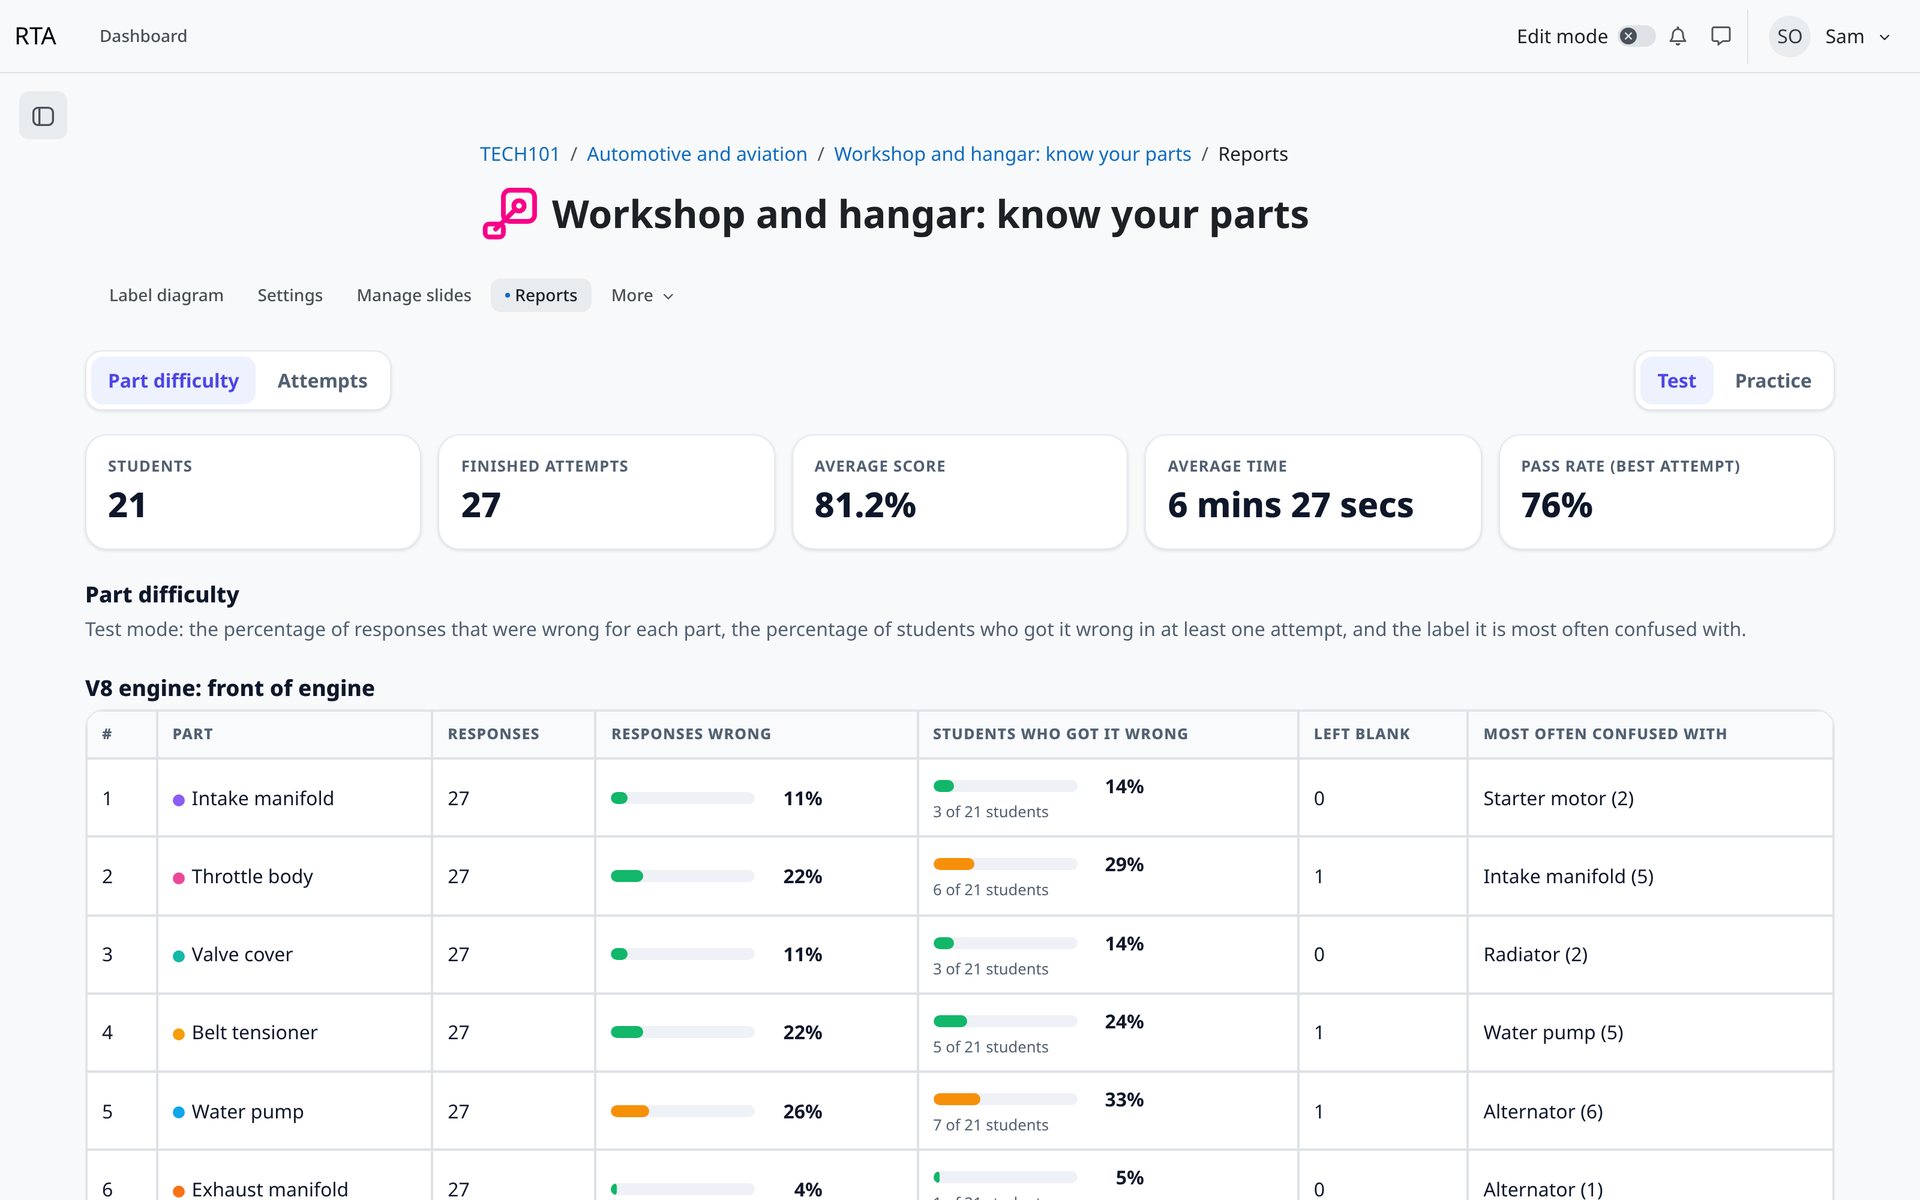
Part difficulty, Test: the percentage of responses wrong for each part, the percentage of learners who got it wrong at least once, how often it was left blank, and the label it is most often confused with.
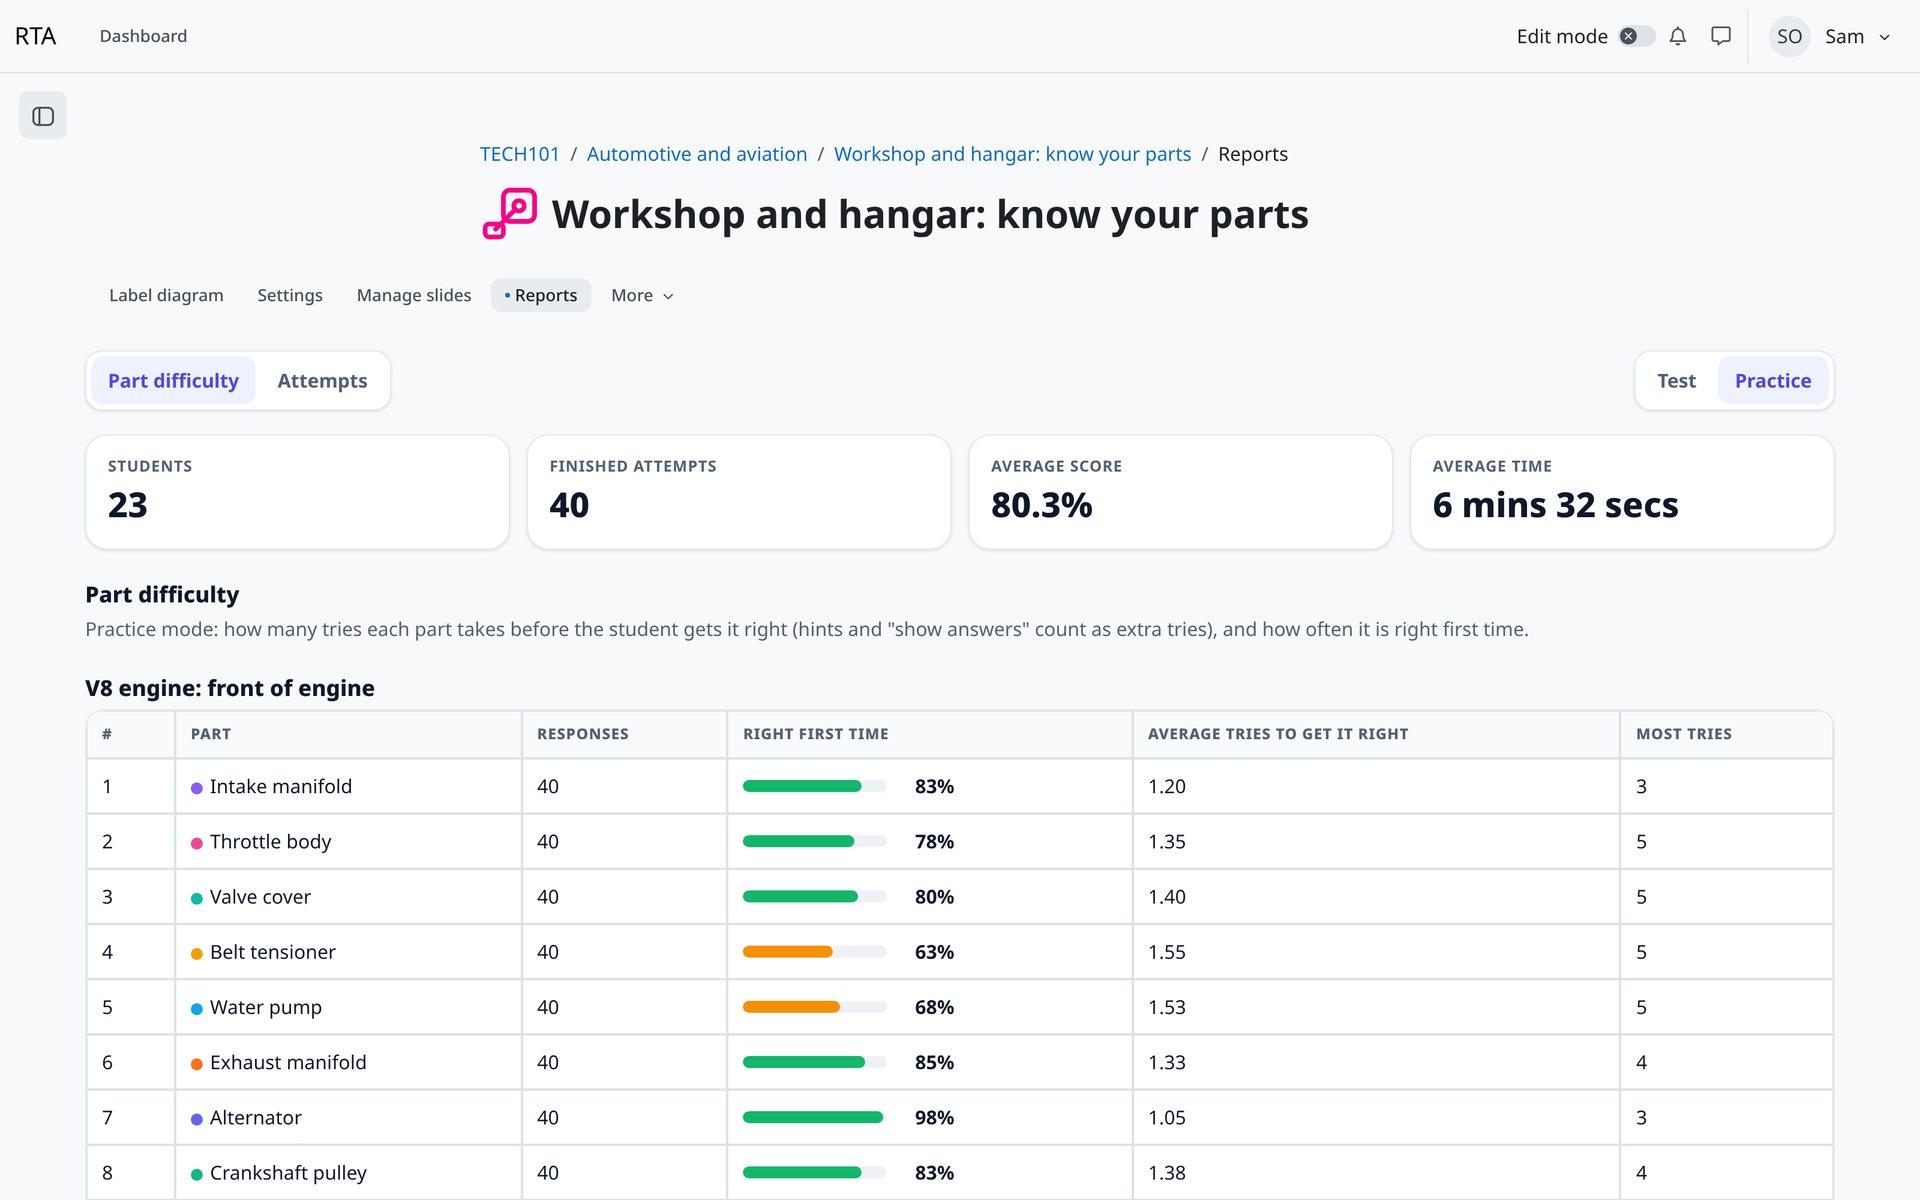
Part difficulty, Practice: right first time, and the average and most tries before learners get each part right.
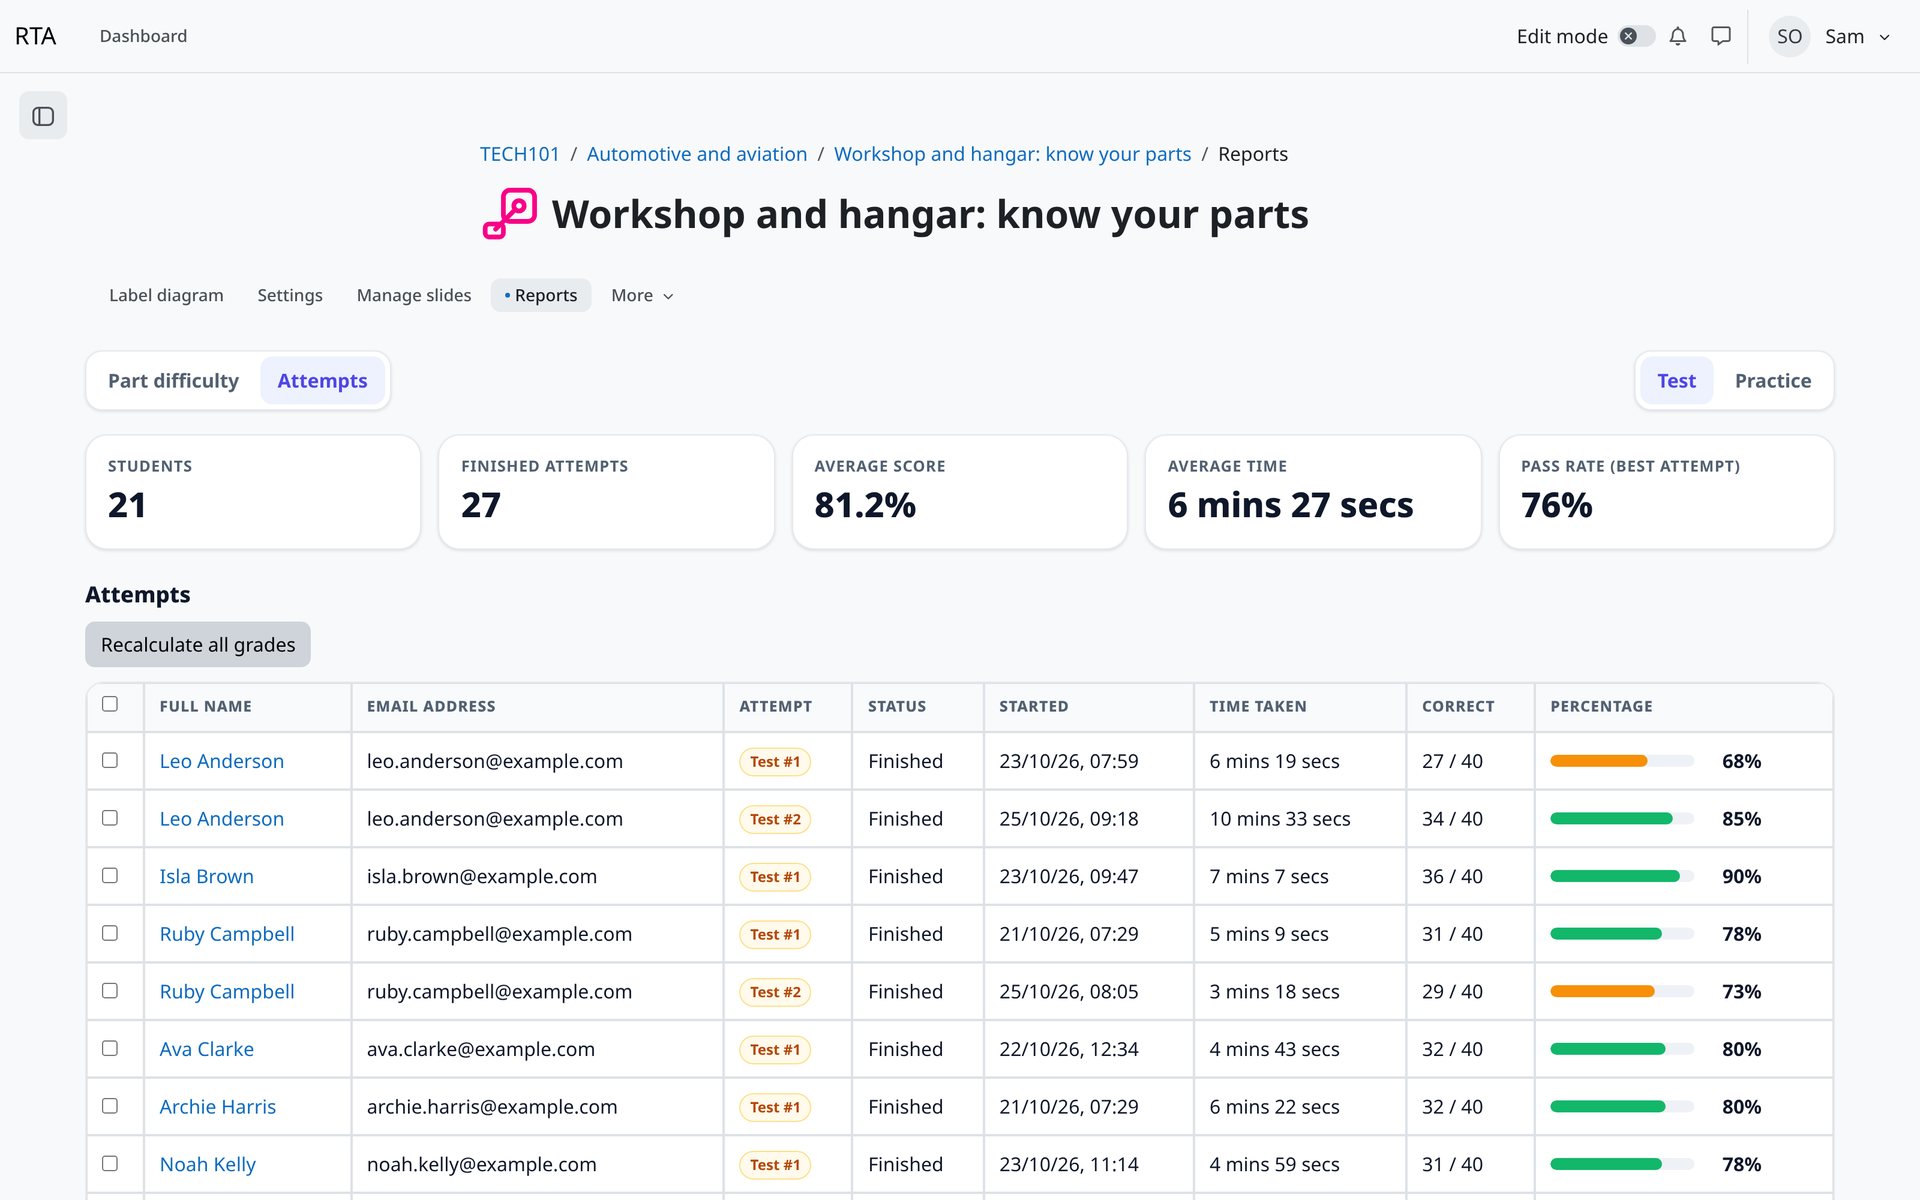
Attempts: filter by mode and group, delete attempts with grades and completion recalculated, and download to CSV, Excel, ODS and more.
Part difficulty: Test
Part difficulty: Test. Which parts learners get wrong, and what they confuse them with.
1Summary: learners, attempts, average, time and pass rate.
2Most often confused with.
Part difficulty: Practice
Part difficulty: Practice. Right first time, and average and most tries before getting it right.
Attempts
Attempts. Every attempt with score and time. Delete with grades recalculated. Download.
Toolbox talk, sorted. "Most often confused with" tells you exactly what to re-teach. If learners keep putting Water pump on the Alternator, that is your next five minutes.
More
Permissions
Capability
What it allows
Default roles
mod/labeldiagram:addinstance
Add a Label diagram to a course
Editing teacher, Manager
mod/labeldiagram:view
Open the activity and use Study mode
Guest, Student, Teacher, Editing teacher, Manager
mod/labeldiagram:attempt
Make Practice and Test attempts
Student
mod/labeldiagram:manage
Add slides and edit labels
Editing teacher, Manager
mod/labeldiagram:viewreports
See reports, delete and download attempts
Teacher, Editing teacher, Manager
Guests can use Study mode. Separate groups are respected in reports and the leaderboard.
More
Privacy, backup and data
Backup and restore: slides, images, labels, settings, attempts, answers and grades all carry across. Duplicate, import, course copy and Sharing Cart work.
Privacy API: attempts and answers are included in data exports and deleted on request.
Course reset: "Delete all label diagram attempts" clears attempts and grades.
No external calls: the plugin makes no calls to outside services. Everything runs on your Moodle.
Any subject
Any subject. Anatomy, aviation, electrical, plant: if it has parts, it works.
More
Questions
Is it really free?
Yes. Label Diagram is free, with no credits, no subscription and no per-learner fees.
Does it use AI or send anything to ChatGPT?
No. There is no AI inside and nothing is sent to ChatGPT or any other service. The two optional prompts are plain text you can copy into a tool of your choice, or ignore.
Can learners cheat by looking at the page code?
Not in Test mode. The answer key is never sent to the browser, every placement is marked on the server, and each attempt uses fresh random tokens.
How many parts can a diagram have?
Up to 10 labelled parts and 4 distractors per slide, and as many slides as you like.
Does it work on phones and tablets?
Yes. Learners can drag, or tap a label then tap its number. Full screen works on iPhone too.
What if I replace an image?
Markers are stored as percentages, so they stay in place when you swap in a sharper version of the same diagram.
Which Moodle versions are supported?
Moodle 4.4 to 5.3.
Can I use it for evidence at audit?
Test attempts record every answer, score and time, and the reports and downloads give you a clear trail.
More
Changelog
2.0.5 27 September 2026
JavaScript rebuilt with the exact build tool versions Moodle uses. No change to how the plugin works.
2.0.4 27 September 2026
Stylesheet passes Moodle's CSS validator on every supported version. Automated test coverage detected on 4.4 and 4.5.
2.0.2 26 September 2026
WCAG 2.1 AA colour contrast on every screen.
Reports respect "Show user identity" and separate groups.
Faster reports on large courses, with paging and streamed downloads.
Uploads check each file really is an image. ZIPs checked before unpacking.
19 more automated tests.
2.0.1 25 September 2026
Backup and restore verified on Moodle 4.4, 4.5 and 5.2.
2.0.0 25 September 2026
First Marketplace release of Label Diagram 2.
Browse
Every screen
Every screenshot on this page is a real capture from Label Diagram 2.0.5 running on Moodle 5.3.
Label Diagram is made by LMS Labs, by LMS Hosting Services, a Moodle Certified Partner. Free, GPL v3 or later. No AI, no AI credits, no ChatGPT.

 Free · No AI · No ChatGPT

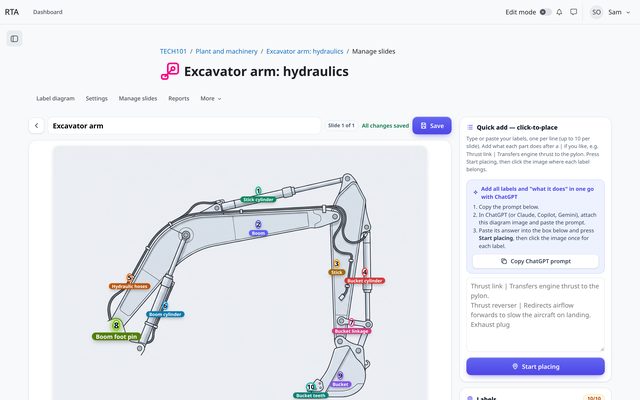 Set up in minutesType labels, click to place.
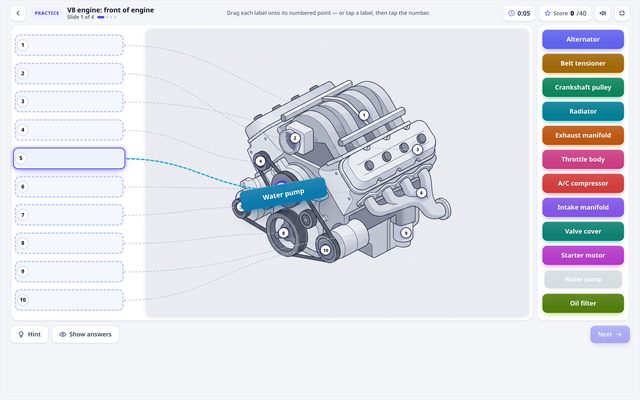 Game-like practiceDrag, snap and learn.
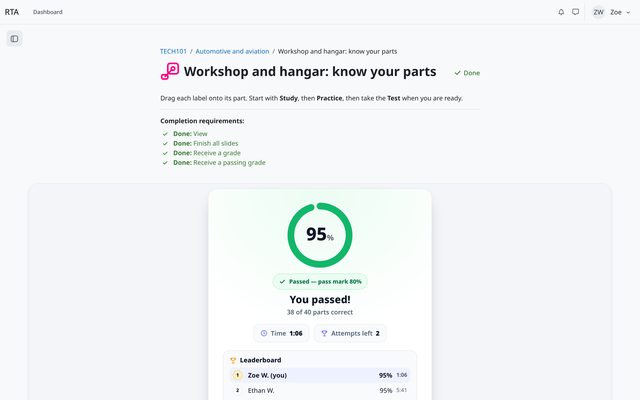 Graded testsMarked on your server.
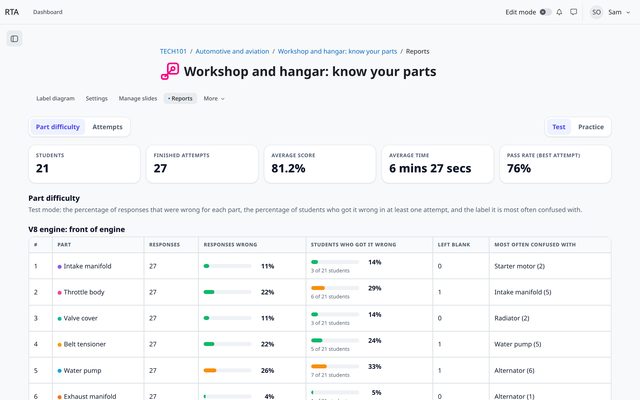 Clear reportsSee the tricky parts.